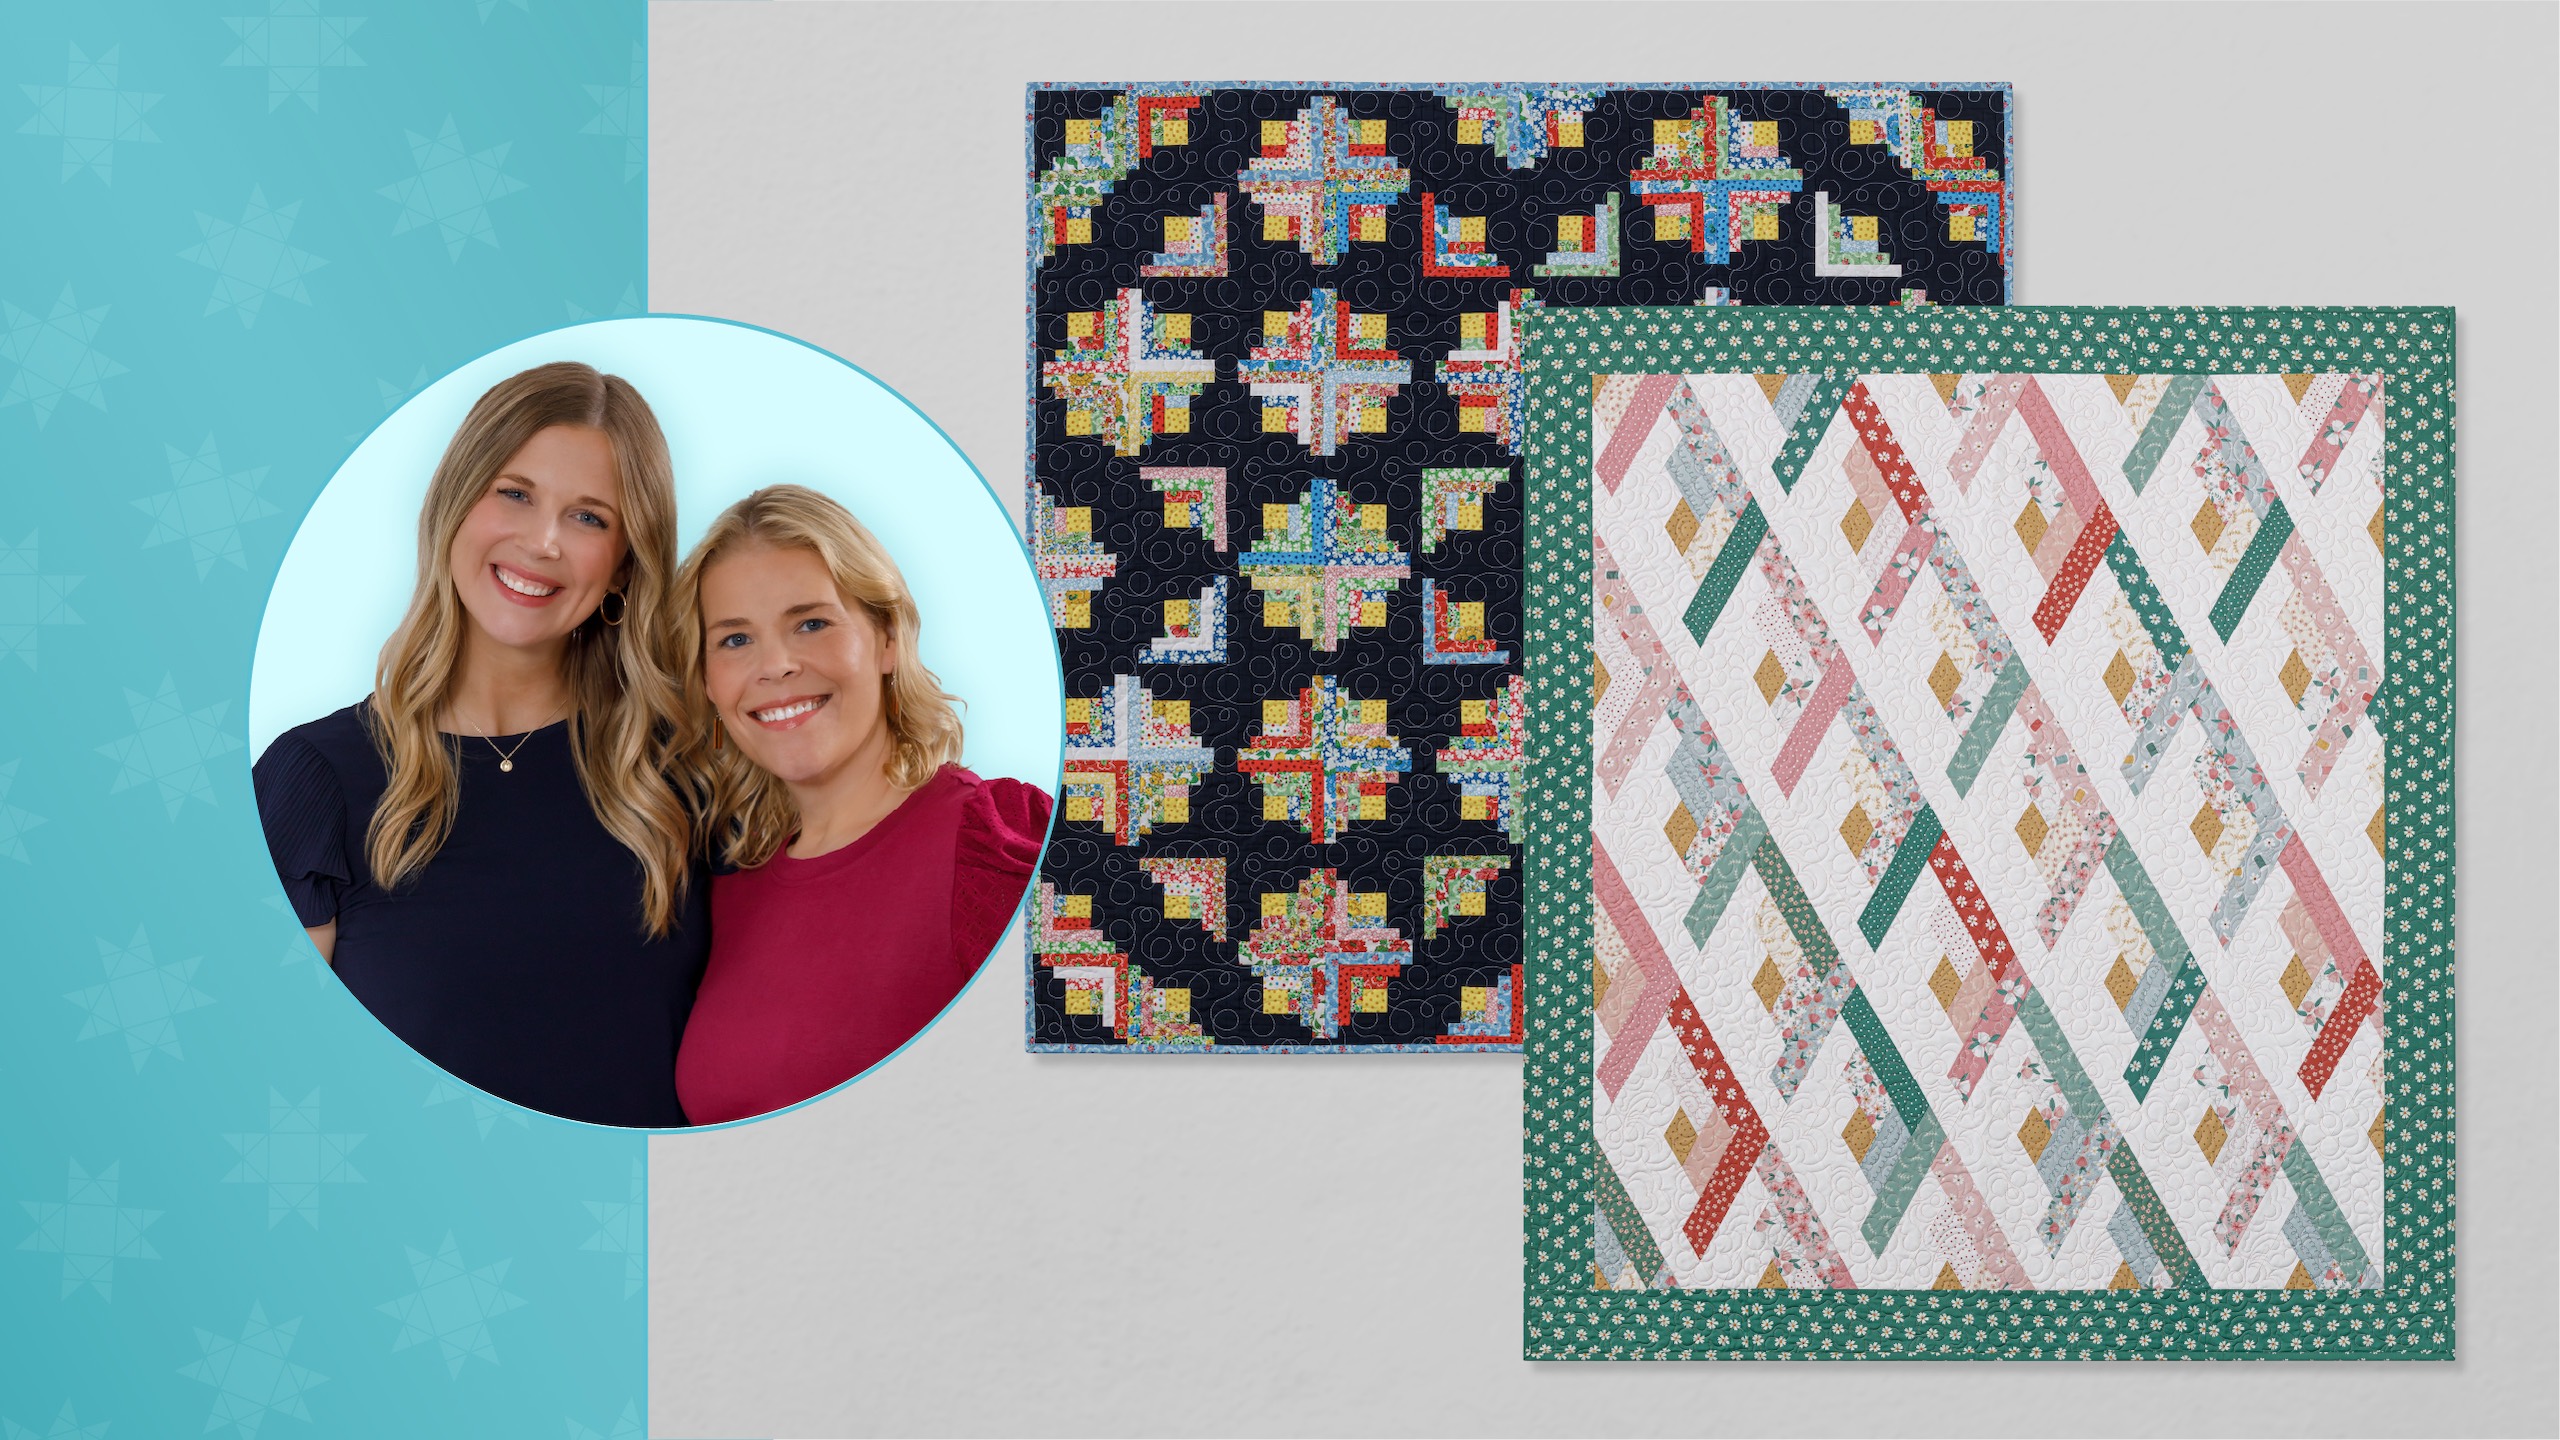
Crisp air, golden leaves, and the coziest of cardigans. Autumn has arrived, and we are ready with two new Log Cabin quilts.
Natalie’s Northern Glow quilt is all-contrast with a midnight blue background against the cheery prints of Merry-Go-Round by Whistler Studios. (You’ll LOVE the cheater cloth Wedding Ring backing.)
Misty’s Rhombus Log Cabin is a departure from the traditional square block. Those elongated diamonds seem to shine with Bloom and Sew fabrics by Amy Latta.
Natalie is the host of Quilting 101, Embroidery 101 and the Creative Strategist and Editor of Block Magazine at Missouri Star Quilt Company. She was taught how to sew by her mom, of course, and began quilting when she grew up.
Common Questions
What is covered in Double Take: Log Cabin?
Crisp air, golden leaves, and the coziest of cardigans. Autumn has arrived, and we are ready with two new Log Cabin quilts. Natalie’s Northern Glow quilt is all-contrast with a midnight blue background against the cheery prints of Merry-Go-Round by Whistler Studios. (You’ll LO...
How long is the tutorial video?
The tutorial video is 00:21:31.
Are supplies listed for this tutorial?
Yes. The tutorial page includes the supplies and materials connected to this project.
Video Transcript
Hi everybody. I'm Natalie with Missouri Star Quilt Company and today I'm here with Misty. Hey guys, it is Double Take Week. You know what that means when the two of us are together and we have a super fun uh couple of quilts to share with you today. That's right. Our focus block is the log cabin and I think they turned out really great. Yeah, they're super fun and I think Nat, you're up first. That's right. Let's get started. All right. So, this is my quilt. I'm calling it Northern Glow. And it I think it turned out cute. It's really excited to show everybody how to make it. Yeah, it's beautiful. It's kind of a 30s print. Yeah. So, to make my quilt, you're going to need a package of 2 and 1/2 in print strips. And I've used merrygoround by Whistler Studios for Windom Fabrics. You'll need an accent fabric, and that goes right in the center of all of our log cabin blocks. 3/8 of a yard. You'll need 2 and 2/3 yards of background fabric, and I've used this beautiful after midnight um color works solid. Uh, and then backing, you'll need 3 and 7/8. So, just about four yards. Um, or two yards of a 108 if you wanted to use that. Well, and this is such a fun backing with that cheater print. Really, really cute. It's one of those fun prints that looks like you did a whole lot of work, but you really didn't. So cute. I love it. All right, so let's get started. So, this is our block. So cute. And I love it. It It's so cute and a little bit little. I like the size of these strips. I think it gives us a lot of variety and um it looks very much like an antique quilt that mom has hanging in her studio. So, that is one of my favorite things. I think it's very fun. So, we're going to start by cutting our middle. That is our accent fabric. You're going to cut that into 2in strips. and then subcut 2 in squares. So, that is fairly simple little cuts here. And then we'll get a little bit trickier as we go. Not too bad, though. All right. So, you'll cut your whole strip and um and set those aside for the middle. Then, the next thing we'll do is cut our jelly roll strips or our 2 and 1/2 in print strips. I like to cut them folded because I feel like it goes um it's just easier to make that long cut if it fits underneath your ruler. You want to make sure that your fold is straight because that will help you to avoid having elbowing. And an elbow just it's a term that we use for when you make a cut and then because there was a fold it kind of like curves up. Yeah. It'll bow a little bit, right? So, it's not a big deal though if you do get those. We're going to be cutting these down into smaller segments. So, you can always fix that as you go. So, because this is 2 and 1/2, we're going to cut 1 and a/4, which will be right down the middle of our strip. So, you're going to go ahead and cut all of your 2 and 1/2 in print strips to 1 and 1/4. And then we're going to cut those down into the pieces that we need to build our block. So, we're going to need a 2-in segment and then a 2 and 3/4. And then you'll want some of these to match as you go through and make these matching sets. So, then we've got a 3 and 1/2, a 4 and 1/2, a 5 in, and a 5 and 3/4. And these are going to build around our little square just like this. So, we'll start here and we'll add this one. Okay. And then we're going to add our background, which is cut into similar sizes. Um, we don't need the 2 in because we're starting on the other side. And then we need one that's one size bigger. And all of these numbers and amounts are listed in the pattern. So then we're going to go ahead and add this one here. Two and a or 2 and 3/4. 3 and 1/2. And then we do our three and 1/2 and four and 1/2. And then we do our four. Oops. four and a half over here by five and a half. And this would make more sense if I turned it like that. This one's five though, not five and a half. Sorry. 5 in. And then we're adding our 5 in strip over here and our five and 3/4. Let me make those make sense. There we go. And then these ones here kind of go like that. And we've got this one here. and this one here. Yeah. And then we're going to go ahead and sew them all together to create our block. All right, let's do it. Okay, so go ahead and add this the 2 in. Okay. Okay. All right. We'll just give it a little finger press and add the next one. Yep. The 2 and 3/4 print goes next. Okay, you want to Okay. All right. All right. Let me go ahead and give it a press. I think when we're working with really small pieces, which we are, it's good to keep things pressed and tidy, and also to keep a really consistent and scant quarter inch seam, right? It just helps things fit together better. All right, we're taking all those seams and then as as you can see here, we're going we're going in order. So if the center is our number one, then we have 2 3 4 5 6 7 8 9 10 11 12 13. So it goes it goes around kind of in a circle as you sew. And so now we're going to put our two and a three4s right here along this bottom side. Switching to that background. That's right. So you're just kind of adding in a circle. Yeah. Okay. Try and line up these ends here. Mhm. And this is one where I would probably try to do the little build yourself a nest thing and keep your keep your pressing station right next to you. And then we'll add the three and a half to that side. Yep. And we'll just keep making our way around the center. Excellent. There we go. All right. Now, our last two pieces, our five and 3/4 here and then our six and 1/2 and our block will be done. We are so close. So close now. All right. These could be um totally like mass assembled. If you had your pieces all laid out and you did all of your centers and then one strip, then you turned them all and did the next strip. You could kind of massroduce them in a way. Definitely, which I find kind of satisfying sometimes. I love to uh strip piece like that. Yeah. Oh, leaf flat. I'm not going to say you have to use starch, but you might want to just because Yeah, when you have small pieces um and a lot of them, starch can be very helpful tool. It's so true. I think especially with small pieces, it becomes really valuable. Yeah. Okay, there we go. Excellent. All right, there we go. So cute. And that's our block. So, for our sample block, we went ahead and wrote all of the numbers on all of these pieces so that you could see where they go and in which order. And I think it's kind of a neat a fun little trick. You might want to make yourself a little sample block at home just for fun. Yeah. To keep track of it all. All right. So, let's go to the quilt and I will show you how these fit in. We just have a diagram, but if you look really closely, you kind of have little stars that come together here in this negative space. Yep. And I think it's really fun. So there's a star here. Here there's four stars and then they come together with this cute little block in the middle. So we're just rotating. There's no sashing or anything. We'll start up in the corner with this one. And then it rotates and rotates back and forth all the way through. And so yeah, you'll just follow the diagram and put them all together. The quilt is 60 by 60. Okay. And we machine quilted it with loops and swirls and no border, just a cute little bound edge. Although if you wanted to add a border or make more blocks and make it bigger, there's so many fun layouts for the log cabin block. Oh, absolutely. I mean, the options are just endless. So, super fun. I think you're up next, Misty. That's right. All right. So, this is my quilt. I called it the rhombus log cabin. It's so cute. It's fun and a little bit different. I wanted to challenge myself a bit to kind of think outside of the box with this one. And so I think it turned out great. To make this quilt, you are going to need one roll of 2 and 1/2 in print strips and I used Bloom and Sew by Amy La for Andover. You are also going to need some background yardage and that is 2 and a/3 yards. You'll need at least an eighth of a yard of accent fabric if you are using some of the colors in your roll. If you do not have some of that print in your roll, then you need a quarter yard. And then for your border, you need one yard. And for your backing, you will need four yards with horizontal seams or 2 yards of a 108. So, let me show you how to make this. All right. So, this is the block that we're going to be making for our quilt today. And it's, you know, just kind of a log cabin stretched into that diamond shape or our rhombus. I love it. Thank you. It's kind of fun. And so first up, we are going to use our accent fabric to make our middles much like Natalie did. And so we are going to just use our 2 and 1/2 in strip. And I am going to actually turn it this way since I'm right-handed. And we're going to make our first cut by just lining this up with the edge of our strip. And so I will do that. And it is helpful if you keep that little notch. Cool. And now we can flip this and measure over to the 2 and 1/2 inch line on the ruler. So 1 2 and 1/2. And we will just cut out our little shape. And you can continue down the strip in that exact same way to get all of your middles nice that you need. And so I'm just going to cut these to get us started. But you will have you'll need three strips worth to have enough centers for the whole quilt. All right. So now we are going to begin by taking our background strip. Mhm. And I found it easiest to go ahead and cut this piece as well in the exact same way so that we it's easier to match up I think. Okay. And then from there I did go ahead and just trim as I went. I didn't cut them all to size. Nice. So much like Natalie said, if you want the exact sizes, they are in the pattern, but we are just going to sew and trim as we go. Okay. So, I love it. All right. So, let's cut this one out at 2 and 1/2 as well to get us started. Beautiful. All right. And so then we can just line these up like so. And you'll notice how the little notches make it so that they really do line up. And so you'll just sew across there with your quarter inch seam. Okay. All right. Beautiful. All right. So, let's roll this back. Give it a press. And then now we will take one of our strips. And the thing that you want to do is you want to make sure that you start your edge in the same direction that it needs to go. So that's the only kind of trick. Um because you know you could cut it either way. Right. Right. So I always just lay this on here and make sure that I'm going in the exact same direction as my piece so that they will all line up. Okay. So, we will cut our first end here. And then we will line these up like so. So, that that side matches. And we'll just sew across there. And then we'll trim it up at the end. Okay. Okay, this is definitely another one of those projects where if you have a little nest, it will make your life easier. So, we're just going to press that now. So, what we mean by a nest, if you aren't sure, is just building a little workspace where you have your sewing machine and a pressing mat and your iron close together so you don't have to get up and move. Although getting those steps in can be nice, a nice break. That's true. That's true. But if you want it to be really efficient, having it within reach is really helpful. Mhm. And so then to trim this, I'm just going to use my template. Line this up. Are you looking at any of the other markings on the template? I'm really not. I'm just using it for the angles for this. Okay. Because the size doesn't really matter. As long as we're staying consistent with our seams, then it should all work out. So that's what I'm looking at. Great. So then we're going to pick a different color here. Again, you're going to cut your angle first because now we're adding it down here on the other side. So just making sure my angle will line up by laying that straight. Make sure it's straight on your strip. That is the thing that I am always checking to make sure my angle is going correctly. And then we can just lay this on here and continue. I didn't do the notch. And if you don't cut the notch, you want it to hang over a quarter inch. So, just keep those in mind. Okay. So, do you typically stitch the strip on top or do you flip it and go the other direction like this? Whichever way you think is easiest. I honestly don't remember what I did. Okay. So, I just was likeoop and I, you know, was sitting in my little little sewing space just adding as I went. Very good. Yeah, I think I'd have to sit and try and restitch it again to see what felt most natural to me. All right. So, we'll just gently roll that back. You do want to be careful that you're not tugging or distorting the fabric. Um, just because we want it all to stay straight. And so then we're just going to lay this on here. Again, use as many angles as you can to stay straight. Just check as you go. Like this little spot got a little wonky. So, I'm just going to trim. That is the nice thing about constantly trimming as you go is you're able to kind of keep it in shape. That's exactly right. And I am going to go ahead just to make it easier on us and trim off this little notch because we can slide it down. Perfect. There we go. All right. And so now we are back to our background strip. And it should already be ready at the angle that we need. So I'm just going to notch that off again. Make sure we're good to go. And then we will fold this over. I think that's the way you liked it, right? Perfect. And then it's ready to stitch. Awesome. It's a really fun way to use the rhombus ruler. Yeah, it's just another another option to try. Line it up. There we go. Beautiful. All right. So, let's press this one back now. Okay. And again, we will use our rhombus to trim as we go. Just making sure we can stay straight on those angles. There we go. So then I'll bring this in. And you'll notice our angle is wrong, but because we're using solids, it makes it a little bit easier. We can just flip this over. Now we are correct. If you want to cut that little notch out, this is when you would do that. Otherwise, we will just flip this back. Make sure we have our quarter inch down there at the bottom. We'll add this white strip. Perfect. And then we're just going to keep in the same way until we finish up our block. All right. So, we are on our final strip uh of this block. Yep. Keep it lined up nice and straight. This is another instance where because of the angle, starch can be your friend. So, if you want to take the time to starch before you begin, it's probably a great idea. And just try not to pull All right, here we go. So, we will trim this final side here. Again, I'm lining up this edge here and this edge here to keep it as straight as possible to my template. And we'll just trim that off. And look how cute our block is. So fun. And so to lay this out, I actually assembled it in these diagonal rows. So it's eight diagonal rows and they kind of go this way. And then you lay the whole thing out, sew it together. Refer to the diagram. It's kind of like a quilt on point a little bit. Very similar, okay? Except for we didn't use any setting, right? Setting uh rhombuses or anything like that. We just sew them straight together on the diagonal. So you don't have Y seams. you're dealing with. And then we trimmed it square. And then I added this 5 in outer border, quilted it in daisy days with some cute pink thread. So cute. Adorable. And I have these cute spools on the back. I love those. Yeah, that's really cute. And it finishes at 60x 69. So a great throw size. Perfect. Well, I think this has been a lot of fun. It has. We had two fun new ideas using the log cabin. Hopefully you guys were inspired. Yes. Go out, try out different layouts, and have fun. And we hope you enjoyed this tutorial on the Log Cabin Quilt from the Missouri Star Quilt Company. See you.