
Double Take - Wing & Wedge
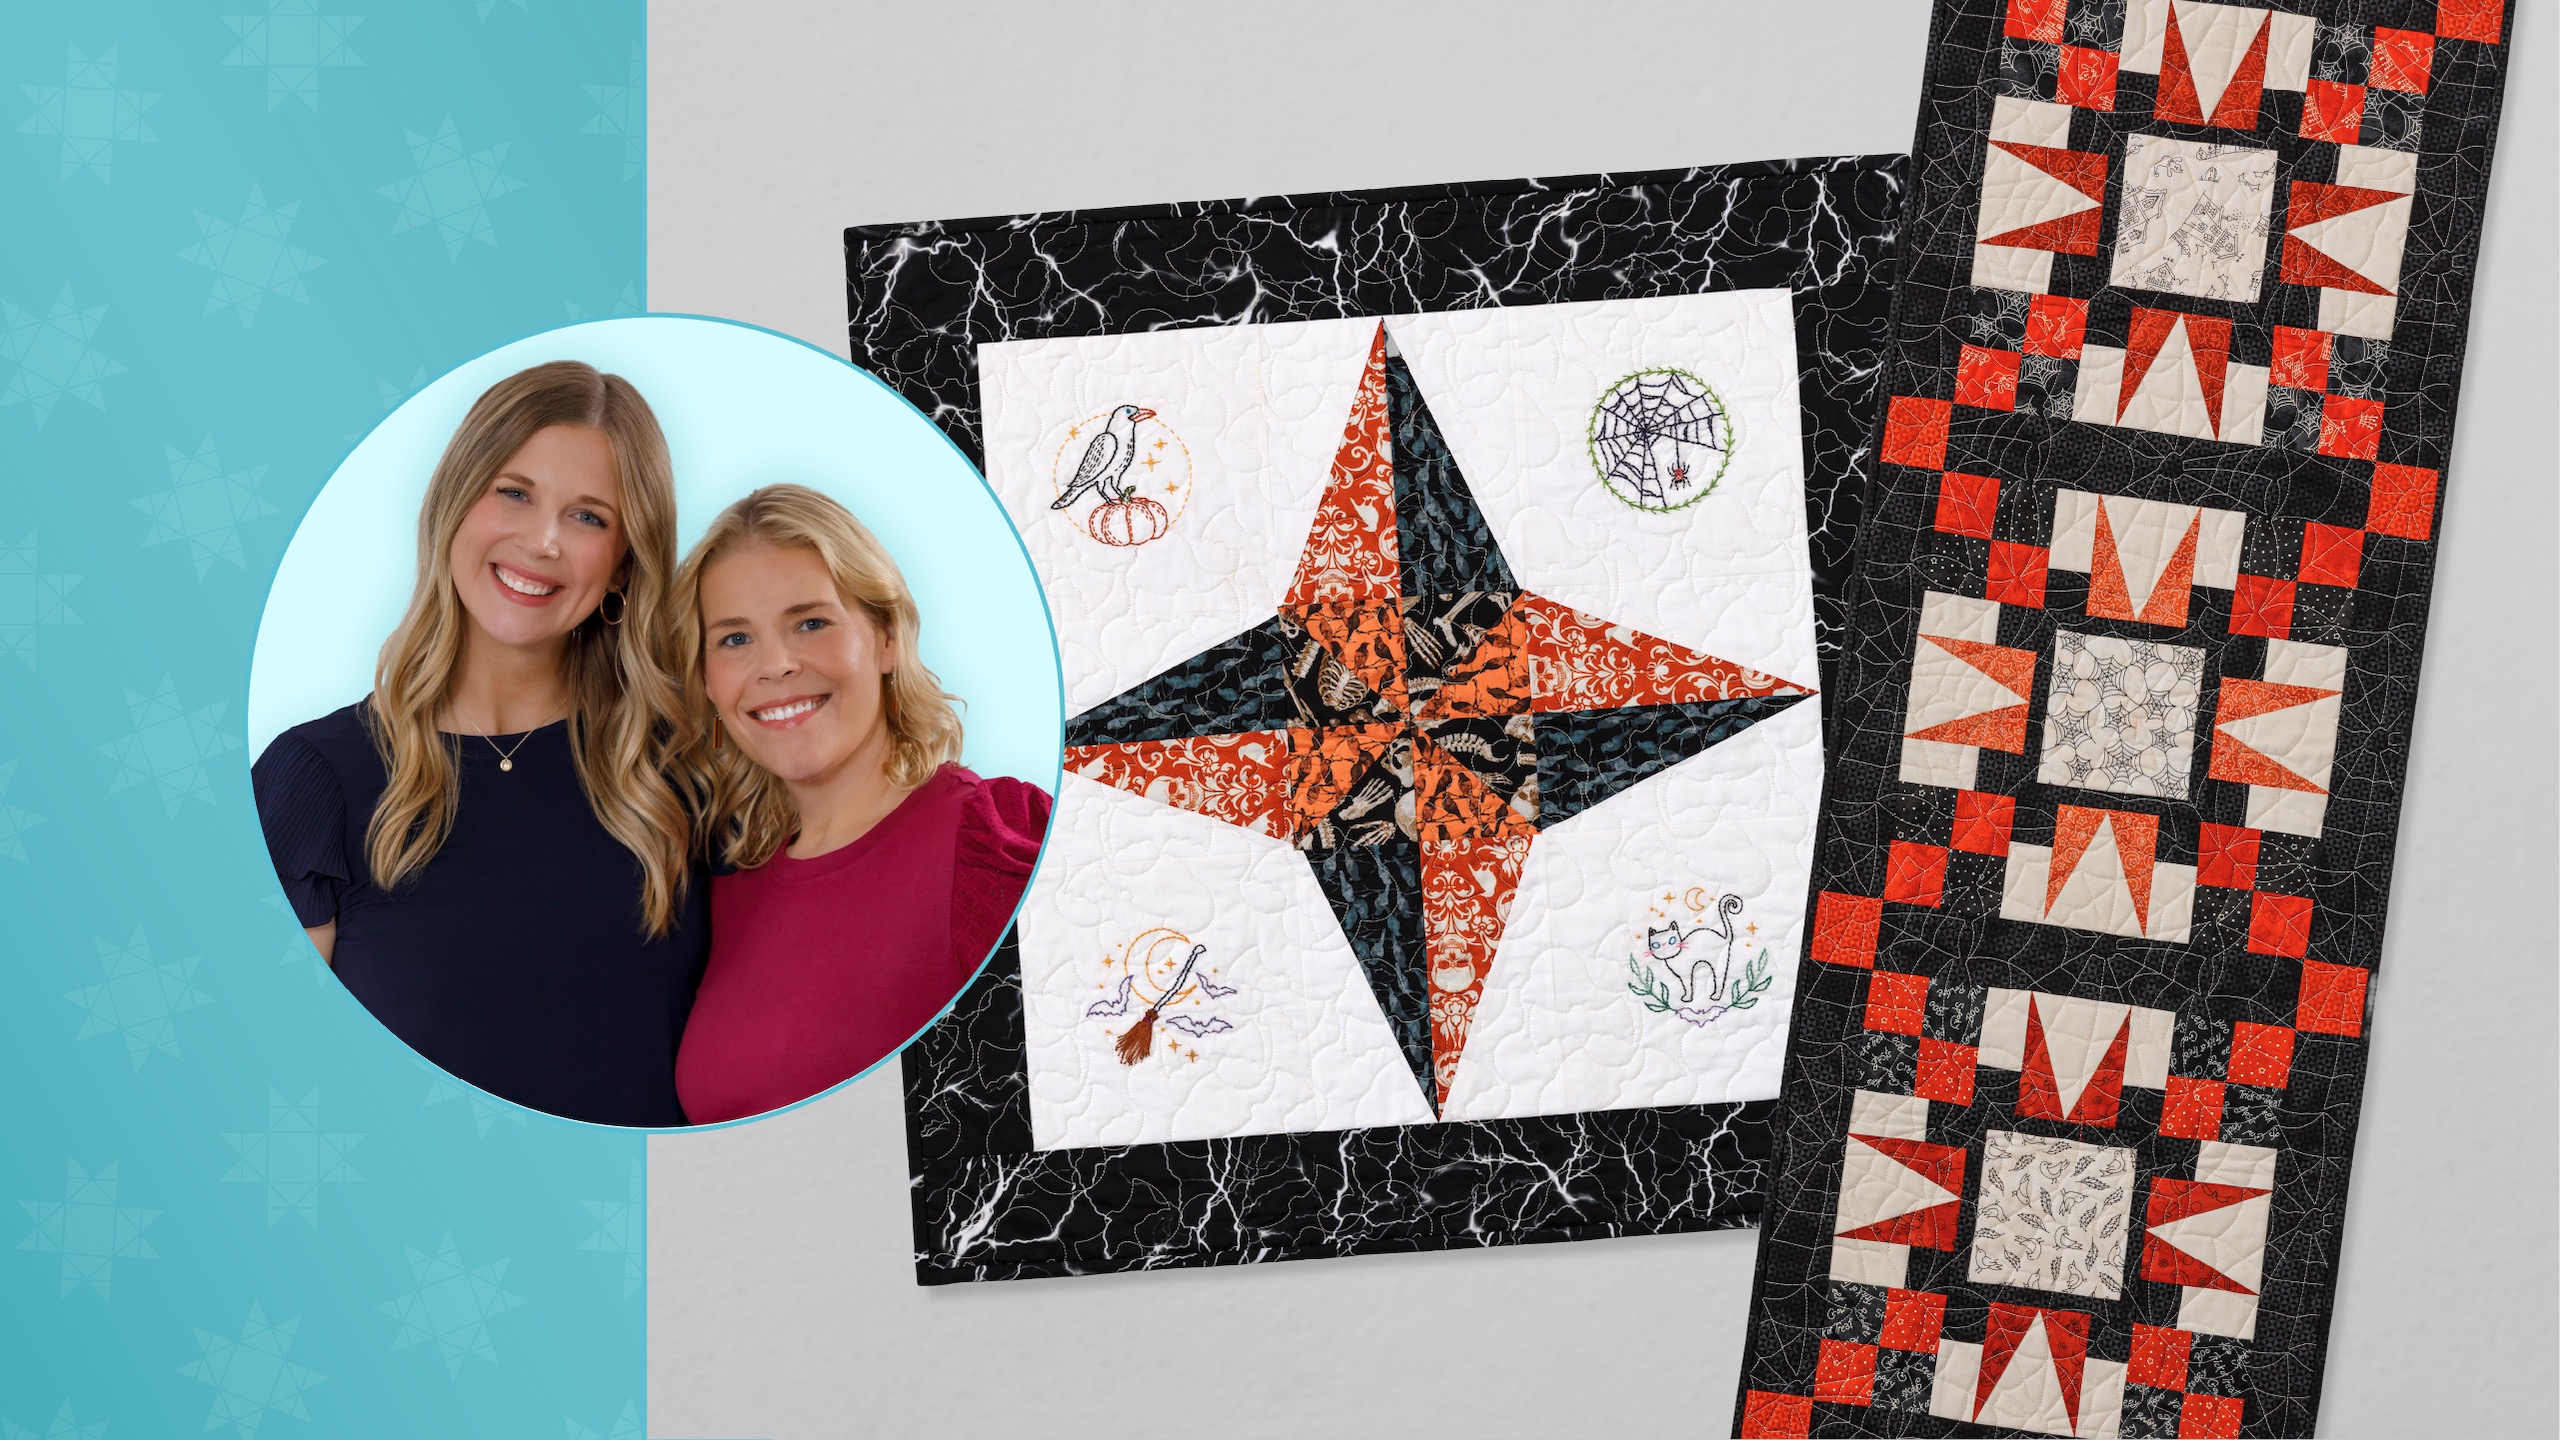
Halloween is creeping in … let’s deck those haunted halls! For this week’s Double Take tutorial, the Doan girls are sharing a duo of daring projects for the Wing & Wedge template set.

Instructor
Natalie Doan
Natalie is the host of Quilting 101, Embroidery 101 and the Creative Strategist and Editor of Block Magazine at Missouri Star Quilt Company. She was taught how to sew by her mom, of course, and began quilting when she grew up.
Common Questions
What is covered in Double Take - Wing & Wedge?
Halloween is creeping in … let’s deck those haunted halls! For this week’s Double Take tutorial, the Doan girls are sharing a duo of daring projects for the Wing & Wedge template set.
How long is the tutorial video?
The tutorial video is 00:36:01.
Are supplies listed for this tutorial?
Yes. The tutorial page includes the supplies and materials connected to this project.
Video Transcript
Hi everybody. I'm Natalie with Missouri Star Quilt Company and I'm here with Misty today. Hey guys. It's Double Take Week and we have some great projects. We do. So, we are prepping for Halloween. Even though it's only August, we're going to get a head start on our Halloween projects. And so, we've got some great Halloween fabric we're using today. Yeah. I think they both turned out really cute. They've got a little bit of slow stitching in them. Exactly. So, fun stuff. Let's get started. [Music] All right, so it looks like I'm up first today. And I made this little table runner. I called it the Harvest Crossroads runner. I think it turned out super super cute. And so to make this project, you are going to need one package of 5 in squares, and I use this adorable spooky stitches by Robin Kingsley for Maywood. It's just an adorable line. You're also going to need a half yard of accent fabric. And that includes your little sashing and your border here. And then a third of a yard of background. I use this beautiful cream. For your backing, you need 1 and 1/2 yards. And I use the small wing and wedge template. So, let me show you how to make this. [Music] All right. So, this is the block that we're going to make for our little runner. I love it. Thank you. I think it turned out super cute and it's really simple to make. We're going to start from the middle and work our way kind of out. And so, I chose from the line. They have these great little kind of white and black prints that I thought were so cute for the center. And so, I just picked my three favorites. And so, we'll use that first. And then from our accent fabric, which remember that was this cute little It looks like it's got um glasses printed in there. It's adorable. So, you're going to cut a 1 in strip off of your accent fabric. And then we are going to sub cut that into 5 in rectangles and sixin rectangles. So, I'll let you add one on each side. One on each side first. And then we'll add these after. Press it and do tops and bottoms. Exactly. I imagine since they're kind of small pieces, we want to be real consistent. As consistent as you can be. Make maybe make your quarter inch just a little scant. Little on the narrow side. Easier to trim. That's exactly right. Then to have to add more. [Applause] There we go. Beautiful. So then I will just set those and roll them back. Same on the other side. Oops. Get those to lay as flat as I can for you. And then we'll go back and add our six inch strips. Top and bottom. Top and bottom. Cool. There we go. Thank you. You bet. So it doesn't fall. Mhm. One more. Almost done. You're good. There you go. Beautiful. All right, we'll give that a press. Roll those back. And then if you needed to square this up, they should end up 6 in. Your centers should be 6 in squares. Excellent. And so then from there, we can move on to these outer corners. And so we're just going to make some easy four patches. Okay. And so you're going to pick two matching sets of your 5 in squares. And so I have half of these already done, but we'll put these right sides together. And then if you want to sew on opposite sides to begin with. I like the line work how it looks like little stitches. I know. It's so cute. Fun little details. [Applause] So she'll just flip that around. So a quarter inch seam on the opposite side. Now, I love these little hacks. Yep. Just saves us a little bit of time. And so then now I will measure over 2 and 1/2 in. Cut this right in half. And then we'll press these open to the dark side. Perfect. All right. And so then I'm going to put them right sides together, but I want to make sure that I have opposite fabrics touching and that those middle seams are going to kind of lock in place. And then we're just going to repeat what we did before and sew a quarter inch seam on both of these two sides. Excellent. And this little hat gives us two little perfect 4 and 1/2 in four patches. [Applause] All right, these are all done. Perfect. So, we will cut these in half again. Okay. And these are still 5 in wide. So, we're measuring over 2 and 1/2 in. And then we're going to press these open. And we are actually going to need to square these down to 4 in. So once I get these pressed, we will use our little ruler here. All right. I find personally four patches are kind of difficult for me to square. They can be just like, you know, hourglasses and half square triangles. They all have different little hacks. And so I know these need to be 4 in and I want the four patch to be centered. I'm going to put my 2in mark running this way and this way. And so that's what I'm checking first. Just making sure that they're lined up. And so we'll cut here and here. And then we can spin our little four patch around. And that edge should line up right on the four. And we should still have our two inches running up and down on the cross crisscross on the seam line. Exactly. That's so great. So, there's that one. And we'll square one more here. They do come out so nice. They do. And sometimes it's just really nice to know that if you're not super precise, you're going to square it and you don't have to worry about it. you can just enjoy the process. And so we're going to make sure that's right on our four. I have these little mantras that I double check. It's like this is square, these are straight, and then I know I'm good. It's always better to double check before you cut it. Beautiful. All right. And so, like I said, you would repeat that with another matching set. I went ahead and already did that. So, I've got all four of these. You have all your pieces. Exactly. And so now we can move on to our little wing and wedge. And so up first we are going to cut I believe this is a 4 and 1/2 in strip. Let me make sure I tell you right. Yes. So we're going to cut a 4 and 1/2 in strip of our background fabric. And then we are going to use it to cut out our wedge. So I have this folded because I'm using solids and it doesn't matter. Mhm. And it wouldn't matter really either way because you're flipping it back and forth. But I'm going to make this first cut. I can turn this around and cut this out. And then you just flip this back and forth down the length of your strip to get all these little wedges that you need. It makes it really easy. All right. Now that we have those wedges cut, we can go ahead and cut our little wing template. And so in order to do that, you're going to take two matching five inch squares. I just picked some of the oranges that I liked for my star legs. Um, and I'm going to give you a little tip on how to cut these because you'll notice here that the star legs are going in opposite directions. So, we actually need to use both sides of the template in order to do that. But I'll give you a little hack that helps with fabric management anyway. and you know make sure that we get the pieces that we need. Perfect. So to begin with we are going to cut our 5 in squares in half so that we have 2 and 1/2x 5 in rectangles. And I'm only doing this to one because I have some of these already ready to go. But you get the idea. And then we're going to place these right sides together or opposite sides together. It just needs to be facing in opposite directions. So we're going to do that first. And then I'm going to use my template here and I'm going to start by placing it all the way in this bottom corner. And we're going to make this one long cut first. And I really recommend doing this because it can get really tight on the fabric, but you can make it work if you do it this way. And so this way, you'll notice now when we open these up, these are going opposites. That's what we want. They frame that triangle. That's right. And so then we can flip this one around and do the same thing. Just slide it in that bottom corner and then cut off our little notches. So we'll do that like so. And again, when we open them up, we have our opposite angles. So that's what you're looking for. And so now we can pull in a couple of our wedges. Okay. And let's flip this around. And I like to chain piece these. Yes. And so we'll just lay this on here. And I will let you sew one. All right. And then we'll put this guy on right behind. Cool. Beautiful. All right. So, now we can just finger press these. Oh, okay. Cool. Because the really the only overlap is right there at the point. Yeah. And it's a small little tiny little spot. So, then we just want these to be going in opposites. All right. Do we have any marks to match up? So, my best advice is this little notch. If you meet it right where that other one ends. Mhm. That's that's perfect. That's the best. All right. So, and it's not going to be perfect, but we're actually going to square these a little bit, too. So, if it gets a little bit off, excellent. We don't have to worry. No reason to stress. That's exactly right. Beautiful. There you go. All right, let me give these a good press now. Okay, there's one. Okay, beautiful. All right, and now we can square these. And so I'm going to begin by cutting off this little bottom edge. I like to make sure I still have a quarter inch from that center point there so we don't lose that. And then we can trim off any of this overhang that is there. Yeah. And then we want these to be 4 in tall. So let me turn this so it's right for my brain. That's right. So we'll trim off that little bit. And then now we need to center this so that because we want it to be three and a half inches wide. So this is the part that's a little bit tricky. All right. And so I need So you're lining up the center point of your leg, your Exactly. It needs to hit 1 and 3/4 in. Okay. Um and so I'm looking there. That should be 1 and 3/4. And so I'm just going to make this first cut here. Mhm. One and 3/4. Double checking. Trim that off. And then I'm going to spin it around. lining up one and three/4er at the top here. Should come over to three and a half. And it does. And trimming that. There we go. And so we'll repeat that same process. Trim the bottom first. Making sure we still have our quarter of an inch. There we go. And then these are 4 in tall. and measure one and 3/4 from the center. Here we go. Make sure I'm straight. And three and a half. Beautiful. Okay. So, once we have all of those done, you should have four that look just like that. that measure 3 and 1/2 by 4. And so the next thing we're going to do is we're going to take a 2 and 3/4 in strip of our background. Okay? And a 1 and 3/4 in strip of our accent. And we're going to sew them together in a strip set like you see here. And then we're going to subcut this into 1 and 3/4 in rectangles. So I have got this here. Beautiful. because we are going to add these to both sides of our star legs. All right. And so then now you can sew these one after the other. You do want the little black square to be at the wider side of your star leg. That's what you're looking for. Awesome. So I'll let you sew those and then we'll add them to the other side as well. These are just so cute. It's a really, really fun fabric line. I love all the little details in it. Okay. And there's those Almost there. Real close. Real close. Yeah. There we go. All right. Beautiful. Oh, sorry. That's okay. For some reason, that just seemed like the easiest way to do it. Absolutely. All right. So, then we will press these open. If we have done it all correctly, they should measure six by four, which I think we've done great. So, we'll press those. And I have the other two already done. So, I've got all four of them ready now. And so, now that we have all of the units of our block complete, we can assemble it. So, let's go ahead and do that. We will take our cute little bordered square and then bring in our star legs that are going to go on all four sides of that. And then our four patches will come in and the oranges are going to go towards the center just like so. And then when we sew it together, it looks just like this. That's so such a cute block. I really, really enjoy it. And I loved how it came together. I do want to point out one other fun thing about this collection, though. So, there is this adorable panel nice that comes with it. And after I designed this, do you want me to help hold it up? Sure. Yeah. It's so cute. It's got these like little cheater blocks and some kind of faux embroidery. You could almost just stitch this together and make a whole quilt out of it. Exactly. It's adorable. And so you can actually cut these to 6 in squares and use it to replace this whole center like I did there. And so here's a block that we made. It's so cute. So cute. And so you'll notice I went ahead and just embroidered right on top of where it was printed with just a little bit of black um pearl cotton. And I think it just looks adorable in the middle. So, another fun option if you want to take it a step further. All right, so again, here is my little runner. It's so cute. Thank you. It finishes at, let me see, 16 1/2 by 45 1/2. So, it's a great little size. And I do want to point out, you'll notice these little sashings that comes from your accent fabric. And so, that's just a 2 and 1/2 in strip by the size of the block. And then these little cornerstones are just from extra 5 in squares. There's plenty in the pack to get out of that. So easy peasy. Quilted it with spiderw webs. It's so cute. And that's it. All right, I'm up next. Okay, perfect. Okay, so it is my turn. This is my quilt. Oh, it's so cute. Now I love it. I'm calling it Mystic Stitches because, you know, it has a little bit of embroidery. We have these great new stitch packs for Halloween called Stitch or Treat. Oh my gosh. And it's they're so cute, you guys. I had so much fun doing all these things. Oh, and this is so darling. Yep. Yep. So, we've got my wing and wedge here and then my stitches. It's going to be great. And I will show you how to make it. All right, let's do it. All right, so to make this quilt, you're going to need some 10in squares. And I used this really fun Halloween line called Beautiful by Michael Miller. You'll also need some background fabric, just a half yard. Um, and a little bit of border. I did a 3 in of this fun lightning print. I love it. And this fabric is just my favorite. So, it ended up on the back. You will need about a yard and an eighth for your back cuz it's just a little wall hanging. Super cute, easy. We're going to need our wing templates. And I used the large wing and wedge. You're going to need a triangle tool for half square triangles. And so I've got both of these. I'll show either one or both of them actually. And that's just about it. All right. Your embroidery supplies if you're going to add the embroidery. It's totally optional. You can make this quilt without embroidery if you don't, you know, if you're not into that. You could add some fun applique up there. You could snowball the block. Whatever you want to do. It's it's just fun option. Yeah, that's right. Perfect. Okay, so let's get started. [Music] We're going to do our classic draw the line both directions and stitch on both sides of both lines. Okay, I will do it. And to make one of these, you really only need about four pieces of fabric. So, you'll have a lot left over. Or you can mix them up and make them scrappy. It's a lot of uh a lot of stuff to work with. But if you have four prints in your stash at home that maybe you want to give it a try before you commit to making a full-size quilt or, you know, it's it's awfully easy and super cute. There's one. One more stitch. One more side here. Okay. All right. So, the rule of thumb here is to cut those lines that you can't see, the invisible cuts, we're going to do a vertical and then a horizontal because then where the lines have been drawn if anything were to get um moved around, you know, you could then just do these individually like so. Or you can take your clearly perfect and kind of cut them off of each other. It's a little bit more complicated to do that. I would go ahead and use this to just trim them. Trim them separately. Oops. I've got a little nick in this ruler. Darn it. Here we go. So, you really only need four to make your um wall hanging. These can be trimmed up and set aside for another project or just set aside for now is what we're going to do. So, I'll do two of these with the Clearly Perfect. And these are 4 in. Okay. And that is to match up with our little wing wedge block. So we'll trim these down to four and press them. And then we're going to make a nice little pin wheel for the middle of this block. Press for you. Oh, sure. If you Thank you. You bet. I was just sitting there. Gives me something to do. Keeps us all working. That's right. Okay. All righty. And if you would press these open, then I will square them with the other tool. Perfect. And we'll put together a cute little pin wheel for the middle. Sounds good. This goes so fast. The slowest part is the stitching on the embroidery blocks. And I love to just do that when I'm relaxing outside or watching television or, you know, anytime. Me, too. Take it with me in the car. Yep. All right. So, again, I'm going to have my one inch in my top right corner. And then I'm going to line up my seam line on the diagonal um 45° angle line. We're going for 4 in. So, there's plenty of room here to get a nice straight cut. So, we'll cut our first corner, flip that around, and put that right into the four. There we go. All done. One more. All righty. Flip that around, keeping that 45 degree angle on your seam line and then matching it up with the 4 inch square. Cool. Okay, I'm going to set those aside for now and we will make our wing and wedge blocks. Okay, so for these two, we're going to take um our two prints. We're going to put them right sides together. Okay. And then I just drew a line right down the middle of this uh cuz what we're going to do is we're going to stitch both of these and then we're going to sew on both sides of this middle line. Okay. This looks like a fun trick. It's It's cute. Makes it nice and easy. You actually get enough to make two of these full size like because of the way that we're using our fabric. It's pretty efficient. That's awesome. That got a little narrow. I think I'm going to do that again. That's not a big deal. Are you sure? Yes. I'm just I'm just going to cuz we're using the wing the wedge on the line like that's the Okay. There's plenty of room. And so then on both sides of the middle as well. Yep. Okay. Just a little efficiency pack. Perfect. Okay. All right. So, now we will go ahead and cut this apart on the line. And we have two sets that are here ready to go. And what we're going to do, we're going to grab our wedge and we are going to line up right on that seam line and cut them in half. Now, you can go down to the bottom if you like. I like to just have a good clean edge down there. Okay. Doesn't matter. And then this gets cut right off. And I usually will come back and cut this because I don't like that part just to hang off. Yeah. Mhm. And so then this is our center. Oh, cute. And it's got its little double side. So, we can press that open. Right. I'll work on that. Cool. Cool. Same thing here. Trim that off. And then we will do the same over here. That is a super fun little trick. Well, I like how this how these combine with the pin wheel to create this cute little block. Yeah. And there's plenty of room for trimming. Okay. All right. So, on to the background fabric. if we're good for that. We're going to keep all four of these together. And we want them to be all the same, which you just keep your fabric right side up and keep cutting it the same direction, and you should be just fine. So, uh, we're at this point. We can cut four 10in squares to do our embroidery. Okay. Um, and if you're not going to use embroidery, these are just your background squares. No big deal. If you if you are not doing embroidery, you can cut them to uh 8 and 1/2. Okay, 8 and 1/2 is the finished size. I cut them at 10 before embroidery so that I have room for a little bit of stretching and you've got to wash off the stabilizer and it has to go in the hoop and you need enough to cover up. Yeah. Yep. So, if you're doing embroidery, these are 10 in. If you are not, they're eight and a quarter. All right. So, I have some eight and a quarter or eight and 1/2. I'm sorry. You're correct. 8 and 1/2. Okay. I just wanted to be sure. Yep. 8 and 1/2 in square. And I have some of these already cut. So these ones are 8 and 1/2. They're ready for your borders or your not border corners. These are ready for the corners. All right. So then you're going to cut a 4 in strip. And I like to keep these together because like when you were cutting, you need them to go both directions. The thing is is this is background fabric. It's going to be the same on both sides. So it's not as big of a deal. But the way that I get around that is by having them I just keep them folded. Stacked. Yeah. And stack them up. So you'll cut that four inch strip. And then we're gonna just go along here and cut some wing and wedge pieces. Some wedge pieces. This is No, this is the wing piece. The wing. The wing. And you'll need four. So, you've got to have some going the opposite direction. I believe this will fit, but nope. I cut it a little too close. That's okay. It'll fit over here. As long as I line it up right. And I've got to make sure it's There we go. Okay. So, these go on either side of our little wedge pieces. And I did all of mine with an orange um on one side kind of a layout. So, we'll start with one here. Stitch it down and press them out. I'll give you two. We have a couple made in in the uh other fabric so we can have a little bit. Yeah. All right. Okay. These can just finger press these or Yeah, you can cuz it's just really that top edge that you've got to worry about right off the bat. And then these ones you want them to continue to stay square. So that goes on that side. Okay, perfect. And then this one I'll line up for you. I really have gotten these confused a couple times when I was making the quilt. I had a had a little mishap, you know, and had to just take them off and flip them over and start again. It's okay. Happens to all of us. So, there's that one. Okay. I'm going to set the seam here. And we'll set that one. And then press them back. Okay, there we go. All right, do this one as well. Okay, so just like Misty did, I am going to straighten the front edge or the peak peak edge. Make sure I have a quarter of an inch there. And then there it is. And then these end up being seven and 1/2 by 8 and 1/2. So they're 7 and 1/2 wide and 8 and 1/2 long. Okay. All right. So we're going to do 8 and 1/2 this direction. And just come up and cut about a/ inch off this end. And you can use a square if you want to. I'm fine using the mat and the ruler for now for this part. And then widthwise, it should be right at 7 and a half, which I'm just a little bit off right down there. But the rest of it matches, so I feel good about that. We can make it work. We're going to move these out of the way and make sure the rest of them line up. So I'll do a a quick little trim here. Yep. Keep that straight. And then we'll go seven and 1/2 or eight and 1/2 down. It's easy to say the wrong number when you're thinking all the things. four, five, six, seven, eight and a half. As long as you have a good idea of like what it's supposed to look like, you can use your visual checks. Exactly. Okay. So, now we have all of the components to build this block. So, I'm going to do one like this. And I wanted my fabrics to match. So, I did my little half square triangles like or my pin wheels so that they matched up with their colors to kind of continue the the same color way through. Yep. So, I'm putting these in opposite spots because I like them. I think it's really cute. So cute. There we go. Like so. And then we've got our corners that are eight and 1/2. So this little pin wheel comes together and it is a 7 and 12 in square finished or unfinished, right? And then these are all eight and 1/2. So that's kind of how it's basically called an uneven nine patch when the middles are a different size than the outside corners, but it adds up really cool. It can be kind of a brain trick though. It might feel a little like something for sure it's not going to match, but it really does. Yeah. Okay. All right. So, this is our layout. So, really, you just have to go ahead and stitch it all together. And then I added a 3in border to the outside edge. So cute. And had it machine quilted with Batman. I think it's such a cute little pattern. And it kept reminding me of all the little bats in these these blocks. There's a bat in at least two of them. Yes. And I just thought it was so cute. So cute. And I love this lightning print on the border. It's fun. Super fun. It's really fun. Another thing I want to point out so you don't get too concerned in these little corners there is just a tiny bit of um of space about a quarter of an inch on some of them if they get close like this one got really close and then that one's a little farther away. It doesn't bother me. Yeah, it's it's built that way. It's okay for it to kind of poke out a little bit. Yeah. And I think when you just make sure that this center matches I'm more worried about lining up my points here than I am out here. These ones are fine. Exactly. because your eyes drawn to that anyway. So, that makes great sense. Yep. Yep. So, it doesn't matter if you're um as we're trimming these the 7 and 1/2 by 8 and 1/2, sometimes that space gets either higher or lower, which is basically why this would or wouldn't line up. But I don't worry about it. I think it's just fine. And it turned out really cute. And uh I hope you guys like it, too. It's adorable. Well done. Awesome. So, thank you guys so much for joining us. We gave you two fun, quick projects for Halloween, I think. And using the wing and wedge rulers. That's right. Exactly. So, I hope you guys enjoyed this double take and we'll see you next time. Bye.


