

Make a Winter Village Quilt with Jenny!
 Jenny Doan
- Charm Pack
- Traditional
- Lap / Throw
- Beginner
- Quilt size 54" × 66"
Jenny Doan is joined by Edyta Sitar to demonstrate how to make a quick and easy block of the month project, the Winter Village quilt. This quilt is a lovely blue and white quilt kit that is purchased through a subscription. Instead of paying for all your supplies in one lump sum, you pay a little each month and we send out everything needed to make that month's block. The last BOM month includes the sashing, border, and binding fabrics plus a MSQC. Machine Quilting Services Coupon for 10% off.
Instructor
Jenny Doan
Jenny Doan is an American quilter, author, and YouTube personality. Jenny started Missouri Star Quilt Company in 2008 and today it is the largest quilting supply vendor in the United States.
Shop this tutorial
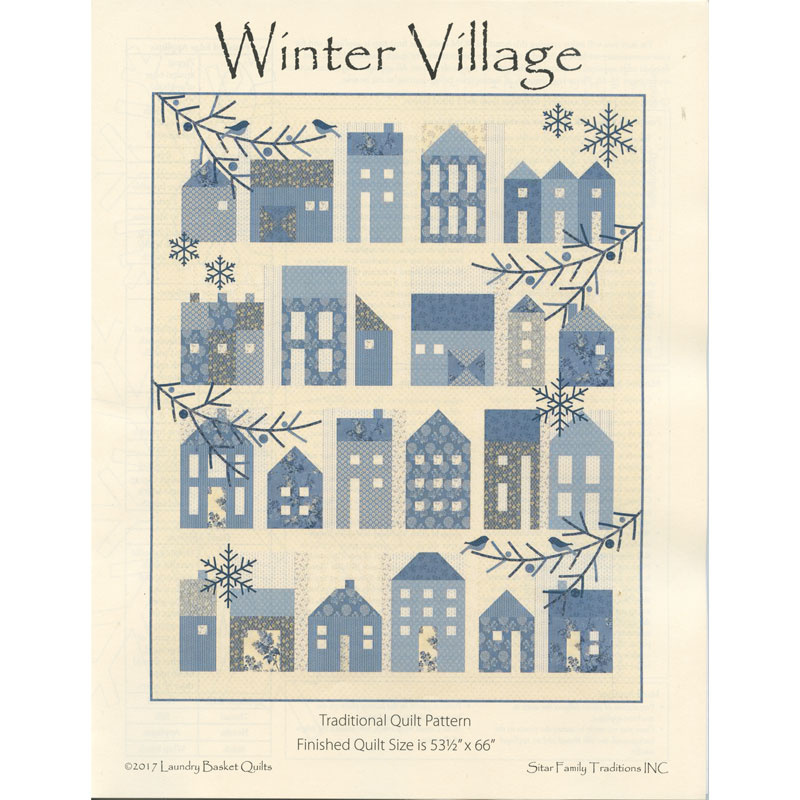 Winter Village Pattern$14.65Shop →
 Missouri Star Quilter's Best Blend Throw Batting$20.95Shop →
 Olfa Splash Aqua 45mm Rotary Cutter$18.75Shop →
 Olfa Splash 24" x 36" Cutting Mat Navy$68.95Shop →
 Missouri Star 2.5" x 8" Ruler$10.95Shop →
 Missouri Star 5" x 15" Ruler$15.95Shop →
 Exclusive Missouri Star Jenny TG1600 ProPlus Oliso Smart Iron$199.99Shop →
Common Questions
What is covered in Make a Winter Village Quilt with Jenny!?
Jenny Doan is joined by Edyta Sitar to demonstrate how to make a quick and easy block of the month project, the Winter Village quilt. This quilt is a lovely blue and white quilt kit that is purchased through a subscription. Instead of paying for all your supplies in one lump s...
How long is the tutorial video?
The tutorial video is 00:19:00.
Are supplies listed for this tutorial?
Yes. The tutorial page includes the supplies and materials connected to this project.
Is a transcript available?
Yes. A written transcript is available on the tutorial page.
Video Transcript
Edyta: I’m good. It’s so nice to be here. Thank you for having me.
Jenny: Oh it’s always a pleasure to have you. Always a pleasure to have you back. And Edyta, like me, loves blue and white. And we share that in common. We’ve got some fun things to show you today. And we’re going to talk about the new Block of the Month Winter Village which you see behind us right here. But because this fabric is so amazing, I mean there’s just so many different patterns and colors. We wanted to just quickly show you a couple of other things that, that she’s made out of that fabric so
Edyta: I love blue and white
Jenny: Me too.
Edyta: Any time I get a new collection I can’t help myself but make some fun quilts. One of my favorites is applique so I have some of these quilts. But foundation piecing of pineapple quilt in blue and white
Jenny: Oh it’s so beautiful.
Edyta: It looks so beautiful on the bed. And a simple nine patch. I mean you can’t go wrong. And so when you’re making your Block of the Month save all your little leftovers and make this nine patch.
Jenny: Oh you can make the tiny ones.
Edyta: But let’s focus on the quilt that is behind us.
Jenny: Oh gosh, ya. So we did this last year. We did a block of the month with you, Harmony. And it was, oh my gosh
Edyta: It was wonderful.
Jenny: People loved that one. And so when I saw this blue and white one I was like we’ve got to do this one.
Edyta: Harmony had applique and then the piecing with a finishing touch to it. This time we’re reversing the roles and in this quilt you have eight beautiful pieced blocks. And by blocks I mean sections of the quilt. So there’s a section of the quilt. There’s many different variety of houses in it. And there’s eight of them and the 9th month is the applique and that’s the finishing touch, a little detail that you will add to your quilt.
Jenny: So pretty. So pretty.
Edyta: So every month you’re going to get a beautiful selection of fabric that you’re going to work from. And I just pull out some pieces for our first house. And I just want to talk to you about the pattern for a few minutes.
Jenny: Oh please. I love houses anyway
Edyta: Ya and with this pattern what is so much fun you have so many different homes. So if you fall in love with a house you can make a dozen and dozen and dozen in every piece of that house. You just did one but I thought a little change. You have a house, you have a garage, you have a condo.
Jenny: And then look at the little birds. That’s so cute.
Edyta: Yes that’s the applique. It adds a really nice touch. So first you have the cover. Then you’re going to find an applique directions. It’s usually on the back of your cover. And now the first three pages it’s your full layouts for your appliques. And all your appliques are going to come with your block of the month pre cut already.
Jenny: Ya so you have the pattern here so if you wanted to do it over. But really
Edyta: And for the layout you need the pattern
Jenny: And you get this
Edyta: You need it for the layout. This is all your pre cut
Jenny: I love the cut outs
Edyta: This is snowflakes. So convenient. You can’t imagine.
Jenny: They’re beautiful, just beautiful.
Edyta: So that’s going to be those few. And then we move on to our first block. And right here you’re going to have your first block. And that’s the one we’re going to work on right now.
Jenny: Ok
Edyta: Yes?
Jenny: So then do you get the whole pattern at once or does this come with the directions for each one?
Edyta: Well I believe you get the whole product at once and then but you have your first block, your first house, second house, third house. And then as soon as you finish your third house it shows you how to frame to a section for the first unit.
Jenny: Oh so
Edyta: So this is your first block. This is what you’re going to make.
Jenny: Ok
Edyta: You make three houses in your first block.
Jenny: Ya. You could actually just even, just use that little piece, couldn’t you?
Edyta: Yes. And I brought some examples I’m going to show you.
Jenny: Oh ok.
Edyta: Yes, you can use a section and use it as a table runner if you would like that.
Jenny: Oh so pretty.
Edyta: Ya
Jenny: Alright so let’s get on to how we’re going to make this.
Edyta: One thing at a time. So first house, super excited what’s coming but let’s look at this house.
Jenny: Do you need the directions or have you made it enough that you know?
Edyta: I think, ya I’ve made it enough but I want to show you something how I do things. So maybe that way you want to do it with me. I select my fabrics for my first house. I have lights and a dark. And I have a list of pieces that I’m going to cut. So I will grab my rotary and a ruler.
Jenny: Ok.
Edyta: And I’m going to start cutting. And I don’t know if you do this.
Jenny: You’re ready to go.
Edyta: Ya. When I cut things I start at the top on my list and as I soon as I cut it, I cross it off the list.
Jenny: I do that too.
Edyta: So I cut at A, A. Cut it. It’s the A, the two little rectangles right here so I cut those, set it down, cross it off the list. Next piece, another piece. Everything that I cut I go ahead and cross it off the list.
Jenny: It’s such a good idea. It’s so easy to get mixed up with that and so
Edyta: Ya it helps me
Jenny: Absolutely
Edyta: And when I cut my pieces I right away line them by my sewing machine so that way I have a visual that yes I did indeed cross off the list. I have everything ready.
Jenny: And I like that you shaded them so that it looks light, medium and dark. Ya.
Edyta: Thank you. Because you can change the colors. You don’t have to do it in blue and white. We’re doing it in blue and white but also the shading gives me a value where I envision that you’re going to go a little darker on a room.
Jenny: Ok
Edyta: And this is going to be the house. So I have all my pieces ready, set, go. And what I want you to notice that it is simple strips, simple squares, rectangles. Make sure you save all of your leftovers because this was leftover from the strip that I cut here. I end up using that for H for my row.
Jenny: Oh ok
Edyta: So before you cut another piece check if any of the leftovers could work nice for you.
Jenny: Oh that’s so perfect.
Edyta: And what’s so special with this one is with every block I right away cut my sashings. There’s sashings between all of the houses.
Jenny: Oh ok. These ones here.
Edyta: So I go ahead and cut them so when it comes to assemble the whole quilt I already have my sashings.
Jenny: You’re ready to go.
Edyta: It’s on the block.
Jenny: That’s awesome.
Edyta: Ya. So this is all the pieces
Jenny: And so that, so right here where it says light fabric for sashing and you’re good to go.
Edyta: Yep, yep. Cross it off the list. That and it’s going to have a really fun scrappy feel to it and overall
Jenny: I think when you’re a block of the month it’s a really good idea to cut that first. Like if you’re working a house one, do all your cutting first. Don’t cut as you go because it, I think you’re going to get confused.
Edyta: Ya and especially when you get a kit you want to pull out the fabrics and you can look at it on a picture but also go to the website and you have large pictures on the website where you can see it more where we position any of the colors. I think you would enjoy it how I did that.
Jenny: It’s so pretty.
Edyta: So we’re going to start by checking our quarter inch seam allowance
Jenny: Ok
Edyta: So what I like to do is I take the chimney unit, what is two light rectangles and one dark. Sew them together. Put the right sides together, sew it, flip it open, push the seam allowance towards the dark. And speaking of the seam allowances I would like you to notice that I don’t have too many arrows on my pattern. Only where I’m breaking the rules I put my arrows. So for this right here I have an arrow towards the light where normally on quilting you push the seam allowance towards dark. So anytime I would like you to break a rule I make sure I put an arrow and see if you would like to do it that way.
Jenny: Ok. She’s a rule breaker.
Edyta: Otherwise. Ya. It benefits us. I’m going to show you that unit right here for the roof how nice it is and how it works.
Jenny: Ok.
Edyta: So right here we’re going to do a quarter inch seam allowance as soon as we sew this together. And I have this prepared.
Jenny: Whew, I’m so glad. I thought I was going to have a test there for a minute.
Edyta: Oh it’s coming.
Jenny: Oh no!
Edyta: As soon as I did that I noticed I measured it and now I know that this is 3 ½ by 3 ½ so my quarter inch seam allowance is right.
Jenny: Ok.
Edyta: And first what we’re going to do, I’m sorry, I have to take this apart. We’re going to start
Jenny: Oh my goodness. This is genius.
Edyta: Placing our square down that we just prepared for our chimney. Draw a line, start sewing from
Jenny: Ok wait. You may not have known this. This three piece right here, this is the chimney block. And she’s putting it on there like a flying geese
Edyta: Ya.
Jenny: So that is genius right there.
Edyta: And notice that when we first sewed this we placed it this way. But when you want it to sew it to your rectangle, you need to put it horizontal. So when you flip it open, it ends up standing up because if you do it the other way it’s not going to happen
Jenny: No that’s perfect. And I love that you flip it up and it makes a chimney. Great idea.
Edyta: It makes a chimney. Next thing, I’m going to take a ruler and a rotary and I’m going to trim off gently staying a quarter of an inch away. And we’ll just talk about rotary and rulers. Switching for a fresh blade, always a good thing. So we cut that off. And now we’re going to flip it open and we have a beautiful chimney. This is just the little leftovers that we’re going to throw it away. Now it’s the other side so we’re going to place a square, draw a line again. Starts stitching. I always start from the top. Do you?
Jenny: I do.
Edyta: Yep, go to the point right here. Zoom, zoom, zoom. Trim it and flip it open. This time I want you to push your seam allowance this way where it’s towards the light. When you do that, notice, now put your finger on it. You get a really nice transition there.
Jenny: Yep.
Edyta: And when I start sewing from here straight down, all my pieces are going in the right direction
Jenny: Perfect.
Edyta: So I don’t go against my sewing machine. Well this would be the roof. Now we need the house. We have the window. We’re going to sew a rectangle, rectangle on the bottom. Push the seam allowance towards the dark. Then we’re going to sew two pieces on the left and the right. And we have a house unit. This should be 6 ½ by 6 ½. If it is, boom.
Jenny: Ya, we’re good to go.
Edyta: We just built a house. We’re going to sew this together. Add the top to it
Jenny: Then our little house is done. How cute it that?
Edyta: Yep. No question there. We have a beautiful little house.
Jenny: Oh
Edyta: Nice transition right here. And again when I’m pushing my seam allowances I push them down towards this. Why did I do it? Because I want a nice transition right here. And when I add my sashing I make sure I pin it. And I don’t know, do you use these pins.
Jenny: We do.
Edyta: I absolutely love those.
Jenny: They’re so smooth.
Edyta: Oh. They’re just amazing and sometimes if I forget to take it out before I run over it with the sewing machine boy they are just amazing. So those little glass pins are very handy.
Jenny: Yeah. I like the glass heads.
Edyta: And as soon as you finish your first one it’s like potato chips. I’m telling you. You cannot stop. You want to cut your second house and make a second house and then the third one. And then you’re sitting and waiting for the next month
Jenny: Waiting for the next one
Edyta: So in case you love to sew the block and you’re waiting for the next month you can make a dozen. It makes a really cute beach house and a wonderful quilt.
Jenny: It would be a cute quilt just all the same houses. Ya really cute.
Edyta: And many times I show my students in my classrooms when we all make this block how nice this block goes with, only those blocks go together. And you can just shift it a little bit to make the houses go on a hill or maybe this way
Jenny: Oh cute.
Edyta: Ya, it makes a really fun arrangements and it’s a wonderful little block. As soon as you sew them, you finish one block then you’re going to finish another one and another one. And this would be your first section of the quilt. Press it, set it and then wait for your next block to come in
Jenny: And then wait. Not so patiently probably. And I think that’s actually true with most block of the months. Once you finish a block and you’re like I really can do this.
Edyta: Ya
Jenny: Ya you get really excited and then
Edyta: And what I love about this block of the month is just this quilt is beautiful to display in your household. But also with every block you’re learning something. With our first just that simple block teaches you how to flip that chimney the right way.
Jenny: Oh ya that’s genius.
Edyta: The second one
Jenny: I love the chimney flip.
Edyta: Your second one quarter square triangles, how to do those and spin the center. Then you go how to align those windows. And I don’t know if you do that, when I have pieces like this where I don’t have a seam right here, I crease a line and that way I can align with my crease line
Jenny: That’s a great idea.
Edyta: That helps with that same line. So that would be for
Jenny: I love all the tips too.
Edyta: Oh they’re just wonderful blocks and with every one you’re going to discover something that you learn as you build your home. So the next step we would do is open our silhouettes and place them onto our quilt and then stitch around the edges. And I love that the silhouettes are already pre cut. Each package
Jenny: Oh my gosh
Edyta: Includes the birds in it and it’s kind of nice. And one package is one side of the quilt. So that is super cool because you can put one side on the other side and finish with flurries of snowflakes if you would like. And there’s six snowflakes in a package.
Jenny: So so pretty. And they just iron on?
Edyta: Ya so last month, the ninth month, we just ironed them on. And you can use a zig zag stitch, blanket stitch. If you want to emphasize the colors.
Jenny: I’m looking closely at her stitching.
Edyta: Snowflakes. You just stitch through the centers if you would like.
Jenny: Oh they’re beautiful. Just beautiful.
Edyta: And speaking of making more blocks. So if you enjoy it you can a few extra blocks. Make a little pillow.
Jenny: Oh how cute it that?
Edyta: And notice the stitching on the pillows right there through the snowflakes
Jenny: Beautiful.
Edyta: And I like to use a blanket stitch to show off some of the threads
Jenny: I do too
Edyta: And the color thread fill is really nice
Jenny: And look at the little birdies. It’s got two little pieces. So cute.
Edyta: Ya he’s just adorable. Just adorable.
Jenny: And these snowflakes. Can you, I mean there’s just like a million things you could do with these snowflakes. So let me ask you that. Can you buy the snowflakes individually?
Edyta: Yes and Missouri Star has them on their website
Jenny: Oh very fun.
Edyta: So you can order them. And they’re just wonderful. There’s six snowflakes. Three large and three small. And we live in California so we don’t get much snow. My children take the snowflakes, peel the paper and then glue them to the window.
Jenny: Oh cute.
Edyta: It is so cute. In our office, the girls do it. We have maple leaves, snowflakes that are always made their way to our windows. And we get a little
Jenny: We actually had our first snow the other night.
Edyta: No.
Jenny: Ya like I came up and there was like snow on top of the car. I was surprised. It didn’t stick to the ground.
Edyta: So maybe we should not call this a winter village, we should call it a Missouri Star village
Jenny: There we go. We don’t get much snow though. We maybe get 15 inches a year but it comes two at a time or five at a time and then it melts off.
Edyta: It is beautiful I think.
Jenny: Ya it is beautiful here.
Edyta: So that kind of winter team and the weather getting cooler please come in and join us in the block of the month. I think it’s going to be fun.
Jenny: Oh it’s going to be really fun. Really fun. Alright did you have, did you have a little table runner you wanted to show us?
Edyta: Yes I do actually. Michael would you like to help us with that?
Jenny: There we go. We’re getting some help. This is just so cute. Because this is actually the first month, right?
Edyta: Yep. This is the first month.
Jenny: Here let’s just hold it up right here.
Edyta: Isn’t that cute? So you have the three houses. And notice how bare it looks without any of the applique. And I”m going to open one of the packages. Oh let’s do the snowflakes. I’m going to show you how quickly
Jenny: Well this, I just think it’s really cool to see things more than one way. So you know we see this big quilt right here but you know when you finish these three blocks like she said. You’re going to want to make them again, I think.
Edyta: Ya.
Jenny: I think so and then this is, how cute it is for a little space in your house. And then
Edyta: Just wonderful and then I keep mine without any applique on it because I can put a yellow flowers in the spring and I have
Jenny: Oh sure.
Edyta: A beautiful farmhouse feel to it.
Jenny: Oh perfect.
Edyta: Even take a bowl of apples, ready for 4th of July. But we’re talking winter village, let me grab one of the snowflakes
Jenny: Well and that is true actually on this you know. Because blue and white is so versatile
Edyta: Ya
Jenny: You can use, you know, any little thing, any little applique you wanted to put on there you can. Oh look at that.
Edyta: Look at how quickly it becomes a winter. Because I threw some snowflakes onto
Jenny: OH really cute.
Edyta: I absolutely love them
Jenny: Great idea.
Edyta: And the packages are quite reasonable. You have them, you have six snowflakes in it like I said. And notice how thin the branches are
Jenny: Just beautifully cut.
Edyta: You don’t want to have this cut by hand
Jenny: No. No I don’t. I wouldn’t.
Edyta: And when you cut the edges so slightly burn so that we did that so they won’t fray as much. It’s really nice because the fusible really gets stuck to it.
Jenny: And then your fusible just comes off with a little fold, doesn’t it?
Edyta: Yep, yep. That’s all. So what I do is I just crease it, wait a few seconds and look, it separated.
Jenny: And it just separated
Edyta: Ya so you have to be gentle, not pull too hard on it because they’re very delicate. But boy what a nice results and extra something.
Jenny: So pretty. So we are so excited about this Winter Village Block of the Month and we hope you guys will join us in making it. Really fun project. It’s great to have you on the set today.
Edyta: Thank you
Jenny: Oh you’re so welcome.
Edyta: Stay cozy up with Winter Village
Jenny: Oh gosh yes. And we’ll see you later from the MSQC.


