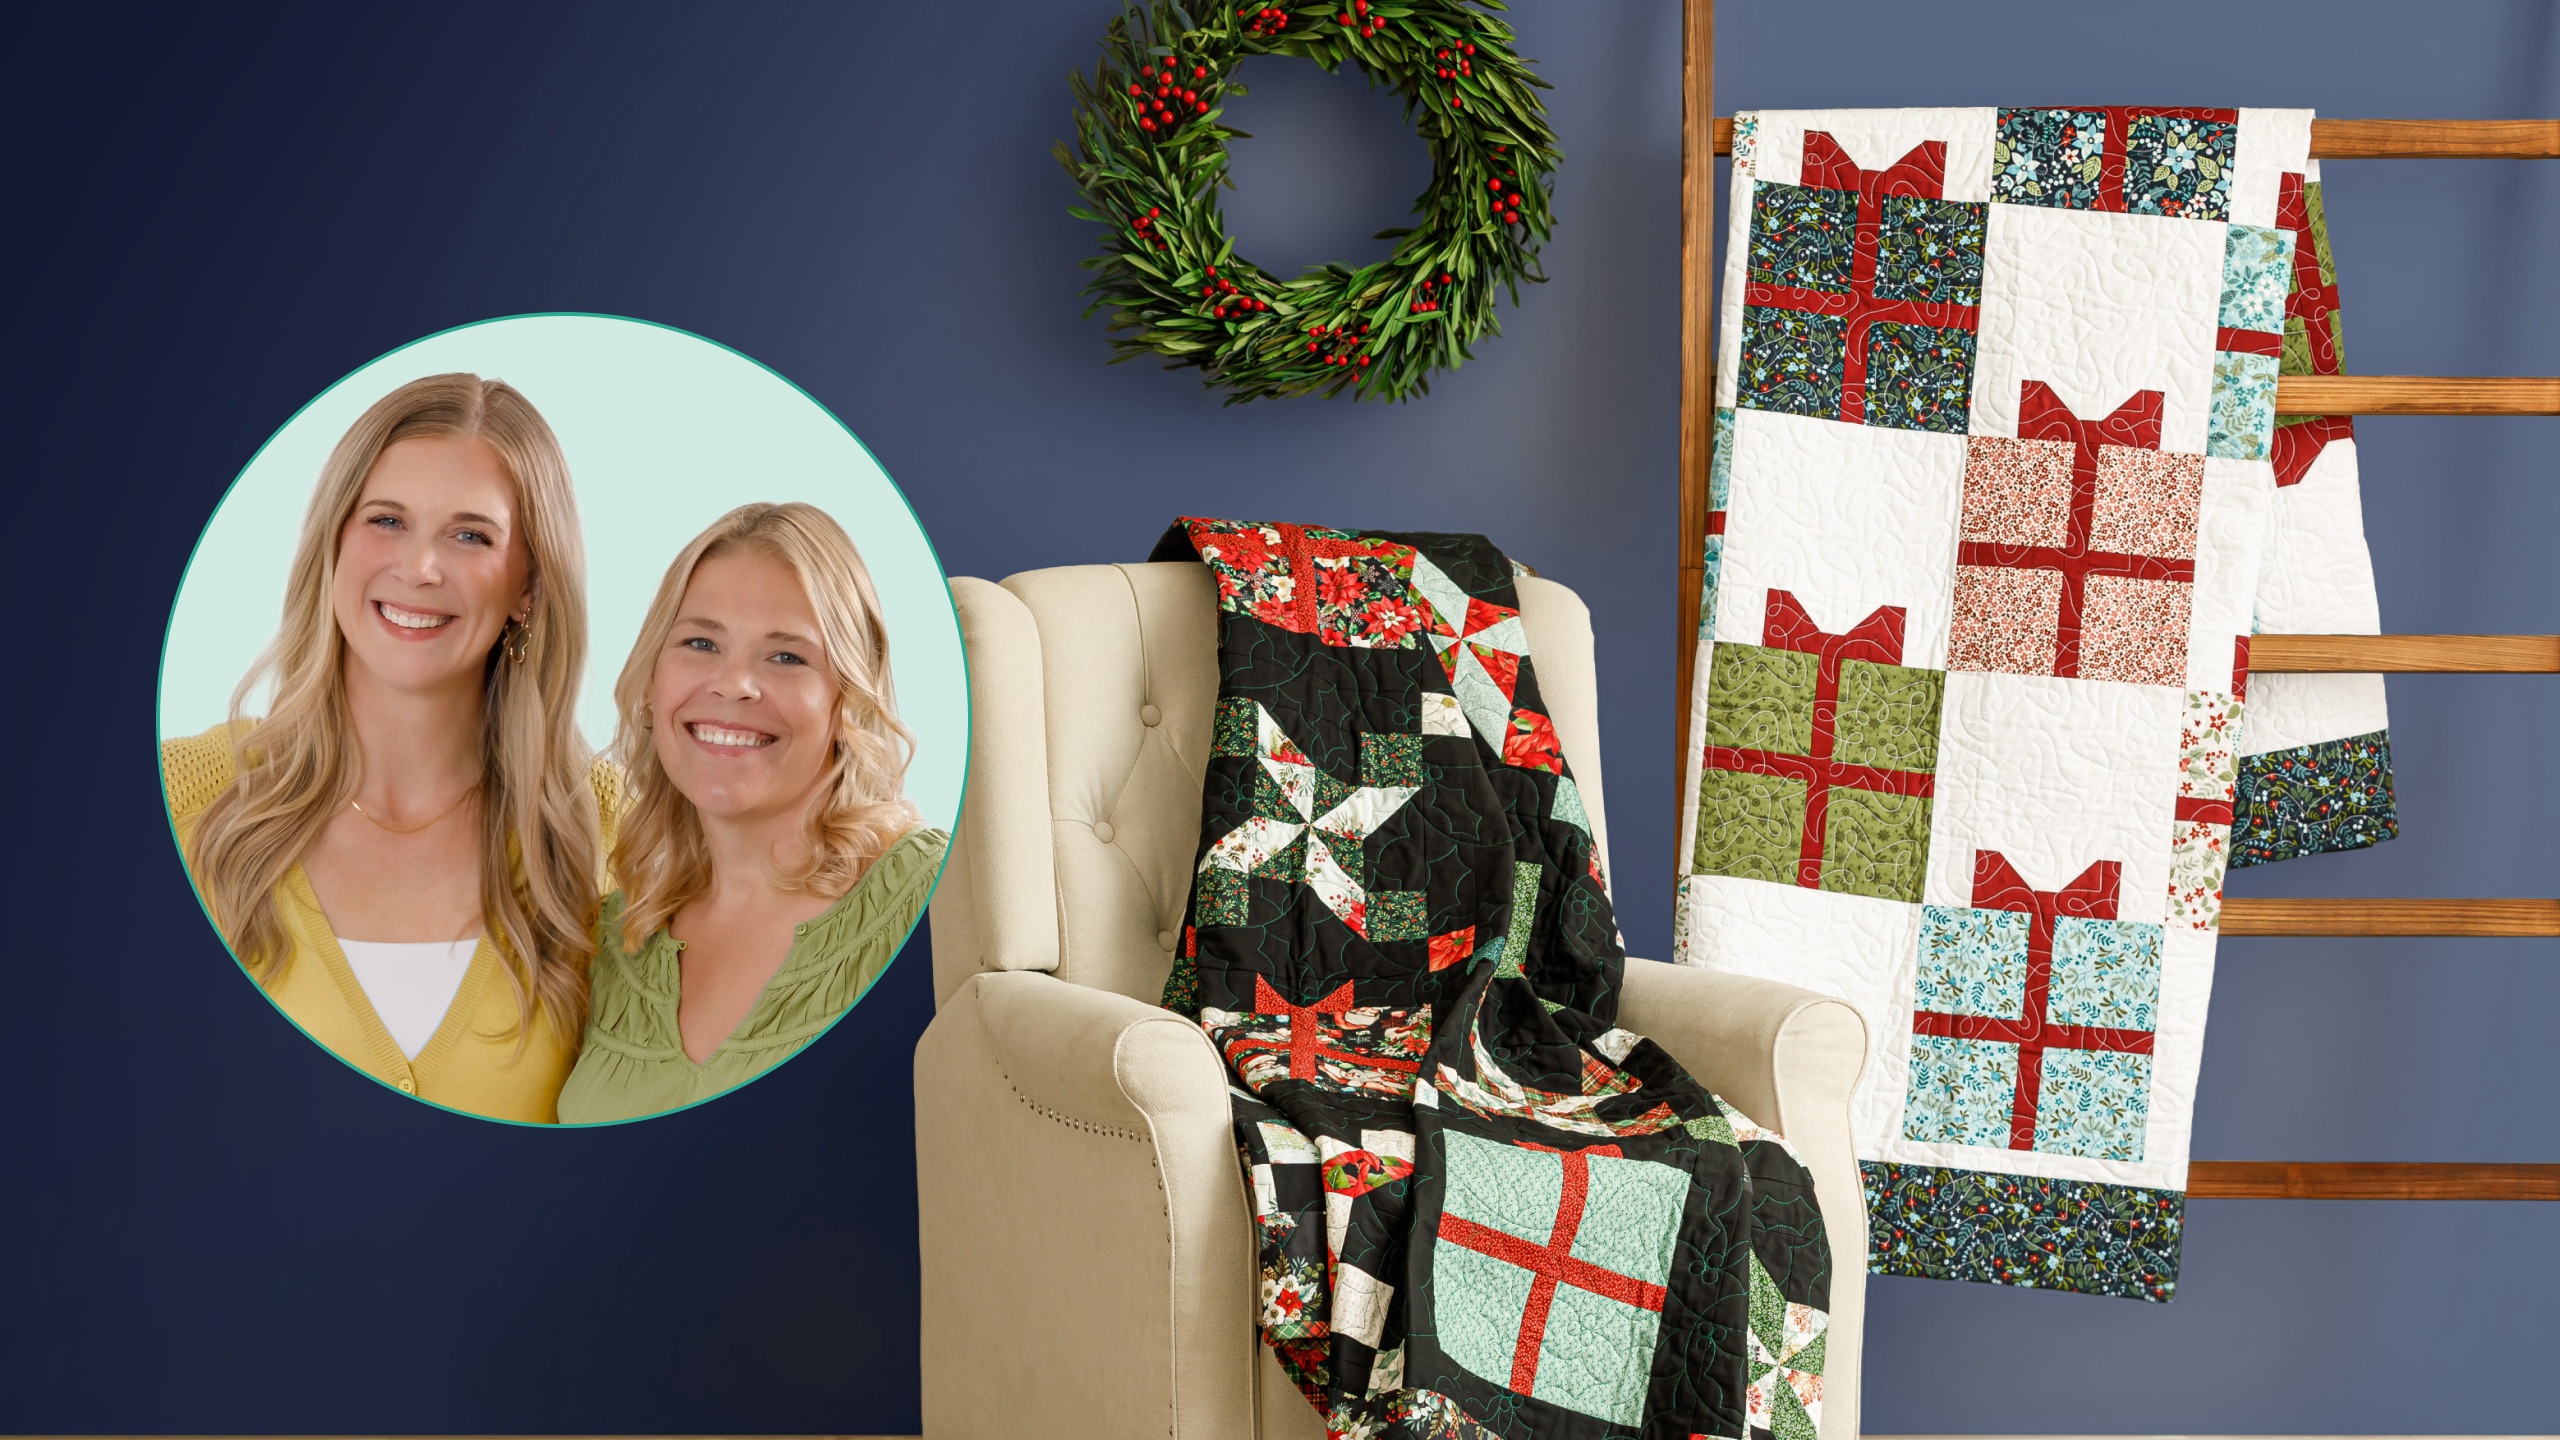
Ho, ho, sew! Today's Double Take kicks off 15 Days of Christmas in July! Natalie and Misty help you start your holiday sewing now, so you can be all wrapped up by Christmas. They each make festive quilts featuring pretty wrapped gift boxes.
Natalie is the host of Quilting 101, Embroidery 101 and the Creative Strategist and Editor of Block Magazine at Missouri Star Quilt Company. She was taught how to sew by her mom, of course, and began quilting when she grew up.
Common Questions
What is covered in Double Take - All Wrapped Up?
Ho, ho, sew! Today's Double Take kicks off 15 Days of Christmas in July! Natalie and Misty help you start your holiday sewing now, so you can be all wrapped up by Christmas. They each make festive quilts featuring pretty wrapped gift boxes.
How long is the tutorial video?
The tutorial video is 00:27:55.
Are supplies listed for this tutorial?
Yes. The tutorial page includes the supplies and materials connected to this project.
Video Transcript
Hi everybody. I'm Natalie with Missouri Star Quilt Company and I'm here today with Misty. Hello you guys. It's double take week and Christmas in July. So we are going to have fun with presents today. All right. So I think I'm going to start up first. This is my quilt. I'm calling it pretty packages. It is pretty. Thank you. I think it turned out pretty cute. I just basically followed the exact same thing that your mom did for the present itself and switched up the bow so it comes together really quickly. So to make this quilt, you're going to need one package of 10in squares and I use this beautiful collection called Holly and Hearth by Shelley Cavana for Bennerex. You're also going to need some background fabric and I just used some white. And you need uh 2 and 38 yards of that. You'll also need one yard of accent fabric. I use this pretty kind of burgundy color. Um, for your outer border, you're going to need one and a third yards. And for your backing, you need 58, five and 1/8 yard, excuse me, with a vertical seam or two and a/4 yards of a 108, which they have these great 108s that go with this line. Oh, beautiful. So, that's what I used. So, let me show you how to make it. So, this is the block we're going to be making today. Just super simple. And we're going to start by making the, you know, bottom present portion of it. And so to do that, we're just going to take our 10in square and I am going to cut it in half once. Oh, good idea. I I see what you did there. Yes. And so then we're going to take our accent fabric and we're going to cut some 1 and 1/2 by 10 in rectangles. And we're just going to stitch that right between. You're so cool. I love it. I mean, we're still going to cut it apart later, but it just gives us one less step. Yeah. And bigger pieces to sew. Yes. Should we just go and put the other side on? Absolutely. All right. I was going to say I can press it if you want me to. Otherwise, it's You can do that in just a minute. I'll hand it over. Perfect. So, now she's just sewing that other rectangle to the opposite side of our accent strip in the middle. Just trying to keep everything lined up. There you go. All right. Perfect. Thank you, Natalie. Of course. And then I will set that seam and roll it back. Sometimes on these ones with the strips, I like my fabric wants to go to the middle. Yeah, I know. Sometimes you just let the fabric guide where it wants to go. On this one, it doesn't really nest with anything major, so you don't have to worry about it. And so then now we can rotate this. And since this is still 10 in across this way, we can still lay our ruler right on the edge. We'll cut this in half. Such a good hack. Yeah, I thought it was a good little time saver. And so now this strip is 1 and 1/2 by 10 and 1/2 because we do gain that extra little bit. And so we'll just add that to the middle just like before. So I'll let you do that. All righty. Oh, sorry. Oh, that's all right. Sometimes my fingers just don't want to don't want to work. And that fabric just sticks together. Yes. Try and finger press that. Yep. And then do you have any good tips or tricks for making sure this Why don't we bring it over here and I can talk through that. Good idea. Yeah, because you got to kind of line that up. Yes. Yeah. So, we want, of course, this little strip to be in the same place as we're joining it on the other side. And so I always do kind of just lay this on here and then I fold it back to try and make sure when it gets to that opposite side of the strip, it's going to be right in line with that seam. And if you want to put a couple pins Yes, please. Right there at the joint. Uhhuh. That is really all you can do. Um, and that's the only place you really have to worry about it. And then you just want your two ends to match and you can zoom right down the side. Do it as best you can and don't worry about it. And close enough is good enough for me. That's right. I am the same. And your mom has that rule, right? Like if it bothers you three times, then you have to fix it. Yeah. I try to live by that, too. Yep. There we go. Got that thread caught around the presser foot there. Mhm. We shall see. I believe in you. It's going to be great. Well, I don't know. When I wrap presents, sometimes my ribbons are crooked, too. So, that's right. Right. It doesn't matter. The ribbon just it it slipped. It's okay. Yeah. You did great. It's all right. It looks awesome. All right. So, now we will press this part open as well. Make sure it lays nice and flat. And now we can just set this aside for a minute while we work on our little bow to top it off. Excellent. And so the first thing you're going to do is you're going to take a one and a half inch strip of your accent and a two inch stretch strip. Sorry, let me slow down. One and a half of accent, twoin strip of your background. Sew it together. And we're going to use this strip set to make all of our little middles of our bow here. Just save us some time. Strip sets are so great for that. They just like it makes piecing those little tiny squares so easy. I agree. So then we'll cut that into 1 and 1/2 in segments. And you just need one of those for the center of each bow. Nice. So we'll just set that aside. And we have that piece ready. And then from our accent, we're also going to cut some 3in squares. And we have some 2-in background squares. And so we need to snowball these on one corner. And because it's a square, you really don't have to worry about which way it goes because you can turn it. And it took me longer than it should have to figure that out. I was so worried about making mirror image them, which if it had a print on it, you might but still it's probably right. It's very forgiving. And so now, let me just draw the line so that they can see. We're just going to snowball just like normal, point to point. There we go. And so, see, when I set this together in the block, just so you know what I mean, it will go like this. And so, I thought I had to snowball these opposite. And I was so worried about it when I was working on it, but you'll see. We can just rotate it. And it's exactly the same. Yeah. So, they all go the same way. So, don't fret. So, we'll just stitch right on that line that we drew for both of those. Excellent. Am I threaded? It looks like it. Okay, good. Yep. For a minute, it just sounded a bit odd. I think it just got caught underneath that. It happens. And you can see that it would be a great opportunity to chain piece all of these. all the bows that you need would come together really quick. And so now we'll just trim off our excess, leaving our quarter inch seam allowance on each of those. Nice. We go. Now, let me press these back. There's one. Whoop. I kind of rumpled it there at the end, didn't I? That happens to me sometimes, too. And one more. All right. So, now we have both of those completed. And so, now we're just going to sew our little strip set unit in the middle of both of those. And that's going to make our bow. And then we will add our little background pieces to finish it off. These measure 2 and 1/2 by three on each side. So, if you want to sew that and then we'll add these to Absolutely. both sides of that. Okay. This block just comes together so quick. They do. The little present blocks are so fun. And I could see them in any any kind of fabric. I know. I I really was hoping we had like some fun birthday prints cuz I thought it would be fun to make a little wall hanging. Yeah. With some applique. You know, the possibilities are endless. Truly. All right. We're going to add that one. You want me to press that before you add the others or are you good? I think I can just add them cuz they're not actually not intersecting anything. Yeah. Anything that needs to be pressed. It's not no seam nesting yet. Perfect. There we go. All right, that is Oops. Oops. Sorry. So, I was just going to see. I'm going to go ahead and press this in. So, then I can press that out and it makes it easier to join them. Smart. So, I'll just make sure these are laying the right way and then these will go out in the middle. Gives me an idea of Mhm. which way to go. Yeah, because these that one middle seam is the nesting seam. Exactly. Cool. There we go. And so then we'll just want those to nest. And just like we did when we were lining up that, if we wanted to put a pin in there, you absolutely can. Go for it. Okay, perfect. I I'll allow it. Perfect. There we go. We'll just hold that in place there. And we should be set. And so then you can just stitch down this side and your present block will be complete. Nice. This really is so simple, quick, and easy. Yeah, I had fun with it. For some reason, it just keeps sounding kind of like it's not stitching, you know? Maybe we need to oil it. Who knows? Or maybe I'm just hearing things or not hearing things, whatever the case may be. All right, there we go. That looks great. And that is shabby. That's it. That's the whole block. And so, let's talk a little bit about the layout because I kind of wanted these to stagger a little bit, but I liked the idea of the bows kind of intersecting. So, I didn't want to just cut rectangles this whole size. And so, every other row starts and ends with a 10 and 1/2 in square. And then the rectangle that setits between the blocks on every single row is 8 and 1/2 by 10 and 1/2. And so those both come from your background. Then I just did a little inch and a half inner border to give it some space around the presents. Finished it off with a 5-in outer border. And I quilted it with this fun panto called gentle snowflake. I think it's really pretty. And so for the backing I have this beautiful print. It is really gorgeous. I love it. Love it. And so this quilt ends up at 71 by 83 and a half. So a really nice size. And I think Nat, you're up next. All right. All righty. Well, this is my quilt. I am calling it present party. And it's made up of two blocks. And it might surprise you to know there's no inner border or sashings or cornerstones on this quilt. Just two blocks. It's so pretty. So it comes together a lot easier than it looks. And I think you're going to enjoy it. So, to make my quilt, you're going to need one package of 10in squares. And I have used Sweet Christmas Memories by Color Principal for Henry Glass. You're going to need a little bit of accent fabric, and this makes up all of the bows on your present. So, you'll need about a half a yard. For your background, you'll need three yards. And for your border, you'll need a yard and a third. It's a nice 5 in border. For your backing, you'll need 7 and 1/4 yards with a vertical seam or 2 and 1/2 yards if you have a 108. Perfect. Um, another helpful tool would be your squaring tool. And because of the way that we're doing our triangles today, we're going to use the Clearly Perfect Trimmer Bead. And so that will make make this quilt a lot easier. Perfect. All right. Let's get going. All right. So, as I said, we've got two blocks. So, this is our block A, the present block, and then this block here is our block B. So, what we're going to do, I know that we just walked through making the present. And so, we're going to start with this block, and we're we're going to skip a step because this part is just the same as the way Misty did hers. It's a 10-in square cut in half. You can put your strip in or you can cut it into fourths and put them together, whichever way you want. But, this part is already done for us. Perfect. Okay. So, now what we've got to do is add our bow. And my bow is just a little bit different than Misty's. So, we're going to start with a 2 and 1/2 by 4 and 1/2 in rectangle. And what we're going to do is snowball these two corners just to create a little flying geese. So, we will go ahead and draw the line and sew on the line. I'm just going to use this. I was going to say need to go. And you can eyeball it or use your seam tape or your laser, whatever method you like. But we are going to be stitching on the line and then we'll trim and press it back and do the other side. Okay. So, I'll let you do that one first. Perfect. And this just creates our little bow in the middle. And then it's nice. This quilt is nice because I did use the same color for my accent. So, you really could just um work your way through all chain piece all all of them. We both did that. I love that. It's just so convenient and easy. Exactly. Anything to streamline the process. All right. I'm just going to go ahead and trim that off. We'll give it a quick seam set and press it back or roll it back. Okay. And then you want to make sure that your your points crisscross. So that's how I kind of keep track of which direction I'm going. And then we can draw this line. You can draw while they're stacked or you can do them all in a pile. Either way works. And stitch right on that line as well. Okay, I can do that. I think yes, I think so, too. I think you're a pro at that. We've done it a time or two. I think snowballing a corner is something we're pretty darn good at. Just comes with all that practice. That's right. All right, I'm going to trim that off. We'll press it back. Okay. So, now we've got this bit for the middle and our print is going to go to our print. And we've got to add a little bit of fabric here. So, these are 2 and 1/2 by 3 and 1/2. And we're going to put those just like so. All right. And that creates the top. So, I'll hand these Oops. Hand these to you and let you stitch on both sides. Bet. Flip that around. Yep. And there's that one. Awesome. All right. I am going to go ahead and set these seams and press them. And then this is one of those times where if you are worried about finding your middle if you wanted to, you could, you know, fold it, do a little finger press, and then line that up with the center here. I don't get too stressed about it. I kind of eyeball it and I feel like if it's not off to my eye, nobody else is going to notice either. So then that can just be stitched right on there. Okay. And then we will add the rest of the sides and this block will be complete. It's so fun. It goes together so fast. It really does. And the next block is really just as easy. It's awesome. Well, maybe a tiny bit harder. Just like one or two one or two steps more, but it's a really great secondary block. It creates such a beautiful chain that just like frames each of these presents so beautifully. I think I think it turned out just gorgeous. Oh, thank you. There you go. All right, I'm going to give this one another another set. set the seam and roll it roll it back so you can see. And I think I'm actually gonna go ahead and roll that the other direction because there are a lot of times I find that when my fabric has a bunch of seams, it wants to lay opposite. Yeah. A certain way that is not quite necessarily what I had in mind, but we'll do it. All righty. So, we've got the main part of the block done. So, now we're just going to add a couple of more sashing pieces. So, we have one that is oops 2 and 1/2 by 10 and 1/2. And that is going to get stitched right along the bottom. And then we've got two more strips that are 2 and 1/2 by 14 1/2. And those go side to side. And once you've got that stitched up, all of your block A's are done. You got your presents. I love it. All right. So, let's move on now to the secondary block. I'm going to set these aside. We'll stick that over here. All right. So, this is our block B. And a lot of times when I'm building out a block, I like to start from the middle. So, we're going to start with our little pin wheel in the center. And you're going to want to have some of your fabric sorted so that you have um coordinates that work together. Cuz if you'll look closely, you'll notice that the pin wheel stretches out into the next section. So, you'll have some that are um also pin wheeled and then the other piece is just going to be these 3in squares. Okay. So, let's just start with our little half square triangles. So, we should have one of each of our prints, which would be like you your contrast can be whatever you like, whether it's a light and dark or um small and large prints, you know, those kinds of things. So, we're going to put these right sides together, and then we're going to do the make four where you sew all the way around the outside edge and then cut it diagonally both directions. Okay, there you go. Got it. And I'm going to get the next piece ready for you because we're going to do the same thing with our background fabric and our black print. This one right here. So, we'll do them both at the same time, but we're going to come back to this one in a minute. Perfect. There's my last seam on this one, and then I'll be ready for that. All right. There we go. Excellent. So, I'll give you that one. Okay. So, then what I'm going to do is cut this diagonally in both directions just sort of lining up with the corners so that I cut through those seams just like so. And then we're going to use our clearly perfect to square these to 3 in. So, we'll line that up on the seam. And I'll show you a little hack. We've shown it a few times before, but I feel like sometimes it's good just to see how that works. So, with this, you can do Oops, I missed that one. Thought I cut it. With this one, you're getting them, you know, cut all at the same time, and they all come out beautifully. But if you wanted to save yourself those two diagonal cuts, you can just use your trimmer B by lining it up on that stitch line and then cutting um cutting them right out of the middle. Now, you don't have a ton of like extra room here. So, you just want to be careful not to cut clean across. Right. But that does save you a bit of a bit of time. I'll start pressing since you have some to square there. Well, I actually have most of mine already pressed. So, um, if let's see. I've got all these little pieces here, like a grand cooking show with all of the all the ingredients prepped. All righty. So, what we're going to do is put this together, and you just you get to decide which way your pin wheel goes. Um, so we'll line this up just like this, keeping our points to the middle and alternating our fabrics. All right. And then we're going to add our next set of half square triangles. This is this this you just choose a print whichever one you want it to be. Sure. And then that lines up with that to create that like lemon moar diamond. Whoops. Not that one. So these line up just like that. All righty. There we go. I've got to keep my directions straight here. It's like turn turn. Yes. Turn it till it works. Okay, then this is where it gets really easy. We're just adding more 3in squares to create these borders. So, we've got a 3-in here of our background that's uh sets next to that. Let's see. It's over there. I was like, I thought I had all four. Okay. And then it's time to put in our other print. This is that second color which helps create the movement as it like kind of flows around. I think it looks really cool. Again, these are just three inch squares. Okay. And then once you've got that sewn together, and I would go ahead and do it, you know, you can do like little two sets of two and join them together. Really, it's whatever you're most comfortable with. You can start from the middle and go out. Yeah. Whatever method makes you happy. And then we're going to add our our um little border piece that makes it look like it's all sashed and it gives all of those little chaining things something to connect to. So again, these are going to be 2 and 1/2 by 10 and 1/2. And they're gonna go all the way around the outside edge. And you're gonna do a top and bottom and side to side. I'm gonna get these out of the way because they are just driving you crazy. In my way here. Okay. And then because our strips are 2 and 1/2 in wide and we want it to add up to the same size as this other block, our cornerstones here are 2 and 1/2 in square. Okay. So this is the only same size as the block. Yes. So, keep keep your your um your little sizes in different stacks cuz you will have some threes and some two and a halfs. Good call. But then these are all like the little extra pieces that you get when you cut your 3in squares from those 10in squares. You're going to have like a strip that's not quite big enough to make a third, whatever, you know. So, they are all going to be scrappy and you can just place those in whatever order and patterns that you like. And just like that, once these are stitched together, your B block is done. So pretty. They come together really easily and look so good. And so I wanted to talk a bit about this. So I wanted this design to have a complete square so that each corner had the little pin wheel block in it and then all of the little presents were framed up. So we start with a B block and then it's a B and an A and we do five across and then we also do five down. So that's and there there is no um there's no sashing. So you can see how these just connect together and there's no inner border. I love that. I did add a really nice 5 in outer border though. And this is what that beautiful backing looks like. I think it's so Yeah, they're kind of they almost look a little bit like that cute antique Santa. And then oh we do have some cute little tags. Always love to add those. So, this machine quilting pattern is called Holly. I think it's called Holly Simply Holly or Holly Simple, something like that. But it's a it's a really beautiful Holly pattern. It comes together great. And because I have this darker background, I thought it would be really fun to use a bright color. I like to add that green. All right, so this quilt ends up being 79 square, which is a great size for picnics and playtime and magical Christmas forts in the summer. Great. And I think these quilts would be great in any kind of birthday fabric or Mother's Day fabric or whatever your favorite fabric is. They're just fun. They are super fun. And you know, since it's only July, you have plenty of time to stitch them up for Christmas if that is your plan as well. Absolutely. All right. Well, I think we've put together two really great quilts using the present block. I think so, too. Hopefully, you guys enjoyed this and we gave you a little bit of inspiration and we will see you on the next double take. Have a great one. Bye. Hey, quilty friends. We are so excited. We have something really special to share today. That is right. Believe it or not, we have a million subscribers here on the Missouri Star YouTube channel and we are so excited. Yes, it really is unbelievable. I know when we first started our YouTube videos years ago, we never imagined that we would have a community this size and this wonderful. From the bottom of our hearts, we just want to thank all of you for being a part of the Missouri Star family. That's right. Thank you so much for joining us on this wild ride. We are so excited to have reached a million subscribers and we are going to have so many more quilts and so much more fun in the future. I can't wait to see what happens next. I can't either and we hope that you will join us for the ride. We'll see you later. Bye.