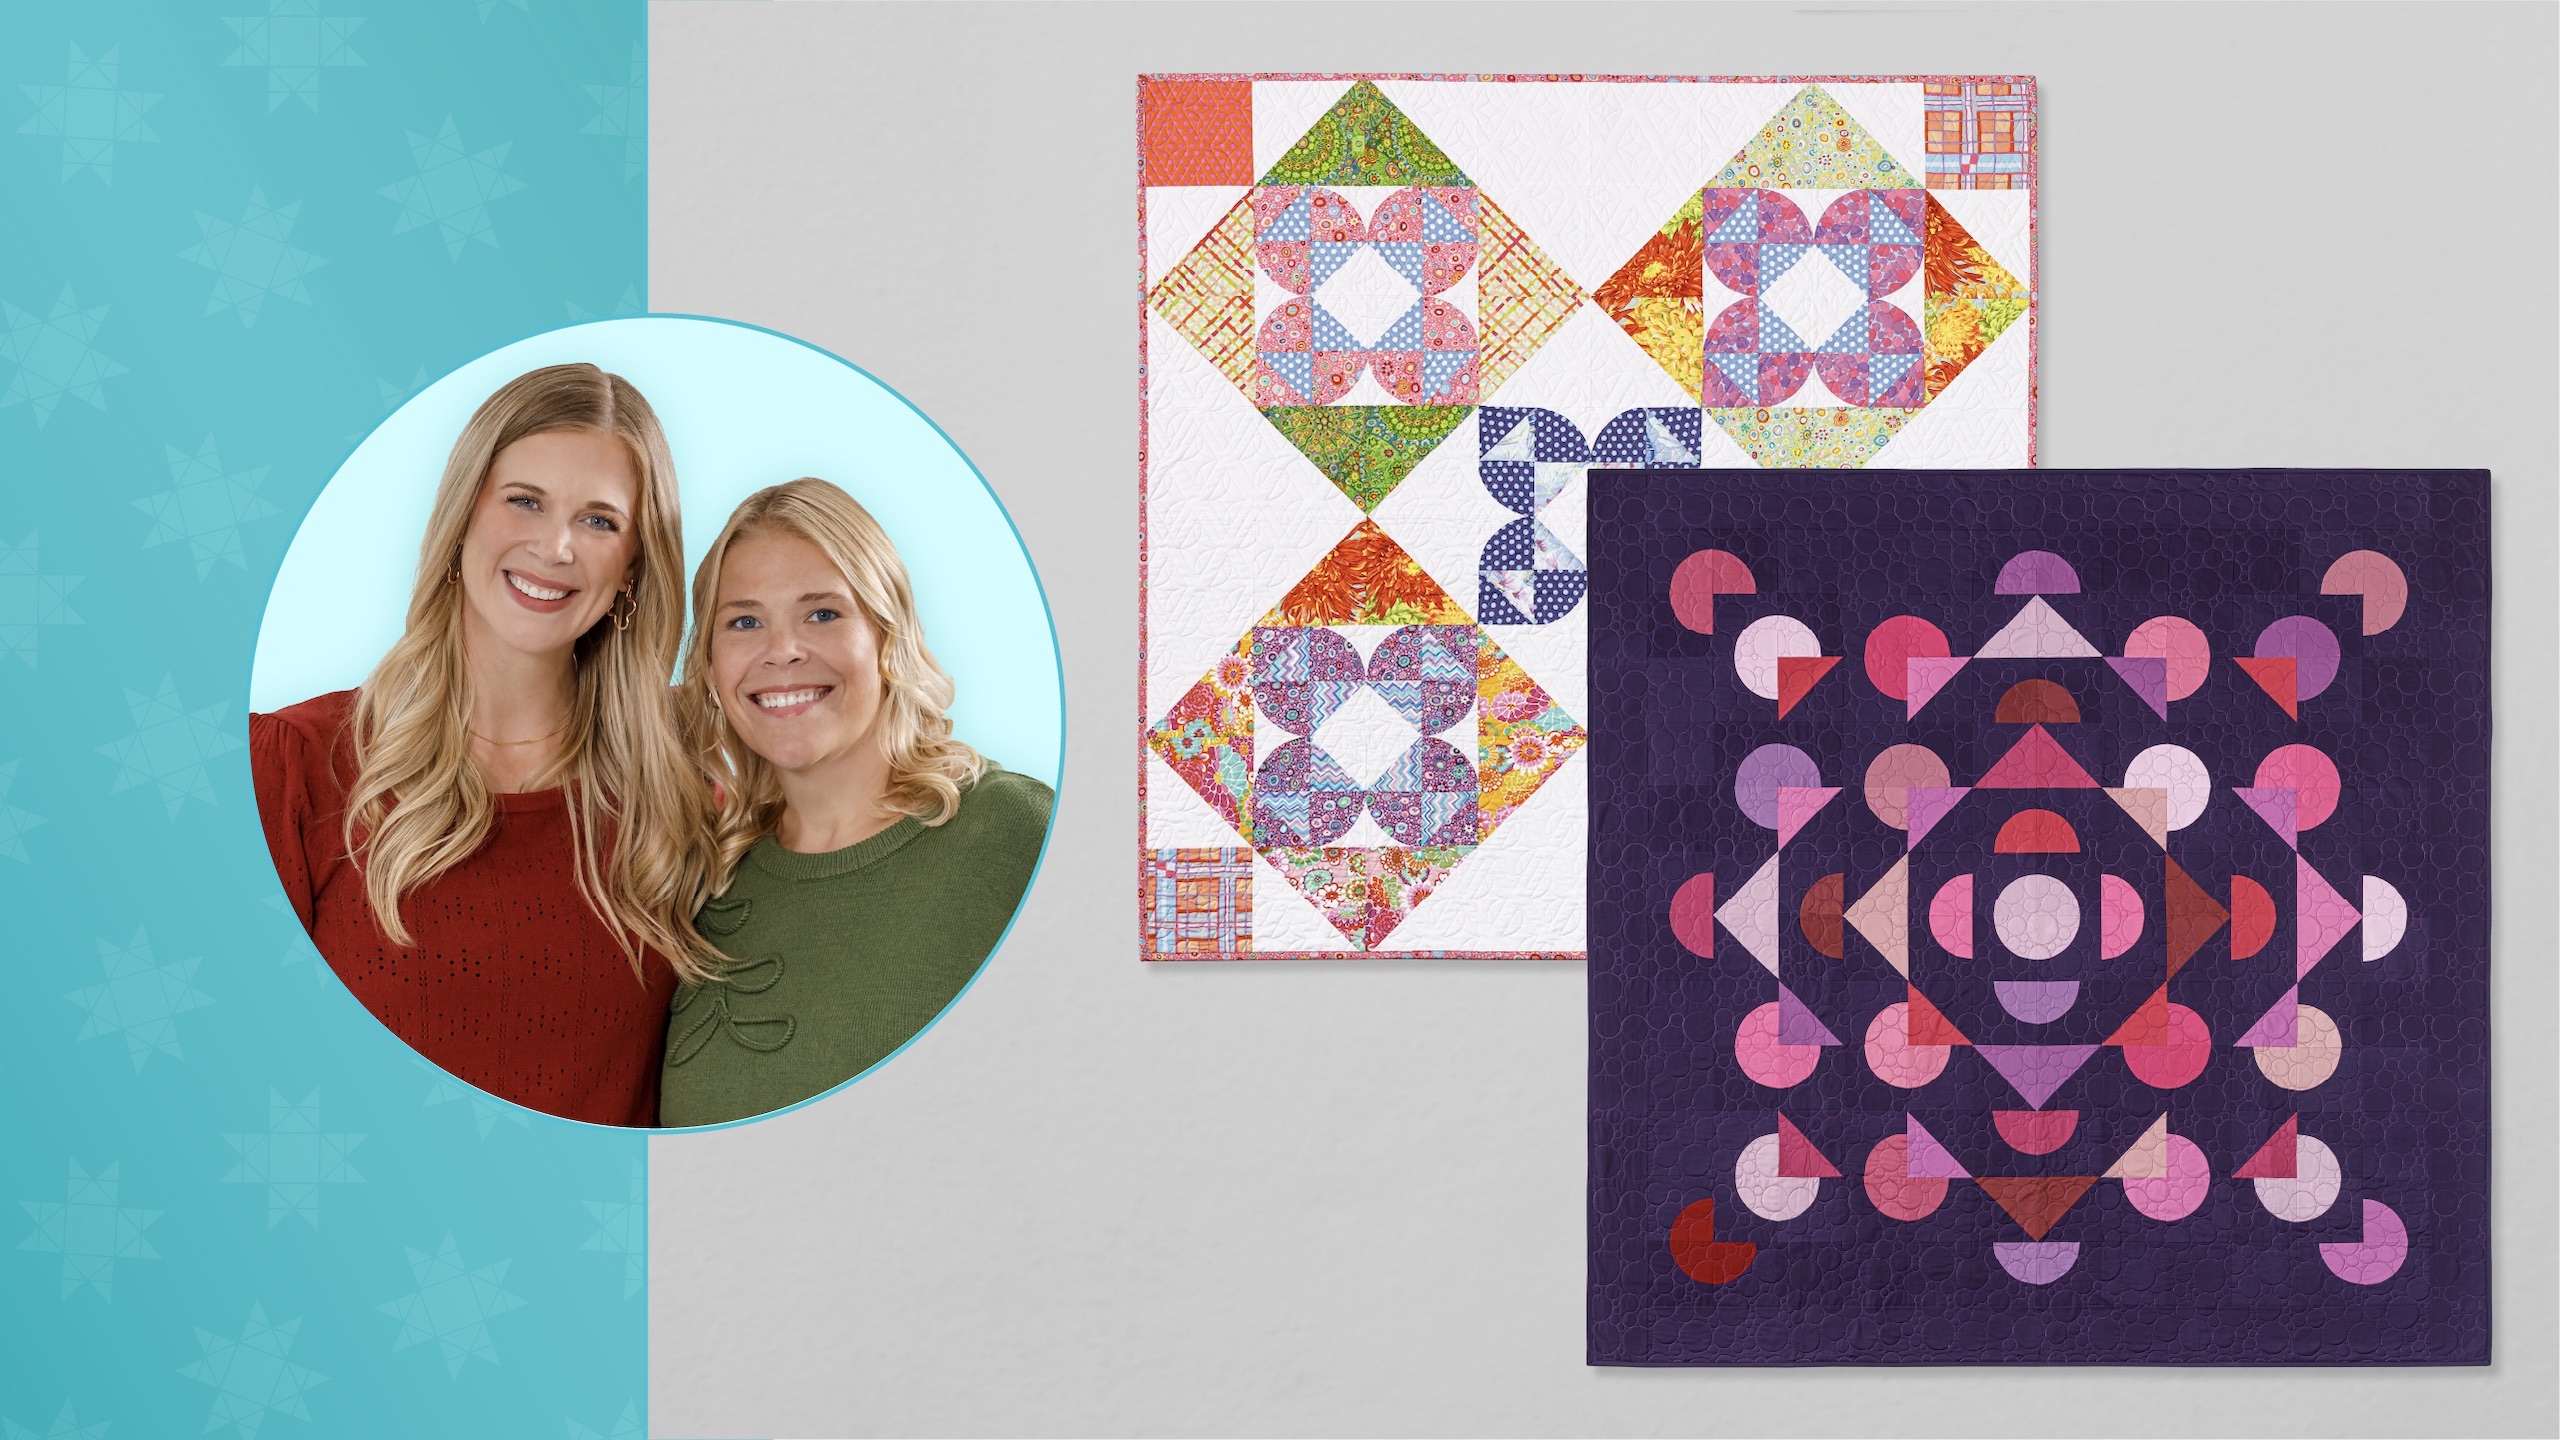
This December Double Take puts a joyful spin on the classic Drunkard’s Path block! Natalie and Misty each stitch their own version using two very different fabric collections. Same curves, two completely different moods—see how fabric choice transforms this beloved block!
Natalie is the host of Quilting 101, Embroidery 101 and the Creative Strategist and Editor of Block Magazine at Missouri Star Quilt Company. She was taught how to sew by her mom, of course, and began quilting when she grew up.
This December Double Take puts a joyful spin on the classic Drunkard’s Path block! Natalie and Misty each stitch their own version using two very different fabric collections. Same curves, two completely different moods—see how fabric choice transforms this beloved block!
How long is the tutorial video?
The tutorial video is 00:32:02.
Are supplies listed for this tutorial?
Yes. The tutorial page includes the supplies and materials connected to this project.
Video Transcript
Hi everyone. I'm Natalie and I am here with Misty today. Hey guys, we've got Double Take for you and we're excited. It's going to be fun. That's right. This month our challenge block was the drunkard's path. So, we'll be using our drunkard's path template and we have two great quilts to share with you. Let's get started. All right, so I'm up first. My quilt today is behind us on the wall. I'm calling it Moonlight Walts. And I just think it's really fun. It's beautiful. I really love it. Thank you. I love that I was able to use solids this time. That's one of my favorite kinds of quilts to make. I know. We both love working with solids. Well, I feel like that's part of the joy of quilting is that so many different fabrics can make the same pattern look completely different. Totally. Okay. So, to make my quilt, you're going to need one package of pre-cut squares. And I've used the ColorWorks tiles in Jamberee. You're going to need some background fabric about 4 and 1/4 yards. And I've also used this same fabric for the outer border. You'll need a yard and 5/8 for that. And you can use the same fabric or different. That's entirely up to you. Um, for your backing, you'll need 7 and 5/8 yards of a vertical seam. Or you could get 2 and 5/8 yards of a 108. You're also going to need some other tools like our drunkard's path template sets and also a trimmer tool for those half square triangles. So, whichever your favorite is, that's it. And so, the rest is easy peasy. All right, let's do it. Okay. All right. So, the first thing we're going to do is cut some background. So, you'll notice I've used this beautiful dark purple, and it just makes everything stand out so nice, and it's it's really, really fun. This is one of my favorites. Okay, so we are going to cut a 10-in strip and a 6 and 1/2 in strip. And those are really the sizes you'll need to know for the entire quilt. Perfect. It's It's just so easy, you know. But you get a quilt that I feel like it has a lot of um a lot of visual impact. It really does. It's It's quite stunning. Thank you. You bet. I always love a drunkard's path quilt. I just do. I hope we put it on next year's schedule, too. No, we always enjoy it. I feel like there's so many possibilities when it comes to that. Yeah. All right. So, from our 10in strip, we're going to subcut these into 10in squares. And these are going to be used to make all of our half square triangles. So, we'll cut these and set them aside. And then we're going to cut a bunch of 6 and 1/2 in squares as well. And those go in the quilt as um the background side of our drunkard's path, but also as several blocks that create a little bit of negative space around that outside border. Perfect. So, that is what we're going to do first. We'll get these cut and then we'll start on those half square triangles. All right. We got to do six and a half. So, this is five, six, and a half, I think, will work, right? Mhm. Yeah. It's always a little bit tricky. Make sure everything stays lined up. Okay. Is this right? One, two, three, four, five, six and a half. Yep. It's always better to double check than to cut and have have to use that in a different project. All right. And go ahead and subcut these. Sorry, I'm concentrating here. You are just fine. I'm actually going to slide that over so I have more space. little five six and a half. And then I'm going to open this up and get my last cut. There we go. Perfect. All righty. So, to make our half square triangles, we're going to pair up a background square with our print or our pre-cut cuz these are solids. So, technically not printed, but it's going to act as the print. So, if you wanted to make this quilt using a print, that's that's where those differences come into play. So, what we're going to do is pair these up and we're going to stitch a quarter of an inch all the way around the outside edge. Okay? And if your precut is a little bit different than the blocks that you cut yourself, just center it up and don't worry about it cuz we're going to square these up after. Perfect. So, we'll sew all the way around the outside edge. There we go. Perfect. All right. So, now we're going to cut this in half corner to corner. And I'm going to do just one corner because well, I'll do them both. Never mind. There are lots of options for for uh getting your half square triangles out of this. And one thing you could do if you wanted to is just align your clearly perfect ruler and cut it out ahead of time cuz you'll notice there's not a lot of um not a lot of difference in these cuts. And that would save you making those cuts ahead of time. So it just saves four cuts. And when you're squaring up, four cuts is a lot as it as it adds up or two cuts even adds up over time. So, we're using the 6 and 1/2, which is the largest size on this tool, and lining up the dashed line with the seam line, and then just notching our little corners down there. You want me to press those? Um, sure. That'd be great. Okay. So, I'm going to go ahead and get these squared up. Press them open. Thank you. I need that. And then you'll notice in the quilt we've got several sets where you have two matching half square triangles here and then the rest of them are just um singles. So wherever you want to put your two matchers, you'll want to keep those together for when you're ready to lay out the quilt. But then the rest of them can just go into a pile and you can uh you know distribute them evenly or however you want to arrange your colors. All right. I'm going to have to make sure it cuts all the way through. I feel like I had some little threads that stayed connected on that last one. Okay. One more. There we go. Oops. Perfect. Awesome. Okay. Thank you. Those. You're welcome. All right. So, those are ready to go. So, now we're going to take our 6 and 1/2. And this is going to become this is the background for our drunkards path blocks. And we're going to line up with the 6 and 1/2 here. and go ahead and cut our little inner curve. So, those are ready. This just gets either put in your scrap bin or saved for another project, whatever you decide to do. And then we'll grab our um our technically our print or our the solid that we're going to use for the inside of all of our drunkards path. And we're going to cut this in half both directions. And you'll do that to whichever colors you decide to use for those drunkards path blocks. So yes, we can cut it in half, but I also want to show you another little hack if you are brave and willing to cut through four layers at a time. I was going to say that's how I'm going to do it because I need my middle. So I'm not going to cut them in four. So what what I was going to suggest was just folding it in half and in half again. Give it a good press. You can press it and you can just set that on there. It's got plenty of room. You don't have to worry about having your edges aligned and you can just cut this whole thing all cut all of them out at once. That's how I do it. So, are you you're saving this middle part for something? Yes. Well, I can't wait to see what. That's going to be very fun. All right. So, these are all cut out. Um, or you can just cut them individually. You can stack them. You can line that up with the corner and just cut the curve. Whatever is most comfortable for you. Whoops. There's really not a wrong way. You know, they work just fine. Exactly. All righty. So, now we're going to we're going to stitch these together. And this is where you need to be patient and just take your time. We're going to line up our middles just so that we know we have the same amount of fabric distributed evenly on both sides of your curve middle. And I just do that by a little finger press here. And then the other thing I do is I finger press this in the opposite direction so that I can have like that concave convex um the little join in the middle that helps everything stay in place. So it's going to line up like that. But we're going to set it in just like this. And then you'll align it there and drag it around. You can put a pin in if you want or a little wonder clip. Here's a little pin. Do you prefer the pin goes in this way or the other way? That way. Which way? With the head on this side. Okay. So, like like so. No. But that's okay. We can make that work. How did you want it? The other direction. Like that. Yeah. Okay. But it's all right either way. No kidding. It's fine. Like I'm I'm good to do however. Okay. Yeah, because then I can pull it out with my right hand and just put it right in my little pin dish. So, the other thing I want to show really quick is like if you're wondering how to line them up, you line it up kind of like this to start with. And then as you go along, you're going to curve them together. I I always think of it a little bit like merging traffic, like a zipper merge. You know what I'm saying? Yep. So you're just like this car and then this car and then you know and you're making stitches and joining the whole line of of fabric traffic if you will. So that's how that looks. But we're going to stick the pin here in the middle to keep our fabric even on both sides of that. And there's so many ways to approach these curves. I actually rarely pin. I just use those marks as a place to line up as I go. Me too. I watch it and make sure that they stay pretty close together. So you can take that pin out if you'd like. Yeah. It's not going to bother me. This is a large enough curve that it's okay. But see, I've just pulled this around just like Natalie mentioned, right? And we're going to line this top little edge up straight. And then that's where I'll start stitching. The other thing The other thing I'll say is that um mom or Jenny, she always says when you're getting ready to try a new block, pick the fabrics that you like the least and do some practice blocks. see if see if you can, you know, if you enjoy it, make your sample and then have that sample sit on the table so that you can pattern all the rest of your blocks after it. But if you do make an error, it's not on your favorite fabric. It's on your least favorite fabric and then you probably wouldn't have to use it in the quilt if you didn't want to. Exactly. So, I feel like those are those are good little helpful hints and advice that it gives me a little bit more courage to not be nervous about messing up. Well, and it's a good reminder because I think when we get a pack of fabric, like our go-to is to grab the one we love the most. Of course, it's so pretty. That's the one we want to play with. Definitely. So, all right. So, now I've got just a little bit left here at the end. I'm going to make sure that my two ends line up just the way that my beginning did. Perfect. And then we'll just sew. A lot of people use a little dot of glue at the beginning or the end. And then the other thing that you might want to have is like a stiletto. Some people like to use that to try and push the fabric through um under the presser feet so you don't get your fingers too close to the needle. I've got these nails so they work basically the same. Just be careful. The Okay, so my other favorite thing about drunkards pads is when you press them, they just lay down so flat. It's so satisfying. It's very satisfying. All right, got that pressed nice and flat. And now that we've got these blocks done, the whole rest of this quilt is layout. Okay. So, you can tell up here I've got little sets that come together where I have two matchers. We have a four in the middle. And and you can put this together in four identical quadrants or you can lay the whole quilt out. It's completely up to you. Um you could even make your own completely different design with these components if you wanted to. So you'll see here that we've got like a 3/4 and then we have some negative blocks. These are just 6 and 1/2 in squares that come from your background. And then we have a half and then the negative space and the 3/4 again. So in this next section down they the half square triangles sort of set in into the circles and then they come together and it all kind of starts in the middle and bursts out. The quadrants are the same. This quilt is square. It's 83x 83. And I'm going to step back and let you get a good pan of the whole thing because the layout is really the fun part. I I think it's super fun to to decide where your colors go and sort of create this burst effect. So, you're going to get this all laid out in the color placement and the the the layout that brings you joy. And then just sew it all together. You'll add a good 6 in border that I I use the same as the background. I feel like it just expands the negative space and makes it look really, really great. Um, but that is, you know, obviously a design decision. You can do whatever you want with your border. Ours is 6 in. I went ahead and quilted it with this pebbles in a beautiful purple color that I think complent the quilt really nicely. And the backing is this beautiful fabric, which I feel like just really sets the whole thing off. It all goes together. It looks like pebbles, too. It does. It does. It's really pretty and fun. I enjoyed making this quilt. I hope it's inspired you. And I think you're up next, Misty. That's right. All right. So, this is my quilt. I called it Flourish. It's so cute. Thank you. I think it's funny how we both kind of used drunkard's path and half square triangles and got you know a very different result. That's right. So, to make this quilt, you are going to need one package of 10in squares and I use this beautiful uh K facet collective for free spirit. You're also going to need three yards of background fabric. I just use this white. For your backing, you need four yards with vertical seams or two yards of a 108 and 5/8 of a yard for your binding. And it's also helpful to have this Clearly Perfect slotted trimmer A2. It just gives you a little bit more size range. Yep. And you could use that for my quilt as well cuz it still has that 6 and 1/2. Exactly. It just goes all the way up to 10 and 1/2. And then of course you'll need the drunkard's path template. And if you have a little 5 in square, it will be handy, but our regular 5x15 will work as well. So, let me show you how to make it. So, to begin to make our petals, so all of these little shapes that you see here, you're going to need two matching 10in squares. So, just pick two prints from your pack that are the same. And then I am going to do that little trick that Natalie showed and we're gonna fold this. I am gonna be as precise as I can because like I mentioned, I want to use that little leftover in the middle. Okay. So, I'm going to fold this and give it a press and fold this again. Trying to keep my outside corners all in a line. And then if you want to nestle in this corner here. Okay. And cut out our drunkard's path. I'm gonna do the same thing with this one. Sure. Okay. So, she's cutting out four at a time. If for some reason it bothers you to cut out through four layers, you could just carefully line up each corner of this 10in square and just do one at a time. Excellent. All right. So, I'll press this one for you as well. And so this is going to give us eight of those inside curves. Okay. So if you want to cut that one. I'm very excited to see what you do with the middles. I'm just, you know, using up every last bit of our fabric. So now I can open this up and press it. Mhm. And so now I'm going to take my little 5 in square and I can fit it right inside here. Oh my goodness. Okay. and get another 5 in square. That's cool. And so then it just eliminates some of my waste. Yeah, that's so great. I was pretty excited when I figured out that this would work. Yeah. So, but it is tight. So, you can see why it's important that you do need to go as close to the edge as close to the edge as possible. So, there's one. That's so cool. And then we'll do the same thing with this one here. Just get it nice and flat again. And we'll cut out our five inch square. And you can see it just kind of nestles in there. Yeah, just barely. Just barely. There we go. So, probably if you were just a tiny bit off it, as long as it's within that quarter of an inch, you're okay. You're going to be fine. Yep. Cuz that little one there is a little wonky. I might have just cut it crooked, it looks like. Yeah, it's it's okay. Yep. There we go. All right. And so very little waste from our two squares. Yeah, that's very cool. Pretty fun. All right. So then we have these. And then the next thing we're going to do is we are going to go ahead and make our outer curves for these. And so that I just have a 5 in square. And we're going to use the 4 and 1/2 So, I'll line that up with the outside edge here. Okay. And we should be able to get two of these, if we're careful, out of our 5 in square. Yeah, there we go. There's one. And then, Nat, if you want to sew this one. Okay. So, same idea that Natalie showed us before. I'm just going to press the middles of both. And all of these are going to get a background added. But I have some done already. So I'll just let you sew one. Okay. And so this will line up like this. I always kind of consider it like a little skate ramp. Yeah. And then we'll pull around and match those middles. Okay. So there you go. Thank you. Let me go ahead and cut another one just so you can see how we can get two out of that five inch square. And so you're actually going to need eight of these for each block, but I've done a little bit of the sewing ahead for us. Excellent. And I go nice and slow. Just take your time. Well, and especially on these 4 and 1/2 inch drunkard's path, this is where I find the the little dab of glue to be really helpful because it's such a tiny bit of fabric there at the start and end. Mhm. And so having that little dot of glue to hold it in place makes a big difference for me. But she's just taking her time. Yep. Don't mind me. You're That's how it goes. Just going nice and slow here. Stitch off the edge. Oh, there it is. Perfect. And these are just so satisfying because you look at it and you're like, I have no idea. What did I do? What did I do? And then you just roll it back and it all just it looks okay. It looks great. Looks beautiful. And so you're going to do all of your curves that you cut in that exact same way. You're going to add your background so that they're all ready to go. Okay? And then we're going to take an accent 10in square and that's what's going to add these little middle half square triangles to all of our blocks. And so for this one, we're just going to cut it in half both directions so that we have four five inch squares. There we go. Started to shift on me. I think our mat is getting a little um the mat or the cutter. Yeah, because I have a bunch of little threads that aren't cutting. There we go. All right. And so with two of these, I'm going to pair those up with the five inch squares that we cut from our middles. Okay. And so we are going to draw a line. Let me get a pen here. Well, there's a pretty good press line, honestly. Pretty well pressed. I think I could use that. Okay, we're sew on either side. Exactly. Okay. Of those two. Perfect. And then I'm going to pair these other two up with 5 in background squares. And I will draw the line on these. There we go. Perfect. Then I'll let you do the same thing with this set. Okay. on both sides of the line. And then I can trim these apart. And I'll use my ruler to cut in between. And then we're going to use that Clearly Perfect slotted trimmer to square these to 4 and 1/2. So, lining up the stitch line with the dashed line on the ruler and cutting away our excess. There we go. All right. Can I press some open? Sure, that'd be great. Okay. I should have grabbed him. You're all right. And then let me switch here and we will do the same with our squares that are paired with the background. Oh, did this one get squared? Probably not. Okay, cuz I have some already ready, so I was just kind of skipping ahead. No worries. There we go. We can always square that up with the five inch square. Exactly. There we go. Yeah. Here I can show that one. If you don't have this special trimmer, then I can lay my 5- in ruler. I know I want to get 4 and 1/2. And I'm just going to keep this 45 line right on the seam. We'll just trim that. Easy peasy. And then flip it around. And they always look so good, too. Yes. So satisfying. There we go. So, it works either way. You just want to square it up. All right. And so then let's go ahead and put all of these components together. I have some different fabrics that I pre-soed here. But then what we're going to do is we're going to take our two styles of half square triangles that we made. Remember, one's with the background and one's with our same petal color and the accent fabrics are going to point into the middle here. And then our petals or our drunker's paths will come in like so. And so that's how it goes. And we're going to sew it together like a four patch. Okay. So if you want to do that. All righty. And she should be able to just open those up. You want me to cut them apart for you? Sometimes that's hard to got that. Get in there. And then we will put these together like that. That's exactly right. Okay. And you just have that one little seam in the middle to nest. makes it super easy. Beautiful. Thank you, Natalie. You're welcome. All right. So then I will give this a press now. All those little seams. All those little seams get to go the way I want them to go. Here we go. Beautiful. And so you're going to make four identical quadrants like this for each of your kind of flower blocks. So I have the other three already sewn here. And then now we're going to put those together with our background half square triangle to the middle. So that's what we're looking for. Just like so. That's so pretty. And that's your flower block, excuse me. Looks like that when it's all sewn together. So, super cute. And I just made five of those in the quilt. But then you can see I set it with these larger half square triangles. So, let's talk about that really quick. Let me just move this out of the way. So, for that, I just used most of the oranges from my pack or the greens. Those were the two that I picked and I just paired them up with a background 10in square. And we are just going to draw a line corner to corner here. My pen ran away. There we go. And we're going to sew on both sides of that drawn line. And then we will square these up to eight and a half. Okay. So, I'll let Natalie sew those. Satisfying to do something this big and have it just be done, right? I know. It's a combination of a little bit of intricate piecing, but you're only making five of those blocks, which makes it go really quick. Yeah. And then we're just setting it with some larger half square triangles. There we go. Beautiful. All right. And this Clearly Perfect trimmer is actually big enough to cut it in half, which is kind of fun to just only have to use the one. So, we'll switching back and forth between tools as often. And so, same idea as our smaller 4 and 1/2. These are going to be eight and 1/2. And so you do have quite a bit that you're cutting off, but that can go right into your crumb. That's right. So then you will just trim this away. There we go. And you'll do the same thing with all of the others. We'll just press this back. And I did keep them in sets of matching prints. So you'll notice like each of these sides is the same. So, I tried to pair up matching sets where I could, but I think all scrappy would be totally fine as well. Absolutely. And so, then the rest of this is really just all in the layout. I did trim down one of our 10-in print squares down to 8 and 1/2 so it will match with the rest of the quilt. And I did that in each of the four corners. I just like how it kind of rounded it out or like a nice little frame. And so then I sewed all of these sets of half square triangles together. And so then you have that then some blank 8 and 1/2 in background squares and continue. And then these rows are just wider, right? Because you have the larger sets of flying geese, your flowers and so forth. It's just all in the layout. So anyway, it came together super quick. It's 64 in square. I quilted it with diamond loops in this kind of light purple thread. And this is the backing. Oh, that's so pretty. that kind of traditional cave mandala. I really love that. And that's it. Super quick and easy. I called it flourish. And I hope you guys enjoyed it. So, we hope you guys enjoyed this month's double take on the drunkard's path block. That's right. I had such a great time. I love the drunkard's path. And if you don't love curves, just give it a try. It's easier than you think. That's exactly right. We're both hooked on them now. So, two fun new quilts using the drunkard's path. And we hope you guys enjoyed this tutorial from the Missouri Star Quilt Company. Bye. See you.