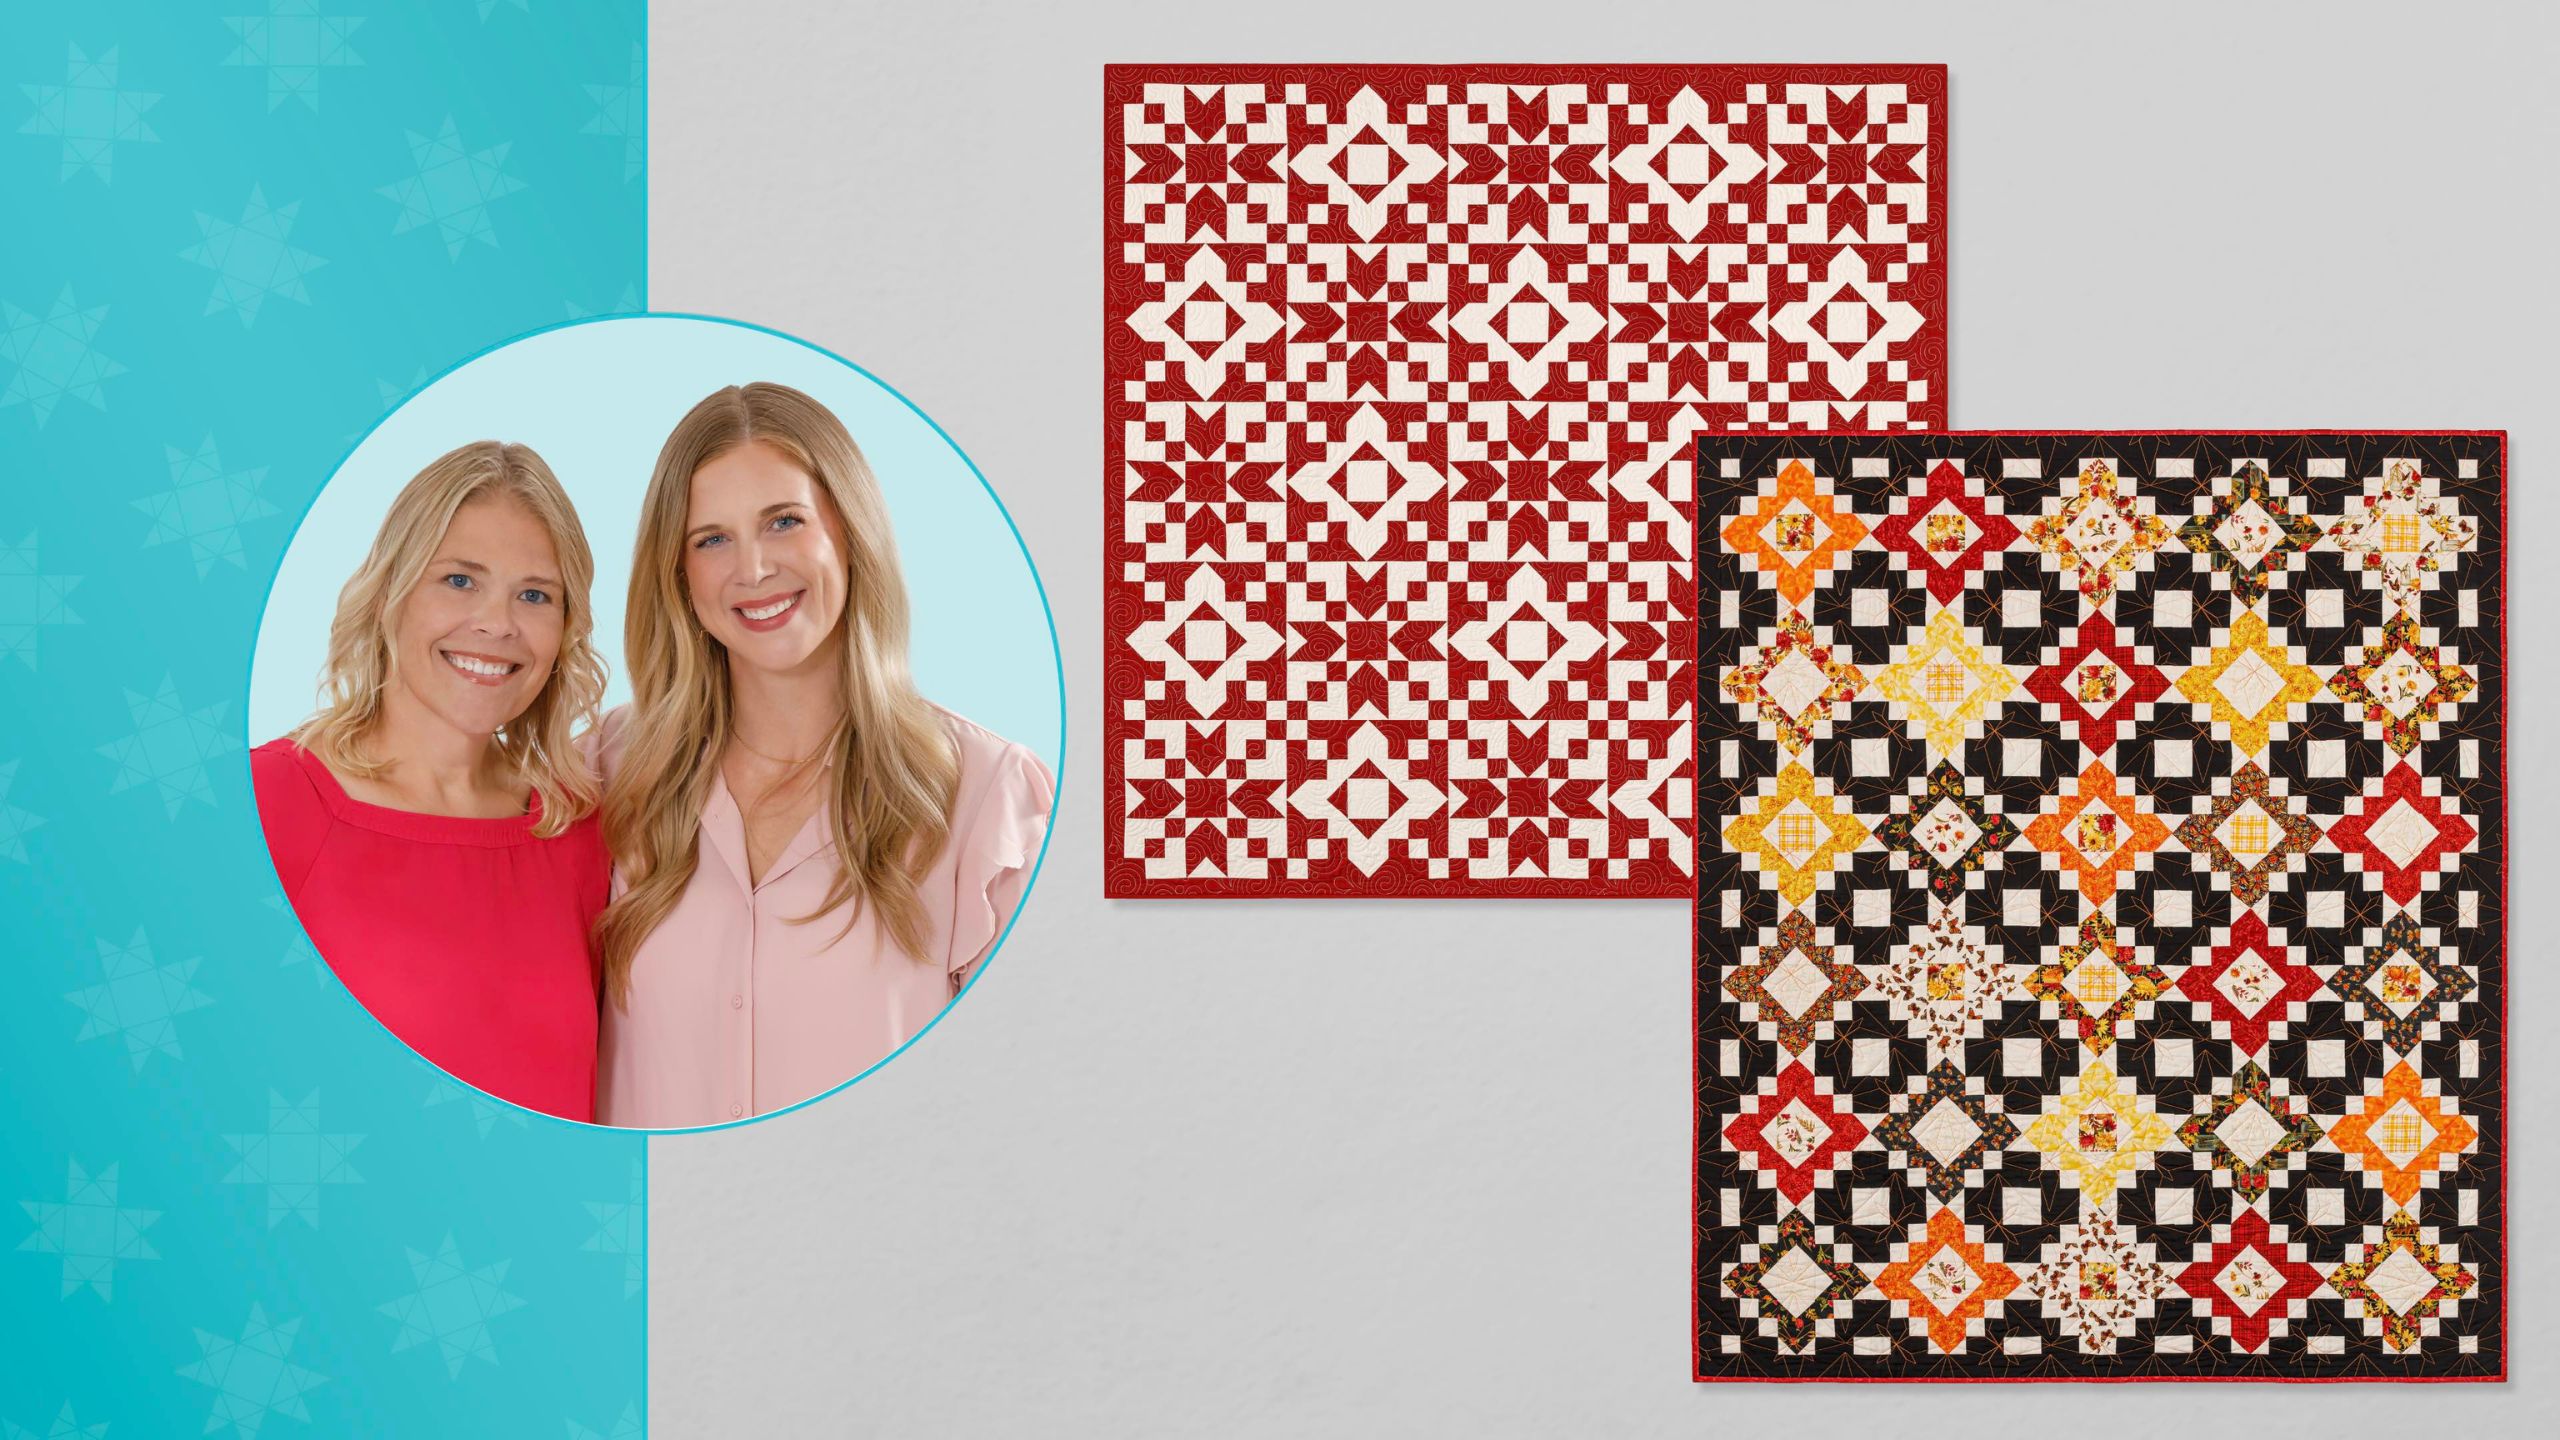
Same basic block, but two very different quilts. That's the magic of Double Take! This time, Natalie and Misty are both working from Mrs. Smith's Favorite quilt pattern by Missouri Star, and then going their own separate, spectacular directions.
Natalie is the host of Quilting 101, Embroidery 101 and the Creative Strategist and Editor of Block Magazine at Missouri Star Quilt Company. She was taught how to sew by her mom, of course, and began quilting when she grew up.
Common Questions
What is covered in Double Take - Mrs. Smith's Favorite?
Same basic block, but two very different quilts. That's the magic of Double Take! This time, Natalie and Misty are both working from Mrs. Smith's Favorite quilt pattern by Missouri Star, and then going their own separate, spectacular directions.
How long is the tutorial video?
The tutorial video is 00:32:09.
Are supplies listed for this tutorial?
Yes. The tutorial page includes the supplies and materials connected to this project.
Video Transcript
Hey everyone, it is Misty and Natalie and it is time for another fun double take. That's right, it's my favorite week of the month and this week we're working on Mrs. Smith's favorite, which is just a fun antique quilt block. That's right. Jenny did a tutorial of that originally and now Natalie and I have two fun spins to share with you. So, let's get started. You're going to like them. All right. Well, Misty, I think you're up first. I think that's right. This is my quilt that I designed. I'm calling it lantern glow. And it comes very pretty. Thank you. It comes together really quickly. And so to make this, you're going to need one package of 10in squares. I use this collection called Monarch Meadow by Nicole Tamarind for White Al fabrics. You're also going to need 2 and 1/4 yards of your accent fabric. And that is the black and the quilt that I made. And that includes your little 2 and 1/2 in inner border. Then from your background fabric, you need 2 and 5/8 yard. For your backing, you'll need four and two/3 yards with a vertical seams or two yards of a 108. And then I use this cute print for my binding. And you just need 2/3 of a yard. So, let me show you how to make it. So, this is the block. It is just one block for the entire quilt. I love that. And so, you'll notice in the quilt, I just set them straight together. But I really love this secondary shape that kind of forms here when you use that accent fabric. And so it gives you your eye kind of a nice place to land in between those blocks. That's absolutely beautiful. Thank you. So the first thing we're going to do is we're going to take one of our 10in squares and we're going to begin by cutting this into 2in strips. So a little smaller than we work with sometimes. Tiny little pieces. But I think it is the same size your mom used in the original. I think so, too. Yeah. So, there's one, two, three, four. And that'll give us one more. And so, I'm going to set one of these aside for now. And from these first four, I'm going to stack them up. and we're gonna cut them so that I have two inch by five inch rectangles. And of course, you don't have to stack all of yours if you don't want to. I just like to save a little bit of time. Yes. Just make sure they're lined up. They're lined up. Yep. And so I can just use the width of my ruler since it's five inches wide. Cut those in half. And now I have those ready to go. And so then the first thing we're going to do is we are going to go ahead and snowball these. And I'm going to keep them in two piles because we need to snowball half going one direction and half going the other way. Yes. So I've got some 2-in background squares. And we're going to start by putting them at the top. Uhhuh. Going opposites. All right. And then in the same direction at the bottom. At the bottom. So I'll go ahead and give you those. Okay. We can just stack them up here for you. All right. We just need to make sure that they're going line or you can eyeball it. Exactly. And we're just sewing point to point. Eyeball this one with two inches. It feels totally doable. Doable. Yep. Yep. But draw the line if you feel a little bit unsure of yourself. Yeah. And go nice and slow. And then this one I'm going to turn the other way because it goes opposite. Correct. Exactly. Okay. You've got it. And then I will take these back and go in the exact so exact same direction. So because this one was this way, it also goes that way. That's correct. Okay. Just want to make sure. I think mine is very similar. [laughter] I think that's what's so fun about doing these double takes is because we start with the same block as inspiration, there's always components that are similar. So once you know the construction, you can easily make both because they're, you know, Yep. They're all based on the same the exact same techniques. Yep. All right. All right. Perfect. Hopefully those are just how they need to be. They look right. And so my stitch lines are going in opposite directions there. And so now we can trim off leaving our Whoops. It's danger. Would you like me to press those while you're trimming the other one? Yeah, that'd be great. Okay, so we've just left our quarter inch seam allowance there. And she'll just roll those back. And when we snowball like this, this will keep our strip that same 2 in by 5 in rectangle that we started with. Hopefully that. There we go. Okay. I feel like with these the nice thing is as long as they are opposites you'll get what you need exactly and you need an equal number of each. So just keep them split. And so you will continue with your whole set until you have um opposites of four of each. Yes. And so we're just going to go ahead and sew these two together now to make our little kind of chevron arrow unit. I have the other ones ready to go. Okay. So, I'll just have you sew that one. These should line up pretty easily just because they're like the same length and everything. Yeah. Cool. Perfect. All right. There's that little unit. And so I'll just go ahead and give that a press, set my seam, roll it back, and I have three others already done. You need a total of four for your block. So, we have that part ready to go. And so, now we're going to take that last 2-in strip that we had, and we're going to sew that to a 2 in by 10 in background strip. So, if you just want to sew down one long side. Yep. Slipping on you a little bit. Yeah, sometimes it can be unruly. Yeah, I might have wh I misaligned them a little bit. That's okay. We're going to be just fine. No [laughter] problem. We actually don't even need the whole thing. So good. Well, because you've got other pieces prepped, right? Well, that and also we only need four cuts off of this and so we have a little bit of extra. That's nice. That's nice cuz they slid a bit when I was sewing, which I'm sure happens to nobody else but me. [laughter] It happens to all of us. All right. And so then now that I have this little strip set, I can go ahead and straighten up the end here just to make sure it's nice and square. Here we go. And then we're going to measure 2 in over. And we need four of these little rectangles. Now we're working on our little corner units of the block with these. Nice. And this little piece is extra, so we don't have to worry about that. Cool. And so then I'll set these aside for just a minute. And the next thing we're going to do is we're going to make some strip sets with our accent and our background. The first one is just going to be 2in strips of each color. So our background is with the fabric strips. Exactly. And then we'll just subcut these into twoin rectangles just like these. This one is a 2 in of your white strip and a three and a half of your accent. Okay. And so same idea. We'll just subcut those into two inches. I have those already cut. Excellent. So, those look just like that. And then the only other thing you need to cut is just an individual strip of your accent at 3 and 1/2 that we'll subcut into the 2 in by 3 and 1/2 in rectangles. So, these are all our pieces that we need. And so, we're going to begin by sewing one of our prints with this other little two patch. So, that those are checkerboarding. Okay. Like a little four patch. Little four patch. So, I'll let you stitch those first. Okay. And of course, if you're doing the whole block, you could sit and chain piece one after the other, but I have some ready to go. So, we're just going to make one little unit. Nice. Beautiful. All right. And so now we will give that a press. Should have set my seam and I had to fight with it a little bit. It's okay. All right. [laughter] All right. And so then now we are going to add this little strip. It's going to match up with the black on this side. I always keep the print up on the lefthand corner. That's what worked for my brain to make them all the same. And so we'll add that to that side. Perfect. Excellent. Love it. And this is one of those little units that's kind of easy to twist. So if you make one, check it with the pattern, and then kind of have that as your reference as you're building it. It can be helpful. So we'll set that seam, roll it back, and then the last thing to do is to bring this little unit, and it's just going to match up on that corner. All right. And make that little Yep. That'll complete our little pattern. Yep. Missed that seam. Perfect. Perfect. Really does come together pretty easy. It really does. Even though you have those twoin strips, you're not actually piecing a lot of tiny little squares together, so it's not too bad. There you go. All right. We'll give this a press. And there is our little corner unit. You're also going to need four of those. Love it. So, that is ready to go. And so, the last thing we have to do is get our little center square. And so, from a few of your prints, I use some of the lightest ones from my pack. Um, we're just going to subcut these into three and a half inch squares. This one is looking a little wonky to me. So, I'm just going to Sometimes they are. Yeah. I'm just going to straighten it out a bit. When they're factory cut, sometimes they just get a little off. Yep. But and we've got a little bit of extra here, so it's okay. Yeah. So, three and a half. Nice. There we go. Also, it can be really tricky when you're working with plaids or stripes because sometimes we get a little hung up on whether they're the lines are straight. That's so true. Yes. So, just do your best and don't worry too much about it because it's going to look fine ultimately. Absolutely. And so there is the little center of our block. And so then we will take these and we actually want the white part that makes the flying geese to go in towards the center. Just like that. If you flip it around, it'll make star legs. Mhm. Which is kind of fun. I think that um when mom did the original, it did make feel like that's how it was. And they're very cute. I love the versatility of just moving these units around. Yeah. So, don't be afraid to play with it a little bit because you never know what might come of that. So, then we are going to just match our prints in those corners. Just like so. And then we're just going to sew this together. Kind of like an offset nine patch. Our block looks just like that when it's done. I love it. It turns out great. And so I did five blocks across by six down. I just framed it up with this little 2 and 1/2 inch outer border all the way around. And I quilted it with this panto called Mexican tile in this orange thread. It's so cute. I really like it. That little bit of pop and interest. It finishes at 64x 76. And of course, I had to put those monarchs on the back. Oh, they're so fun. Who doesn't love monarch butterflies, you know? I love them. So, I think it turns out pretty great and it goes together faster than you would think. So, Natalie, you're up next. All right, I'm excited. All right, so this is my quilt. I am so excited that I got to use two colors. This is Nordic Star weave just because it felt very kind of Scandinavian, but um it's very fun for me. I ended up having a little bit of like a decision-making problem and so I get I guess I was trying to decide which way to turn things and I thought what if I use them both? I love it. It's so beautiful. It turned out even better than I could have expected. Okay, so to make my quilt you're going to need two colors and I have used porcelain and Marrakesh by ColorWorks Premium Solids. So, our background fabric, we're going to need 4 and 1/2 yards. And then our accent fabric is what we're calling our red. 5 and 1 eighth yard. And that includes our 2 and 1/2 in border. Okay. And then for your backing, you're going to need 7 and 2/3 yards with a vertical seam. Or if you're using a 108, 2 and 5/8 yards. Perfect. And that's it. All right. Let's start. This is going to be good. All right. So, this is the main Mrs. Smith's block that I used. And I I love that because I was able to use two color quilts with yardage. I was able to just resize it for 2 and 1/2 in squares, which works really well for my brain. I love the the way the math is, the 2 and 1/2, the four and 1/2, the six and 1/2. It just kind of all works together and makes the design easy for me. Yeah. So, this is block A. And then this is our block B. And you can see that they're made up with the same components, but what I've done is I've flipped a couple things and I've used my accents and my um backgrounds just in some different places. So they're very similar. They're both made up of really exactly the same types of units. So what I'm going to do is go ahead and teach this secondary block right here. Okay? And then I'll show the pieces of both of them at the end. Okay, that sounds great. All right, so we'll set this one aside for now. So, we're going to take our two colors and we're going to cut several different sizes. Um, so from our accent fabric, we're going to have some 2 and 1/2 in strips. We will have some 4 and 1/2 in strips and we will have some 6 and 1/2 in strips. And then those will get subcut into squares and rectangles. And then from our um from our background, we are going to have the exact same pieces, which I do have another one of these. Yes, a 2 and 1/2, a 4 and 1/2, and a 6 and 1/2. And then these get subcut into 2 and 1/2 in squares. We've got a a 4 and 1/2 in square for our center of each color. And then um yeah, two and a half by four and 1 halfs. Lots of different sizes. So let me show you now the units that we're going to be making for each block. Just going to set these aside for now. [clears throat and cough] So, this block is made up of the corner unit, which is this piece right here, and then I don't know what to call I never know what to call like the the cross. I called it like a chevron crisscross in the middle. I didn't know what to Right. Right. So, it's the chevron block. And these are the same pieces that make a Misty's quilt as well. So, if you Yeah. Just a different size. So, so we're going to make four of these and four of these. And the construction is basically the same. So, we'll start with our two. And these these pieces work for both blocks because we've got our red and our white. We're just going to rotate them to make them fit for our little four patches in the corners. Oh, that makes sense. And so, I've got this one already stitched together, but I will go ahead and cut two and let you stitch a little four patch for us. Perfect. All right. I do love that so much of this because it is the same colors and you're just moving things around. You're you're essentially making it all at the same time. Yeah. So, you'll get a bunch of these 2 and 1/2 in segments cut and then we will press them. We'll set our seam. Just press them to the dark side because that way they're going to automatically nest when we flip them and put them together. And all of your four patches can be made the same way because they're two colors and you can rotate them to be used in both blocks. That's perfect. So, we'll just set that like that. Awesome. I'll move that for you. We'll just line up that edge. Nest the seams in the center. Yes. There you go. Okay. So, we'll uh press this one back as well. Again, the construction really is so similar. We're just using different sizes, different size cuts. [snorts] All right. So, we've got our four patch and we're making it like this one. We we want them to be identical. So, what we're going to do next, we've also got a strip set just like Misty with the 4 and 1/2 and the 2 and 1/2. So, we will cut a 2 and 1/2 in segment of that. And then we also need a four and a half inch strip from our little four and a half inch strip. Yes, [laughter] you know the strip. Okay, I'm going to trim that a little big so I can straighten out the other end because it's not exactly straight. There we go. I love working with yardage sometimes just because we always have a little bit more wiggle room. That's right. I'll get that pressed back. And then this one is going to be And so these are all still just two and a half. Two and a half by four and a half. So this piece is going to get stitched either on this side or this side, whichever makes the most sense to your brain. Because then this segment here, which I set aside because I was going to There it is. I [laughter] was lost it. I was going to press it, but it's going to go right up here like that. So, it really doesn't matter which uh side you stitch it on as long as your cream goes up the middle for these ones. And then you'll notice on on the other block, it really is just opposite. So then your reds go up the middle, you know, same same type of thing. Exact same construction, just Exactly. All right. So, I will give you this and then I'm going to go ahead and just press this one back. Perfect. Actually, I might press it to the dark just because or to the light just so that it nests. Whatever you want. Yeah, I'll make that easy for you. Whoops. Darn it. I'm dropping things today. That happens, too. Yes, it does. I'm going to finger press that and then we'll add the top. Yep. I'll force this to go the opposite way. There we go. Perfect. Make sure that edge is nice and straight. There we go. Okay. All right. Oh, did I sew it to the wrong side? I did. Uhoh. I didn't pay close enough attention. Yes, we need our That's like my quilt. That's habit from making my quilt. Oh, cuz [laughter] yours go the That's how mine goes. Okay, so that was just my brain still in No worries. All right, so we are going to just take this out and try again. No worries. I always say whenever I'm teaching a class in person, Yeah. I always say there's not a quilt that I've made that I haven't used my seam ripper at least once. 100% true. And I feel like that that just tracks for so many of us, but we also get so self-conscious about it. We feel like, "Oh gosh, I did that backwards or upside down." And there's no reason to feel weird about it. Absolutely not. And it happens to every single person. None of us are perfect. Everybody who quilts, [laughter] and it's not it's not even about perfection. It's just like muscle memory or habit or something that you just do. So, this actually just goes like that. That's right. Okay. No problem. Yep. So, we'll get that flipped around. stitch down on that side and we are good to go. Lovely. Thanks, Nat. Yeah. All right. Make this go. It is easy when you're working with two colors to get them backwards. Well, especially because they are both so similar. You were very clear that I wanted this to chain and it didn't matter. My brain was still the other way. You're totally fine. [laughter] It's a good example of how easily though that like it can get backwards and it just happens. And then how quick it is to just No big deal. We'll just pick that out and do it the other way. Exactly. All right. So, we're going to make four just like this. And we're going to stack them and set We're going to flip them the right way and we're going to set them aside because next we're going to make our little chevron pieces. Perfect. All righty. So, those are ready to go. So, now we're going to work on this unit, which means we're going to need some 2 and 1/2 by 6 and 1/2 in strips. And we've got our big strip cut. I'm going to cut that a little big so I can flip it and trim off my salvage after. I just like to work with a bigger piece rather than trying to like just cut off the edge. I'd rather just, you know, it's going to be precise that way. Yes. And then I have a little bit of extra room there. So then I'm going to slide that over. Get my two and a half. And it looks like I have just a teeny bit extra up here. There we go. All righty. And then from our accent fabric, we're going to need four. One, two, three, four per set to do our little units. And we'll snowball them going in opposite directions. So let me cut a few more little 2 and 1/2 in squares here. And obviously, if you wanted to be really efficient, you could get all of your cutting done ahead of time and have it prepped and ready to go and then chain piece these like crazy because it goes pretty fast when you're actually in that in that mode, you know? It really does. Sort of the production mode. One, two, three, four, five, six, seven, eight. I had to cut all four because I only have that one. [laughter] And we are going to need them. Okay. So, we'll set that aside and we're going to do these two. And these ones go um in both directions facing in. So, as long as they're in opposite directions, we will be just fine, though, because they can they can flip-flop. Yep. You want me to start with this one? Mhm. That would be great. do that. Okay. And then this one, I'm just going to make sure I stay in the same direction. Yes. And then this one I'll keep close so I can make sure I'm going opposite. Right. Yep. Is that right? Yes. Yes. Okay. And one more. There we go. Okay. There we go. Awesome. All righty. So, I'm going to go ahead and trim these and press them open or back, whichever you want to say. Not open, not pressing the seam open, but pressing the the unit open, I guess. Sometimes I say that and it confuses people. Yeah, which is fine. I'm confused most of the time. So, listen, we're all just doing our best. [laughter] Yep. Alrighty. I love quilts like this where you have so many pieces that are that you repeat, you know, because you just can kind of get in that groove and it's that like zen process of quilting that I really of Yep. All right. So, these are going to come together just like so. And then we'll just stitch them right down that side. Perfect. Repeat to make four per block. Okay. And then the last thing we need is a little 4 and 1/2 in square for the center. And we'll cut that right off of our 4 and 1/2 in strip of background. Oh, you know what? I didn't line these up very good. So, I'm going to try to flip this over and make sure I can get these little ends from the other end to meet. Yes. No worries. I think we'll be happier in the end. There we go. That turned out excellent. Thank you. You're welcome. Oh, don't want that on my ironing board. Okay, just gonna press that. All right, so then we've got four of our middle blocks here and we are ready to lay this quilt block out. So, we'll start with our 4 and 12 in square in the middle. This one is that creamy background color. And then we will add our little chevron units. Oh, I've got these going the wrong way. this for this block, we're making that diamond shape. And you can see how if you flip them around, you've got a star. So, you could actually do this completely opposite as well, but uh this is how they work in this quilt. So, we have our little diamond that sort of makes that little square and a square on point. And then these guys go in with our cream facing in. And this is um pretty much identical to Misty's block. Very just in red and white. It's just a twocolor version of the same block. Exactly. And in a you know a larger size because we've got our two and a halfs instead of twos. So that is our first block. This block here which I believe in the pattern is block B. But I think it's it's a really fun one. So then to make this block, what we're going to do is make those exact same units but in a different color. So, I'm going to put them right on top so you can see how it changes. Yeah. So, we've got our corner blocks and you can see the difference. So, wherever the red is, that's where the cream is now. So, we've got our four corners just like this. And even with this, you can see just how like just using that makes it look different. There's there's so many options and you you know, you get to it and you're just like, I have to choose. I just have to choose. So, and then on this one, I went ahead and flipped these. So, we've got our star legs, which I think are so cute. I do love a star block. So, these are just a little bit different here. And I could have left the middle white because it does look good like that, but I went ahead and put a red center just like that. And now you've got this block. So cute. Isn't that great? I just love it. And I love how when you put these two blocks together, you get this really beautiful chain that runs all the way through the quilt and it just they just stand out so cool from each other. And it's very um it looks very traditional but also a little bit complicated, a little bit technical, and it's so easy. It's really beautiful. I just think it's like so striking in the red and white. I love it. So I put it together five across by five down. It makes a nice big quilt. It's 84 in square. I went ahead and added a 2 and 1/2 inch border just to frame it up. I thought it looked really great. I think it's funny how sometimes we come to the same conclusion without even having that conversation. So, this is the backing that we chose. And I just think it's really fun. It's this great red textured fabric. It's a 108. And I think sometimes when you've got a two-color quilt on the front, it's a really fun opportunity to just put whatever you want on the back. Absolutely. And it adds that much more texture and interest. Oh, our quilt pattern here is called Marmalade. It's one of our newer patterns and I just think it's very whimsical and flowy. Turned out great. I'm really proud of this quilt. It It came out so much better than I expected. And really, you could use any combination of two colors and I think it would just look outstanding. I agree. It's gorgeous, Nat. Oh, thank you. So, we've given you guys two great ideas inspired by the Mrs. Smith's favorite block. Yes. It was really fun for us. I hope that you guys got some creative inspiration today and hope that you enjoyed this double take on Mrs. Smith's favorite from the Missouri Star Quilt Company. See you later. Bye. Hey quilty friends, we are so excited. We have something really special to share today. That is right. Believe it or not, we have a million subscribers here on the Missouri Star YouTube [music] channel and we are so excited. Yes, it really is unbelievable. I know when we first started our YouTube videos years ago, we never imagined that we would have a community [music] this size and this wonderful. From the bottom of our hearts, we just [music] want to thank all of you for being a part of the Missouri Star family. That's right. Thank you so much for joining us on this wild [music] ride. We are so excited to have reached a million subscribers and we are going to have so many more quilts and so much [music] more fun in the future. I can't wait to see what happens next. I can't either. And we hope that you will join us for the [music] ride. We'll see you later. Bye.