So many of life’s daily tasks are immediately undone: Clean dishes are dirtied. Weeds reappear. Groceries are gobbled. We’re like squirrels in a cage, racing on a stationary wheel. Good thing quilting is forever!
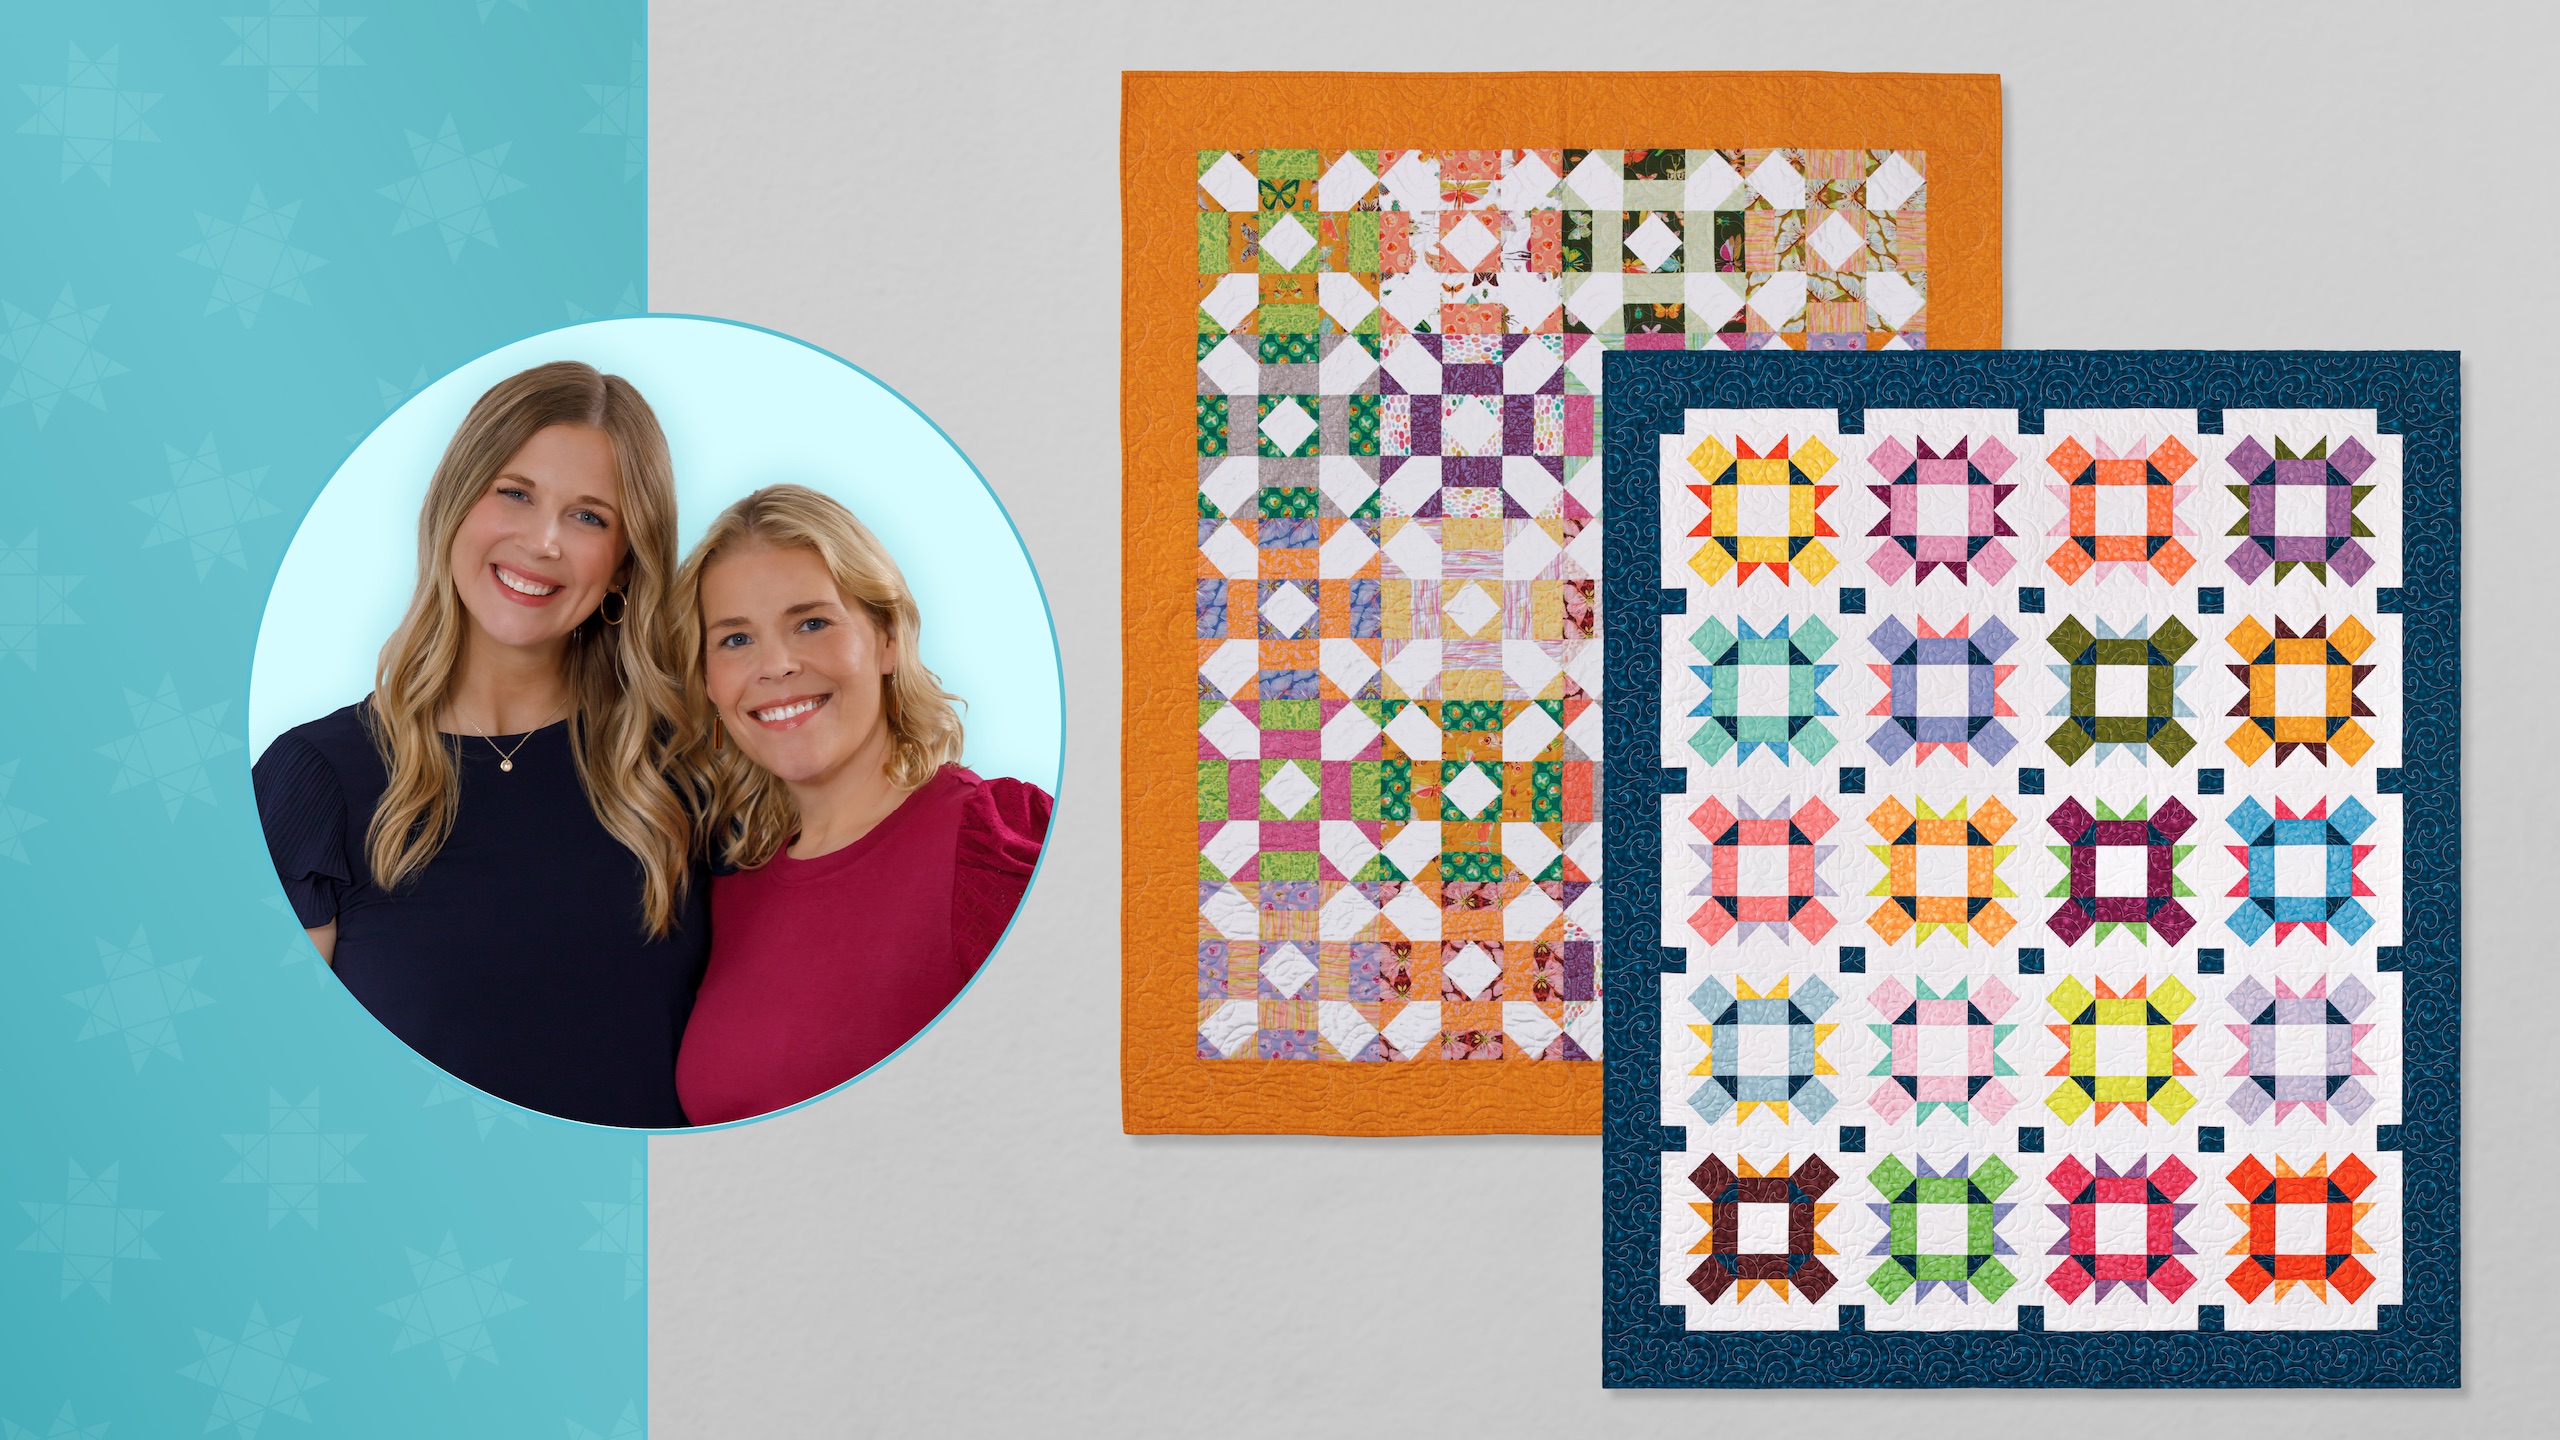
This week, we’re making two new variations of the Squirrel in a Cage quilt.
Natalie is the host of Quilting 101, Embroidery 101 and the Creative Strategist and Editor of Block Magazine at Missouri Star Quilt Company. She was taught how to sew by her mom, of course, and began quilting when she grew up.
Common Questions
What is covered in Double Take - Squirrel In a Cage?
So many of life’s daily tasks are immediately undone: Clean dishes are dirtied. Weeds reappear. Groceries are gobbled. We’re like squirrels in a cage, racing on a stationary wheel. Good thing quilting is forever! This week, we’re making two new variations of the Squirrel in a...
How long is the tutorial video?
The tutorial video is 00:19:00.
Are supplies listed for this tutorial?
Yes. The tutorial page includes the supplies and materials connected to this project.
Video Transcript
Hi everybody. I'm Natalie with Missouri Star Quilt Company and I'm here with Misty. Hey guys. It's double take week and today our challenge block is the squirrel in a cage block. So I think I'm going to go ahead and go first. My quilt is on the wall behind us and I'm calling it squirrel tracks. Perfect. It's slightly different from the original, but I think you're going to love it. So let's get started. Okay. So to make my quilt, you'll need a package of 10in squares. And I've used watermark by Tamar Kate for Windom Fabrics. You'll need about half a yard of accent fabric. 3 and 1/2 yards of background fabric. And for your outer border, you'll need a yard and a quarter. And I've used the same fabric for my accent and my outer border. For your backing, you'll need about 5 yards with a vertical seam or 2 and 1 eigh if you use 108 inch wide fabric. Okay, perfect. Yeah. So, it's going to be fun. Let's get started. Okay, so this is really fun. I'm excited about how this turned out. I think it looks really cute. This is the block we're going for. So, basically all I did the original squirrel in a cage is this part. And I just added some flying geese in these little where this bar block is. And I think it's fun. It turned out really cute. All right. So, from our background fabric, we're going to cut some 4 and 1/2 in squares. We're going to cut some 2 and 1/2x 4 and 1/2 in bar blocks and some 2 and 1/2 in squares. So, I've got all of that cut and ready to go. From our accent, we're just going to need a bunch of 2 and 1/2 in squares. And you'll see that all over the quilt. So, all of our accent makes up this little block here and also our cornerstones. Perfect. Now, you can get a couple from your layer cake from some matching sets, but I've cut them all from accent fabric today. Um, also, we're going to select matching sets for everything. Okay? So, we'll need two of each color. And this particular layer cake has doubles of everything. So, if your layer cake doesn't have that, you may want to get two or just, you know, scrappy. It could be scrappy. You could definitely do things that coordinate or look similar or whatever. Yep. So, this layer cake comes with matching sets. So, what we're going to do, I'm going to cut two 4 and 1/2 in strips. And I've got them stacked, so I'm being efficient here. So, I'm going to cut two 4 and 1/2 in cuts. All right. So, we're going to need three 4 and 1/2 in strips. So, I'm going to pull this off and cut my last 4 and 1/2 in strip. And then these get subcut into 4 and 1/2 in squares. And you're going to do this um from all of your layer cake sets, all of those 10in squares. All right. So, we're cutting four 4 and 1/2 in squares. I've got three here. I need one more 4 and 1/2 in square. So, I'm going to pull that off. And you don't have to stack up all your fabrics like I am. You can just cut four 4 and 1/2 in squares and four 4 and 1/2 by 2 and 1/2 bar blocks. So I'm going to get those bar blocks from this section here. So that's two and this will be four. All right, I'm going to stack those up and then I'm going to need 2 and 1/2 in squares. So I'm going to cut this down 2 and 1/2 and 2 and 1/2. And then we'll subcut these. And essentially, you want to keep these in matching colors because what we're going to do is use we're going to mix and match for the whole quilt. So, of all of these cuts, you'll be able to make several different blocks. But if you keep them stacked up in their matching colors, you'll be able to select what you need for each block and mix and match um which things you use for for each block. So you'll you'll get everything you need. Oh, there we go. All right. So, this block is made up of two different units. So, what we're going to do is make four units that look just like this. And we're going to make four units that look just like this. So, we've got our bar and our flying geese. And then this is just a 4 and 1/2 in block that's snowballed on all four corners. Perfect. Okay. So, let's start with our flying geese. So, we're going to take one of our background units and we are going to snowball the little 4 and 1/2 by 2 and 1/2 with our purple squares, a purple print. So, I've drawn the line on this one. You can you can draw the line or you can use your seam tape or press it. What however you like to do that. But we're going to start by doing one there and then we'll do one on the other corner. Sewing right on the line. I know sometimes we do like on it or next to it. I'm going to go ahead and trim this. And I just line that up um on the seam line a quarter of an inch away and press it. Because these overlap, you want to go ahead and trim and press. You can chain piece a whole bunch once you get into it, but we're going to do one at a time today. And then we're going to add our second snowball. It overlaps. And you want that to overlap so that you keep that little point right there. You can I don't typically like to start from the point, but it can also feel weird if you start from starting in the middle, so no worries. It can go either way, though. Whatever is most comfortable for you. Okay, there you go. All right, so we're going to go ahead and trim this one and press it. Set the seam. Makes things come out a little bit crisper. and roll that back. And then we're going to add our bar block to the top here. Go ahead and stitch that down. And that part will be made. The first unit will be all done. Yes. And you're going to do that four times for each block. Perfect. There is that. All right. So, I'll set that seam and press that back. roll it back. And then we've got all of those. So, I've, you know, it's like a cooking show, right? You've already got some of these made. So, I'm going to set those aside. And now it's time to go ahead and make this block. So, then you're going to select your 4 and 1/2 in square. And what we're going to do on this one is we're going to put our accent color on one corner and then we're going to background color the other three squares. So, we'll do these two at a time using your doing your opposite corners and they go in the same direction. So, these line up this way and then these ones will line up the opposite way. Perfect. So, we can I'll give you those to go ahead and stitch both of these. And because they overlap, you can do your opposite corners, right? And then and then trim and then we can add trim. Press them back and do the other two. Yeah. It's a good little timesaving hack. Yeah. to do two at a time. It works pretty well. Yep. So, I've just Is our um tension good? Oh, yeah. That looks great. It just looked a little like a little sus. Was tired at the very beginning. Yeah. Here we go. Yeah, we're good. Good. Good. Good. Always got to pay attention to your tension cuz you don't want to sew through the whole thing and then have to do it again. It's a sad day. Yes. All righty. So, these are trimmed. I'm going to set my seam and roll these back. And roll that one back. And then we will go ahead and add two more snowalled corners. And these go in the opposite direction to the first two that we did. Perfect. Stitching right on the line. and flip it around. Yep. It's pretty efficient, actually. It sets up really well for chain piecing. There we go. All righty. So, we'll trim these. I do love snowballing things. cuz I feel like it can just elevate the quilt and turn it into something completely different. Yep. All right. Set these and roll them back. And all four of these corners are done the same way. And then you just turn them so that they point the direction you want them to. So we're ready to assemble this block now. All right. So we've got these made. So I'm going to scoot this stuff out of the way. And these are all the things that you'll need for all the rest of your blocks, right? So, but what we're going to do, oops, I need one of my 4 and 1/2 in background squares for the center. Almost forgot that. And then our bar blocks face to the middle. I always love putting blocks together because it it's like, oh, that's how that goes. It's like a puzzle, you know, you can put all those pieces together, especially that final piece. So satisfying. It is. All right. So, these face the inside. And then our accent squares also face the inside corners. I do think these would look cool. Scrappy. Yeah. So, there you have it. So then you can just stitch that together and you've got your block. It's absolutely beautiful. All right. So in the quilt we've got a four across the top by five down. And then these are your little cornerstones. These are 12 and 1/2 in blocks. And we've added a 5 in outer border. And that's it. And and what did you do for the backing? Oh, let me show you the backing. It's this really fun fabric that has all the colors and it's such a pretty like soft watercoly line. All right, so we machine quilted it with free swirls. It's one of our patterns that we've had forever and I just think it's lovely and very like traditional and elegant. It's beautiful. It's 67 by 81, which is perfect for like a twin bed or a lap quilt, picnic quilt size. So, it's really fun. So, I think I think you're up next. Of course. All right. So, this is my quilt. I called it out of the box. And even though it looks so different, it's actually very similar to Natalie. They are so similar cuz they're inspired by that same squirrel in a cage block. Right. So, to make this quilt, you're going to need one package of 10in squares. And I use Insectarium by Tamara Kate for Windom Fabrics. You're also going to need 1 and 3/4 yds of background fabric. And for your border, you're going to need 1 yard. For your backing, you need 3 and 58 yards with horizontal seams or 1 and 78 of a 108. I just use this bright pink. So, let me show you how to make this. Okay, so my entire quilt is made up of this block right here. And so, the first thing you're going to want to do is from your background, you're going to cut some 4 and 1/2 in squares. And that's all you need out of your background. I love that. And then you are going to pick some contrasting 10in squares from your pack. Just want to make sure you have a lot of contrast there so you can still see the pattern. And then we're going to begin by lining these up. And at first we'll cut a 5 in strip off of one side. And so now what I'm going to have you do now, okay, I'll put these right sides together. And we are going to sew a quarter inch seam on both of the long sides. Oo. So, I'll have you do that. Okay. And then, while she's working on that, I'm going to subcut my other half of these squares into 2 and 1/2 in strips. And then subcut them into 2 and 1/2 in squares. Think my seam might be a little narrow there. It's all right. It'll all work out. Okay. There we go. And then now I'm going to split these up by print just to give myself a little bit of organization. All right, there we go. And then now once she has completed that, I am going to cut this into 4 and 1/2 in rectangles. One and two. And then I will cut this in half at two and a half. Check that seam. It's a little narrow, but I bet it'll be fine. All right. Yeah. Okay. And so you're cutting in between your seams, and that's going to give us our bar blocks. All right. And so we will cut this last set in half. And now we can press open all of our bar blocks. So we'll begin. We'll set these seams. And I'm actually gonna put the darker. That's a great hack for Yeah. speeding up the process. It just makes it go really quick. Yeah. So, roll it back so that my seam is behind the darker fabric. All right. So, once we have those pressed, that portion of our block is complete and we can move on to our snowballing. Nice. And so, for our corner units, we're going to take four of our four and 1/2 in squares. I have some of these already done, so we'll just do one. Okay. And we're going to begin by putting two of our yellow squares in opposite corners. Awesome. And again, like Natalie said, we could draw the line, but we have the diagonal seam tape. So, I'll let you go ahead and do that. Okay. I do love this seam tape. It's just so convenient. It is definitely a timesaver. So the diagonal seam tape is great because it has these three lines and the red line is the one that you line up point to point when you're stitching across the middle and then if you wanted to stitch on the either side of that line you would scoot it over to the corner in one of the black one of the black lines. Yeah, it's great. So she's just got her needle right on that first point and then the opposite corner and then I just watch that point as it stays in line with the the red line right down the middle. Yep. All right. So, now that she's stitched those right point to point, we'll cut off the excess, leaving our quarter inch seam allowance, just like so. Then I will press these back. And then the last step for this unit is we're going to take one of our contrasting squares and add it to one of those open corners. It doesn't matter which corner that it won't because the same you're going to rotate it anyway. So awesome. There you go. And I have the rest of those ready. There you go. Beautiful. So, we'll go ahead and trim that one and then roll this back. And then in the exact same way that Natalie did her snowballs for the center of our block, we're going to use that secondary fabric that we chose to snowball all four sides of our middle. And I've gone ahead and done that just cuz I figured it's the same. So, but the magic is you have the exact number of all the pieces you need. There's no excess at all. It's a, you know, perfect use of fabric. So, let's go ahead and lay this out now that we have all of our pieces. So, this is our center. And then those bar blocks are going to go in with the contrasting fabric touching. That's what you're looking for. Mhm. There we go. And then from these, we're going to have the corner that has no snowball going into the center. I love that. And it's just so fun because the components are so similar. Similar. Yeah. But the quilts look so vastly different. And then when you sew them together, there's your finished block. It's It's so great. So simple. And so then let's look at the quilt behind me. I just put them directly together. No sashing. And so you get 1 2 3 four across by five down. And then I added a 5 in outer border here. And I quilted it with ginger snap which is just a fun kind of curly pattern. It is cute. And then here of course is that pink backing. You can really see the quilting there. Very nice. Super fun. It finishes 57 by 69. So a great throw size and just super quick and easy. That's so awesome. Well, this has been so fun. I think both quilts turned out great. They're different and very different. And it's just such a good reminder to all of us that when we, you know, pick inspiration, we're all going to come up with something completely unique. And so, you can change your quilt completely just by changing one element of it. Exactly. And so, our inspiration was the squirrel in the cage. And we've got two great quilts. So, we hope you enjoyed this double take from the Missouri Star Quilt Company, and we'll see you next time. Bye.