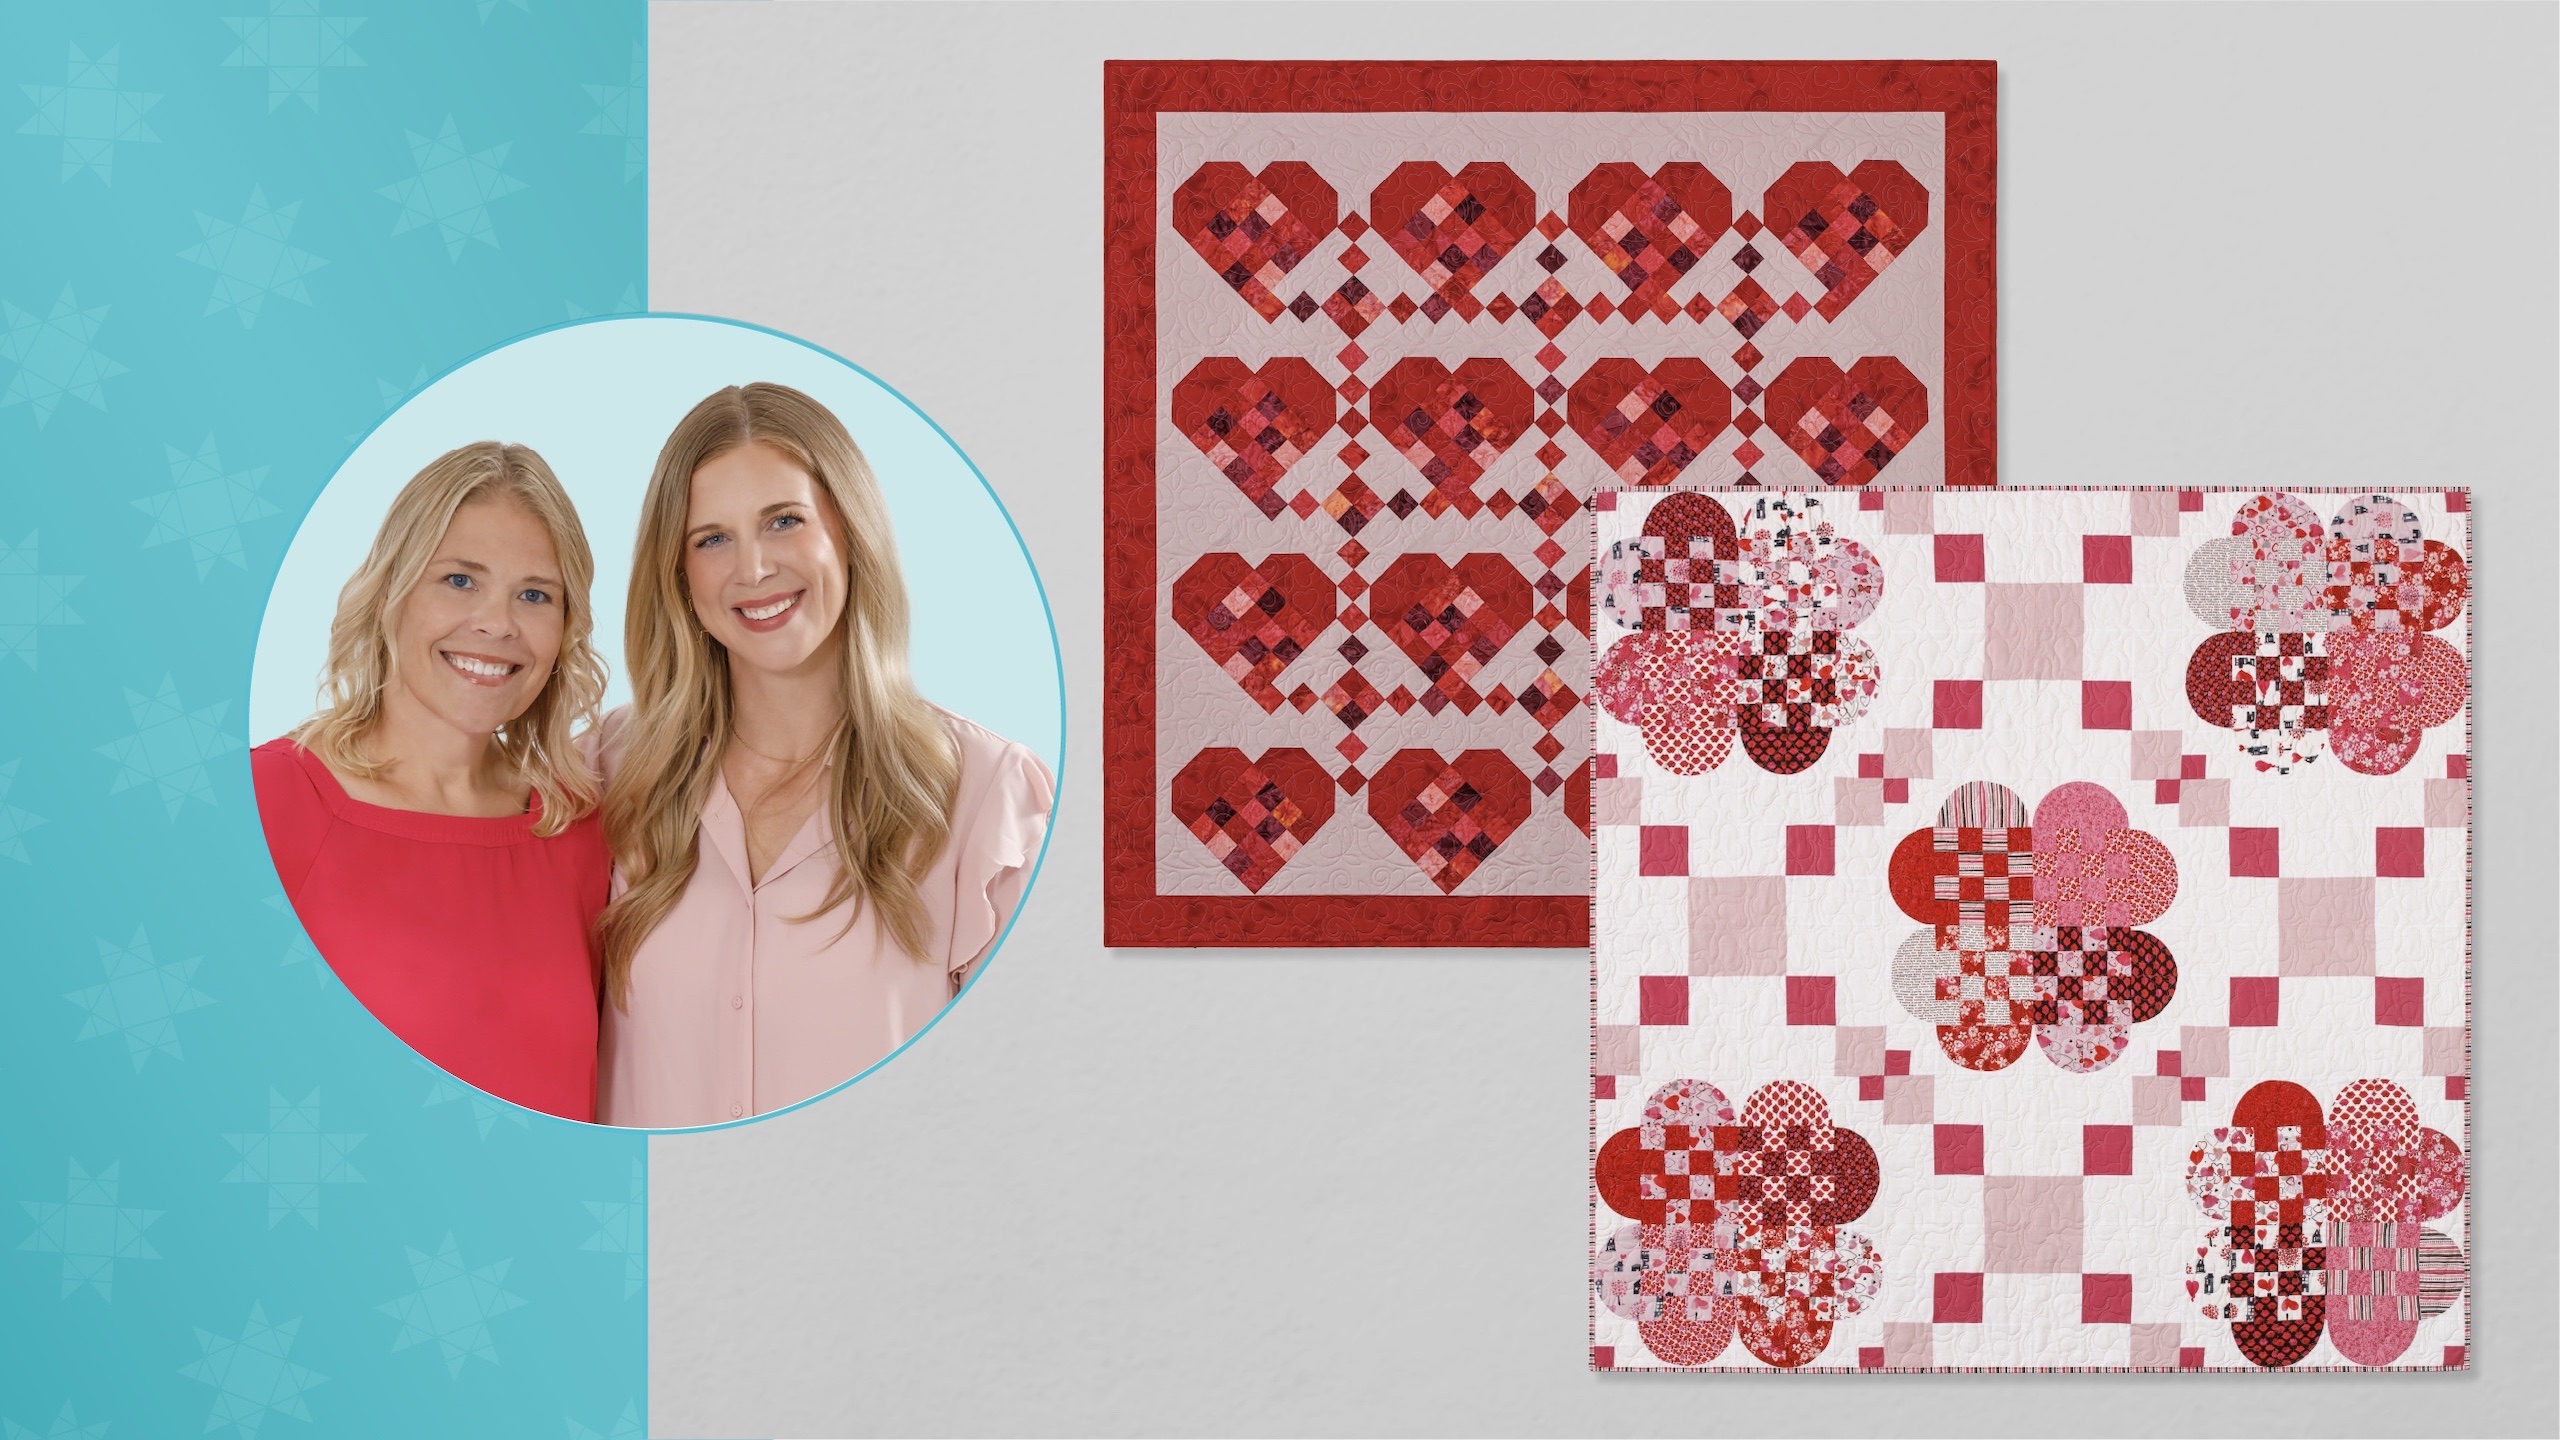
Double Take: Woven Hearts
Sewing for someone special? This Double Take explores two Woven Hearts quilts that are sure to inspire something sweet!

Instructor
Natalie Doan
Natalie is the host of Quilting 101, Embroidery 101 and the Creative Strategist and Editor of Block Magazine at Missouri Star Quilt Company. She was taught how to sew by her mom, of course, and began quilting when she grew up.
Chapters
- 0:00Welcome & Getting Started
- 0:32Natalie's supplies
- 1:40Cutting & sewing the Swedish woven heart block
- 16:08Cutting & sewing the Irish chain block
- 20:14Chatting about the layout
- 20:53Backing & Machine Quilting Pattern: Heart Blossoms
- 21:16Misty's supplies
- 22:12Cutting & sewing the Drunkard's Path block
- 32:12Making Block II
- 34:26Backing & Machine quilting pattern: Affection
- 34:40Message from Natalie & Misty
Common Questions
What is covered in Double Take: Woven Hearts?
Sewing for someone special? This Double Take explores two Woven Hearts quilts that are sure to inspire something sweet!
How long is the tutorial video?
The tutorial video is 00:35:17.
Are supplies listed for this tutorial?
Yes. The tutorial page includes the supplies and materials connected to this project.
Video Transcript
Hey everyone, it is Double Take Week and I am Misty here with Natalie of course and we have two fun projects to share with you today. That's right. So this week our block, the challenge block that we chose is the woven heart and I think it's a really fun one. It is. It's super fun. It's kind of inspired by our Swedish heritage and so you know with Valentine's coming up, why not have two great heart projects? Can't have too many hearts in our lives. That's right. So, Nat, I think you're up first. Perfect. See you in a minute. Okay. So, this is my quilt here behind me. I'm calling it Nordic Heart Strings. I think it's really cute. I combined the Swedish Heart Block, which I also blew up large. I don't know if you guys remember, the very first one I did was so tiny and so cute. So, this is a much larger version, and then I combined it with a version of like our Irish change block. And so, I think it's really fun, and it comes together pretty quick and easy. So, I think you're going to like it. All right. So, to make my quilt, you're going to need one package of 2 and 1/2 in strips. And I've used Ravishing Red Boutiques by Kathy Angel for Island Boutique. You're going to need some accent fabric, and this also includes your outer border. You'll need 2 and 1/3 yards. For your background, I've used this pink blush color. It's really beautiful. You'll need 2 and 38 yards. And for your backing, you'll need seven and an eighth yards if it's just regular 45 inch wide fabric or two and 38 if you use a 108. Perfect. All right. So, let's make those blocks. All right. So, this quilt is made up of two blocks. We have our Swedish woven heart block and we have the Irish change block. So cute or my version of it because I put a four patch in the middle. I love that. So let's start with our little Swedish block. And we have some we do have some cuts to make for our background and um our accent fabric. So from our background, we're going to be cutting 2 and 1/2 in strips which will get subcut into 2 and 1/2 in squares. We've got a 4 and 1/2 in strip that'll get subcut into 4 and 1/2 in squares. And some of them will be left whole because we're going to be making strip sets for our second block. And then this one is also left whole because again, strip sets for Irish change. So that's what we need out of our background. Okay, perfect. And I'll subcut a couple of those in just a minute. And then from our accent fabric, we're going to be using an 8 and 1/2 inch wide strip that we're going to subcut down into four and a half inch wide rectangles. Perfect. So, I'll start with that because that's an easy I've got it out and it's ready to go. And I need a couple of those to start this block. Straighten up this edge and get rid of our salvage. There's not a lot because it's boutique. It's printed all the way out to the edge. So, you can really decide where you want that to start. But for each of our little woven heart blocks, we're going to need two 4 and 1/2 by 8 and 1/2 in rectangles. And that makes up this part right here, the little curved heart or heart topper, I guess. All right. So, I'll hold those and set that aside. And then I'm going to take my 4 and 1/2 inch strip and cut a 4 and 1/2 inch square. I think I'm gonna line these up so that I get a full use of it. And I might I'm not going to press it because I'm down here and it'll be all right. It looks pretty good. It's pretty darn great. All right. So, we're going to cut that and set that aside. And then I'm going to cut a couple I need four 2 and 1/2 inch squares for each block. So just getting all of these ready. And then what we're going to do after this is start sewing some of our strips from our jelly roll. Okay. Or our strip roll set together. So there's two and here's four. All right. Right. So, we've got our pieces cut now. So, now we're going to be making strip sets. And to make the the 16 patch in the middle, I just stitched together sets of four and then subcut them. And I mixed them all up throughout the whole quilt. So, we will do one of those. And you can just really pick and choose which ones look good together. I kind of like to do contrast because I like to see the differences in the blocks. So, I'll let you start with a couple of those. And then I'll throw a we'll put a purple in there and maybe this dark pink one. Beautiful. Yeah. Just make sure I've got them all lined up. Perfect. And you can do these in sets of two and then stitch these two together. So you don't have to take them apart and press them until you've got the whole strip set made. Beautiful. Oh, this one was short. Ah, that's okay. That is just fine. We're not going to need the whole thing anyways cuz we're going to mix and match and there's lots of lots of room there to Yep. to mess around. I think I'll I'll work on this just because not you don't have to, but that just gives me something to do while you're stitching. Exactly. We'll have to press it eventually anyway. Right. That's right. All righty. Now I can just open this one up. Yep. And add it to whichever side you feel matches best. All right. We'll put it this way. So there's good dark and light together. Perfect. I love that. All righty. Because boutiques have kind of that starchy feel, sometimes they like to stick together. So they do. You just have to kind of adjust and make it go where you want it to go. They do make for pretty precise piecing because they do feel a little bit pre-starched, which I enjoy. I like that, too. I like like working with boutique. It's funny. It took me a little while. Uh, but they've really grown on me. They're they're very nice to work with. Yeah. Not my not my initial style, like not what I'm drawn to, but they're very cool. Yeah. All right. There we go. Okay. So, let me give this a quick press and then we will cut some strip sets and sew some together because we've got a few of these made already. Let's see. Easiest way to do it, I guess. I don't know. As long as it's flat from the top, that's what matters. And I I do usually flip it over, but I want to make sure that my um my seams are pressed out really straight because I want these to intersect and make a nice little woven block. Exactly. So, I don't want to have anything that isn't, you know, really tightly pressed against that seam. Okay. So, I have another one here already made. So, we're going to cut a couple of each and then mix and match. That will be perfect. Yeah. And these are going to get cut into 2 and 1/2 inch strip segments. Got to straighten up that edge. And I when I straighten up edges like this, I always want to watch not just the top and bottom of the fabric, but also where the seams line up and make sure that I'm really getting a nice straight cut. You don't want to line it up and have something be just a little bit off and then have all of your seams sort of be at an angle. Yeah. All those. So, you got to be a little bit careful. It will really throw you off down the road once you've sewn a lot of seams. Right. Right. All right. So, I'm going to do two of this one. And when you make your own, you'll probably have a little bit more variety. And then I'm going to do two of the next one. And we can stitch them together. This one has a nice straight edge already. I'm just going to line up and make sure that my seams are still straight. Looks pretty good. All right. Perfect. So now I'm just going to rearrange them so that we don't have the same two next to each other. And it looks like I picked that same purple. purple, which is okay. I don't mind it at all. Let's go this way. Maybe. Maybe not. Maybe not. Like that. Oh, I picked all the same colors. All right. Well, that's okay. I've got some extras here so we can mix it up and have some variety. So, let's see. I've got this one. One, two, three. And I think I'll put this guy over here or over here. How about that? That looks That looks great. Now, it doesn't matter. This This roll does have quite a few colors that are very similar. So, if you get a lot that are kind of the same, that's okay. Just mix and match and do something that feels pleasing to you. You could even cut your strips in half and make a few different sets that way as well. That's a great idea. Yeah, just for variety sake. Y So now we're going to go ahead and stitch these together and I'll let you do two sets of two and then combine those. And then in the meantime, I'm going to draw some lines on these little 2 and 1/2 in squares corner to corner because we're about ready to snowball. Going to reach around you just a minute. Good. Do what you got to do. Just had to grab a pen. Trying to line up those little junctures where our seams will meet just to match them up. And you can press a line, draw a line, use a laser, use your uh quarter inch seam tape if you've got it, whatever is most comfortable for you. But we're going to be sewing corner to corner right on that line. Just snowball those corners. All right, so these are ready to go. Okay, let me just open these back up again. Okay, there we go. Make sure we're happy with it again. Yeah, it'll be all right either way. It's okay if they make some Yeah, some fun little patterns or That'll work. Or maybe No, that was right, I think. Perfect. Okay, beautiful. These are nice big blocks that come together pretty fast. I do love a big block. Me, too. Okay. All right. So, let me give it a press. We'll set our seams and do a good job on our ironing over here. And then I typically like to just kind of let it lie flat. Roll it back the way it wants to be. Looks pretty good. Nice and flat. Okay. So, we've got the middle part. So now we're going to go ahead and create this part over here that makes the little curved heart tops. So we're going to add our snowalled corners, one to each of the top corners. And they go in opposite directions because we're curving that that part of the heart. Okay. So you want your lines to go I guess if I have it this way. We're going, you know, top middle to the outer edges. Yeah. And we're sewing on that line. Perfect. Here's your next one. Perfect. So, now I'm going to go ahead and trim this just about a/4 of an inch from this seam line. And there is plenty of room if you wanted to go ahead and stitch and save that triangle. That's uh completely up to you. We're going to trim those off and then press them back real quick. like fabric's got a bit of starch in it. So, there's one and our next one here. Let me move that out of the way. Now, the final thing that we've got to do is add our middle corner. And what we're going to do then is stitch this here and these together. So, it's kind of a a straight line thing. It's a little offset for patch. Yeah. Kind of kind of. We can turn it around. Maybe it'll make more sense this way. There we go. Perfect. All right. So, I'll have you stitch that one and then this one. And this block is just about done. Three seams away from finished. Such a fun one. Quick and easy. I can just open that up. That's right. Good old chain piecing. That's right. It's magical. Fold it back. Make sure I've got my little seams nested before I get there. Perfect. One more quick press. All right, I think we did pretty good. Yay. So, that's our block, the uh woven hearts Swedish block. It's done and ready to go. So, this next block comes together just as easy, if not easier. Yeah. So, we're going to start by sewing together a couple of different strip sets. And I've got two of those here in different colors. And what we're going to do is cut them into 2 and 1/2 in segments and make a bunch of four patches. Perfect. So, I'm going to line these up so I can cut them all at once. Not all of them, but you know, a couple. And straighten up this edge because you just don't know for sure how that's going to go. Yep. Better to be safe. That's right. Okay. And then these get cut into 2 and 1/2 in segments. And if you'll stitch that together for me, that'll give us our middle. and line up my center here. Feel like I'm fighting with these boutiques a little bit, but that's okay. There we go. All right, we'll set our seam and do a quick little press. So, that is the center of the block. Scoot those out of the way. And then what we're going to do, so these these little side pieces are strip sets. So, we're going to take our long 4 and 1/2 inch long strip. And what we'll do is put a piece of fabric on either side just like so. So, we'll have this one and this one. And I've got one of these stitched together because we've done a lot of strip sewing today. So, I'm pretty sure you get the idea. So, we've got this one done. And then it's the same thing for the wider strip set. So, we're going to take our 8 and 1/2 in strip and we're also going to put, and it doesn't have to be these same ones, obviously. You can do whichever strips you like, um, on either side. So, I have both of these made already just for ease because it's one long straight seam on both sides of those strip sets. So, now we're going to take these and cut them into two and 1/2 inch segments again. And I'm going to do one at a time and then we'll get this block laid out cuz that's all there is to it. I love it. Well, there's there's one or two other things, but we'll talk about it in a sec as we get there. So, we'll do one of these. And again, you do want to make sure that your seams line up with the lines on your ruler to make everything stay nice and square. And you'll need two of those per block. And then for our big big strip, same thing. 2 and 1/2 inch segments. Going to straighten this edge. I just love strip sets. They make things go so much faster, so so quick. And uh it's much more it's very satisfying and precise. a lot less tedious than sewing tiny little squares to things to all the pieces. Yep. Yep. All right. And so we need two of these per block as well. And then from our background fabric, we're going to cut um from our our two and 1 halfs and our four and 1 halfs. We need a couple of extra little background pieces. So here's how we're going to build it out. We've got our middle. We're going to add our two sides. These are 2 and 1/2 x 4 and 1/2. And then we get to add our tops and bottoms. And these line up once we've got our seams sewn. Then on these sides, we add another um 2 and 1/2 by I believe it's 6 and 1/2. Is it 6 and 1/2 or 8 and 1/2? That was 8 and 1/2. Yep. 2 and 1/2 by 8 and 1/2. Good call, Misty. And then we add our tops and bottoms to those. And this block comes together so nice and quick and looks just like that. I love it. It's so cute. So nice and easy. And that's it. Now, you'll notice on the quilt, these blocks are set on point. So, you'll need to cut your side triangles and your corner triangles um from background fabric. But you can see how they fit into the the quilt here. We've got one of these. And then in between oop or a pin would be great. Yes. Here we go. I'll just pin it up for a second so I can show the other block. There we go. So, this just sets up like this. And then all of your little Irish change blocks go in between. So there's no other sashings or cornerstones or anything like that. Um just your side setting triangles and your corner setting triangles. Then we've got a nice outer border that is 5 in. All right. So we've got this beautiful red boutique. Same as our border on the backing. It's really lovely and machine quilted it in heart blossoms. I think it turned out really great. The quilt ends up being 77 by77. And Misty, I think you're up next. All right, let's go. All right, Misty, I guess you're up. That's right. So, this is my quilt. I'm calling it Forever Flowers, and it is super fun to make. And it's so cute. Thank you. I do love how it turned out. So, to make this quilt, you are going to need one package of 10in squares, and I use this collection called Love Matters by Claudia Bianci for Cloth Works. You're also going to need a half yard of your dark accent fabric. That's this darker pink. 58 of a yard of your light accent and two and two/3 yards of your background. For your backing, you are going to need four and a half yards with a vertical seam or 2 and 1/4 of a 108. And I did want to point out this adorable little stripe that I used for the binding. You'll need 2/3 of a yard if you want to do that. And then I'm going to use the small drunkards path template. So, let me show you how to make it. All right. So, up first, we're going to make this block that you see here. It's very similar to Nats, but I did use that drunkard's path to finish out the curve. I love the curve. Thank you. I do, too. And so, to make this, we are going to pick two um contrasting 10in squares. And I've just stacked these together. And I'm going to cut them in half both directions so that I have four 5 in squares of each print. So like this and like this. There we go. And so from these first uh sets, I'm going to make our drunkard's path. And we'll use these in a little bit. Okay. And so I've also cut some 5 in background squares. And so let me show you how to use this template. I'm going to lay the 4 and 1/2 inch line on the outside corner of my background square. And I am just going to cut this out with my rotary cutter. This is gentle enough that I can use the regular 45 with no problem. Yeah, that's one of my favorite things about our our template. The curve is just so easy. It's very gentle. And so you can actually get two out of these squares. So we'll just trim these as well. Oops. There we go. Perfect. Oops, I missed a spot there. That happens all the time. Yes, it does. Now we got it. All right. And so then there are our little outside curves. For our inside curves, we're going to use the other side of the template. And so I'm just gonna cut one of these. You'll cut all four. So I would technically I would stack up all four and just cut them at once. That's a good point. We'll do it that way. That's just me though because I'm like Yeah. Speed. Yes. If I can make one cut and get a bunch of things done at the same time, that's a great idea. I was just thinking I have some done, so I was like, I don't need them all, but we might as well. And so I've stacked them all nice and neat. And we're going to line up our corner just like we did on the other side with this outer corner. Awesome. And we will cut through all four at once. And actually, if you wanted to use this for another project, you could still use this little piece that you cut off, right? You just have to match it up. There's plenty of room. The curve is just slightly different, which that's part of what helps them go together so nicely is that just that little bit of difference in done that little magic math for you. Yeah. All right. So, then we're just going to make one of these to start. So, I like to just kind of fold this in half and find my middle. Yep. And I finger press that. And then I'll do the same thing here. And, you know, if you want to pin or glue or whatever you like, you're certainly welcome to do that. But basically, you want to start by lining the straight side up. And we'll start stitching. We'll pull this aroundatch, match the middle, and go all the way through to the end. So, I'll let you sew this one. All righty. You'll need to do this four times for each block. And I always I like to start nice and slow just so that I don't end up Yeah. overdoing it. And then I just curve it. Just take your time. And this for me was really one of those things that when I first started doing it, I was so nervous and afraid, but I really enjoy it now. And by the time you've done it a few times, by the time you try one quilt, you will be very comfortable sewing curves. Oh, yes. Just be patient with yourself. Yep. Little I do like just a lot of little stops and starts and adjusting. Oop, got a little little heavy-handed there for a second, but that's okay. And if you around as you come to that end sometimes, especially on the four and a half inch size, like a little stiletto or something to help guide it can be really helpful. Oh yeah. Just to keep it all lined up. But honestly, it's so forgiving. So that looks great. Perfect. And so, you know, it looks all kind of rumply and you're uncertain if it's going to work. And this just rolls back so nicely when we come to press it here at the ironing board. And it just lays beautifully just like that. And so I have these other ones ready to go. Let me grab them because you're going to have two of your reds like that and then two of the pinks. And so you'll just make all four of those. And then now we can move on to making our little four patches for our bigger 16 patch. Perfect. So I'll set these aside for now. Well, actually, why don't you sew those together? You want to do that? Absolutely. You want me to do both? Yeah. Okay. Go ahead and sew them together in sets of two. While she's stitching those together, I'm going to place my last sets of 5 in squares right sides together so I have the right sides of the fabric facing. And then they'll be ready for when she's all done. Perfect. Now I can just press these. And then what I need you to do is sew on both sides. So just a quarter inch on just two of the sides. And if you didn't want to just do one, I have some ready to go. But you'll do the same thing with both of those sets. Press these back. Now, I just love the little hacks and tricks to get things and make them help a little faster. Yeah, there's that. Perfect. All right. And so, you can see she's stitched on these two opposite sides. And so, now I can take my ruler and I'm going to measure 2 and 1/2 in from the edge. Since this is a 5 in square, we just want to cut it in half. So, I'm going to do that. Then, we'll take this over to the ironing board, and I'm going to press these with my seams to the dark side. There's one and two. Just roll those back. And then now I'll bring those back over here. And I'm going to place them right sides together again. But I want to make sure that I have opposite fabrics touching and that little seam is kind of nested. Yes. And so then now just like before, she's going to sew on these opposite sides intersecting that first seam. This is just a really easy way to make some simple little four patches. They come together so quick, too. They really do. Just want to make sure that stays nested. There we go. All righty. And just like before, since it still measures 5 in this way, we can lay our ruler on the side here. Measure in 2 and 1/2. And when we cut those in half, we get two perfect little four patches. And we need a total of four. And so remember, you had that other set. So you'll have all that you need to make this block. Very little waste. Yeah. Really nothing. Yeah. Just that one little curve's path, which you can totally use in another project. Exactly. And so then now we can lay this part out. So, we're going to alternate so that our colors are swapping between the two just like so. And then if you want to sew that together into our 16 patch. Okay. Then now we just have our little outside corner of our block. That's the last thing we'll have to do once she gets this stitched together. There you go. Oh. Oh, I can put them together. I was going to say they can just go right together. No worries. Okay. Yep. There we go. There we go. It's not your pattern. So, you know, this fabric is pretty nice, though. Yeah, it really is. It has a really nice feel. Mhm. It's a fun line. All those fun Valentine's prints. Yeah. There we go. All right. Now we can press it. Yes. So, I just open it up at this point. I want it to lay nice and flat. Make sure I don't have any little puckers or anything from the top of my block. That's really what we're always looking for when we press things. Nice flat blocks that go together easily. Exactly. And so then that you can see how this is starting to take shape. These are just going to fit on either side here. So all that we have left is this little outer corner. I love that because your fabrics aren't scrappy. It really does look like a true woven heart. Yes. You can really see it. Yeah. Oh, okay. So then for the outer corner, this is just using background and accent fabric. And so we cut some little 2 and 1/2 in squares out of our darker accent, the pink. And then we're going to start by pairing that up with a 2 and 1/2 in background. And then we'll sew that to a 2 and 1/2 by 4 and 1/2 in rectangle. And I went ahead and finished that just cuz it's pretty straightforward. Yes. And so then this just sets in this upper corner. And you want the pink to be pointing up. And then you'll just sew this together exactly how Natalie's went. Exactly. And it looks just like this. So when you have it all done, I love it. And then you'll notice in the quilt that you're going to go ahead and sew four four of those together to make this really big kind of flower heart block. So do that and then I will show you how to make block two. So block two is very easy. Similar to Natalie's, I actually just made some strip sets to make this go quickly. That's so smart. It It's the best. And so you only need two different versions. Of course, the pattern will tell you exactly how many of each to make. The first one is we're going to do two 4 and 1/2 in background strips and then our 4 and 1/2 in darker accent. We're going to cut that into 4 and 1/2 in rectangles. And so that's going to be the middle of all of these blocks. Then our other strip set is a 4 and 1/2 in light accent and an 8 and 1/2 inch background. And you need two of those per block. And so we are just going to put those together. by just flipping those. That's such a great way to make one of those nine patch blocks that has gives you the variety effect, right? I love that. Exactly. And so then once you stitch it together, it just looks like this. And so just like our heart blocks, you're setting four of these together into these big blocks. So you could just lay these out in rows if you wanted and do one this way and back and forth, or you can assemble those large blocks, whatever makes sense to your brain. But I just think it turns out so cute. It's 72 in square and I quilted it with a pattern called affection, which I think is really cute. And it's got this great little Valentine's floral on the back. I think it just turned out so cute. So I hope you guys I did. I loved it. Yeah. I hope you guys enjoyed this double take. Nat, here's your blog. There it is. These are our cute little Swedish woven hearts. That's right. This was so fun. And so also be sure to subscribe because we are so close to being a million quilters strong. That's right. We're almost there, guys. That's right. And we will see you next month for the next double take. Bye. Hi everybody. I hope you enjoyed today's video. We're trying super hard to get to a million subscribers. So if you enjoyed it and you want to see more, just hit subscribe and share with your friends and encourage them to do the same. And I will see you next Friday with a brand new tutorial.