

How to Make a Words Have Power Quilt - Free Quilting Tutorial
 Jenny Doan
- Layer Cake
- Modern
- Double
- Beginner
- Quilt size 66" × 75"
Jenny Doan is making an inspiring new quilt with precut layer cake squares and the Words Have Power panel by Missouri Star Quilt Co. This quilt combines Misty's Wonderful Words star blocks and Charisma Horton's Lovely heart blocks, and it looks so bright and cheery with Wilmington Essentials - Dry Brush Rainbow Lane 10 Karat Gems by Wilmington Prints.
Instructor
Jenny Doan
Jenny Doan is an American quilter, author, and YouTube personality. Jenny started Missouri Star Quilt Company in 2008 and today it is the largest quilting supply vendor in the United States.
Shop this tutorial
 Words Have Power Quilt Pattern by Missouri Star$6.95Shop →
 Digital Downloads - Words Have Power Quilt Pattern by Missouri Star$4.95Shop →
 Words Have Power - White Panel$8.95Shop →
 Wilmington Essentials - Dry Brush Rainbow Lane 10 Karat Gems$38.95Shop →
 Wilmington Essentials - Dry Brush Magenta Yardage$10.96Shop →
 Kona Cotton - White Yardage$7.28Shop →
 Wilmington Essentials - Dry Brush Paradise Blue Yardage$10.96Shop →
 Missouri Star Quilter’s Best Blend Twin Batting$26.45Shop →
Common Questions
What is covered in How to Make a Words Have Power Quilt - Free Quilting Tutorial?
Jenny Doan is making an inspiring new quilt with precut layer cake squares and the Words Have Power panel by Missouri Star Quilt Co. This quilt combines Misty's Wonderful Words star blocks and Charisma Horton's Lovely heart blocks, and it looks so bright and cheery with Wilmin...
How long is the tutorial video?
The tutorial video is 00:23:56.
Are supplies listed for this tutorial?
Yes. The tutorial page includes the supplies and materials connected to this project.
Is a transcript available?
Yes. A written transcript is available on the tutorial page.
Video Transcript
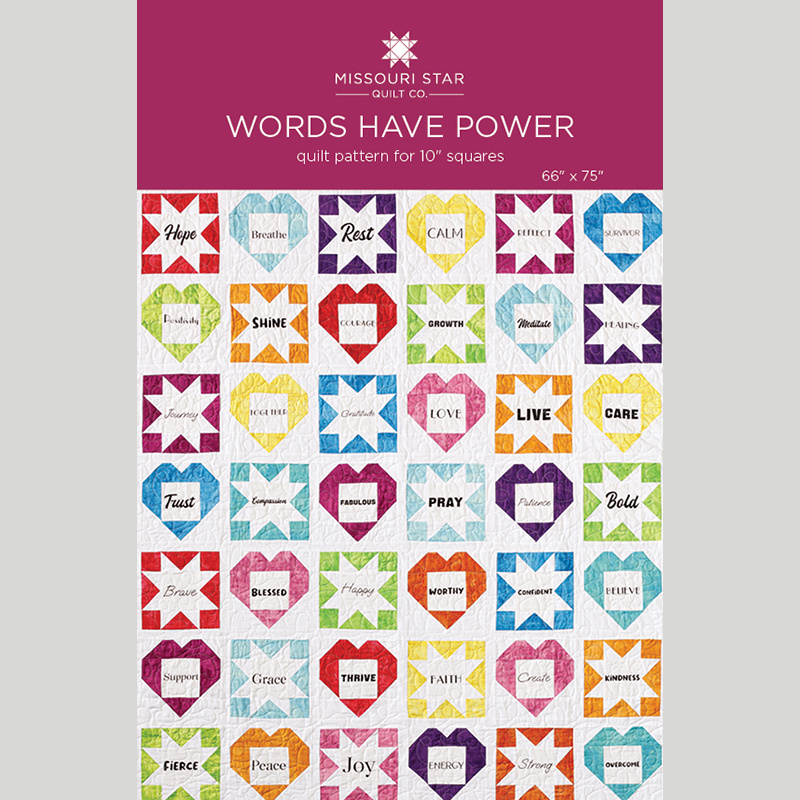
Hi everybody, it's Jenny from the Missouri Star Quilt Company, and I've got a wonderful project for you. This is based on our Words Have Power panel and it's made with two blocks, a star block that is Misty's Star and a heart block that is a Charisma Horton pattern called Lovely Words. And I love the way both of those patterns frame the word and just bring it to life. So let's take a look at the quilt. So you can see every other block is a star, heart, star, heart, star, heart. And then in the center are our words that have power. And you never know on any given day which words you're going to need, but this quilt is a huge comfort to anyone who needs it. So let me show you how to make this quilt.
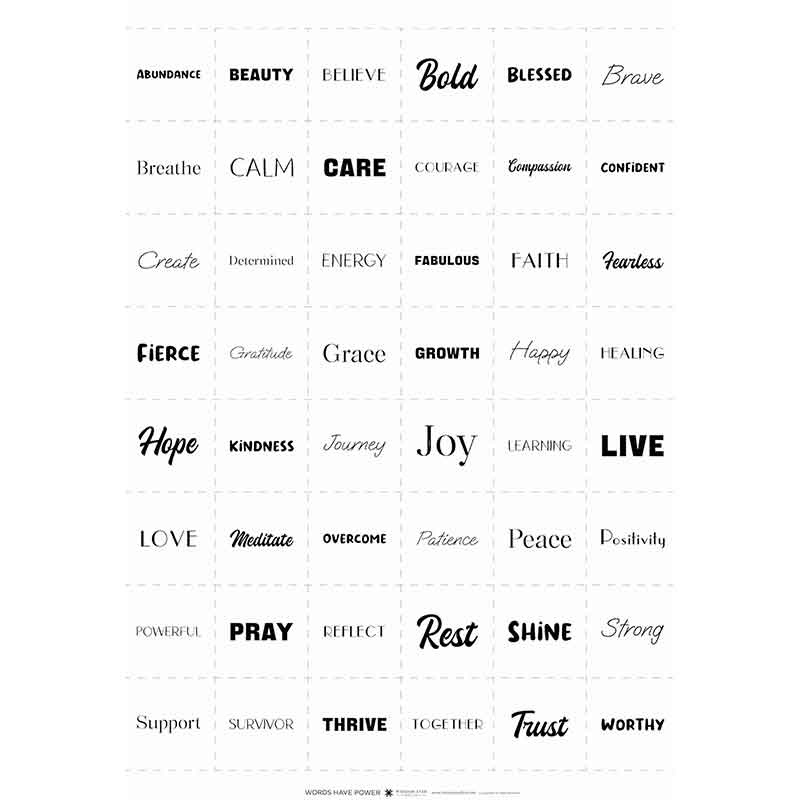
So to make this quilt, you're going to need one packet of 10 inch squares and we used Rainbow Lane, and that's by Wilmington Prints. You're going to need one Words Have Power panel, and you'll have all the words you need on here, way more than you need for this quilt. And just every word is special and every word has power. So it's a great panel to have and it has all kinds of words that can help you all the time. You're going to need some background, 2¾ yds, that includes your sashing and your inner border. You're going to need a border. The outer border, it's a nice big 6" border with this pink, and we used 1¼ yds. Our backing is 4¾ yds, and it's this nice blue. The quilt is 66" x 75", and I want to show you the backing, how beautiful it is. It has this dry brush look to it, and it's just really, really pretty. My binding is the same as the border, I didn't want to take away from it. And of course, all the little borders and sashing are all included in this piece of background of fabric.
So the quilting pattern on this is hearts, and I thought that was the perfect sentiment for a quilt like this. So for the star, the first cut we're going to make is a 4½" strip. And if you feel uncomfortable about the pinked edge, you have enough extra to just slice those off so you feel like your cuts are really clean. So let me go ahead and do that. I'm just going to take the little pinked edges off just right here. You don't have to, of course, but if you want to, you can. Then we're going to come and we're going to lay our ruler on here and we're going to get a 4½" strip, like this, and then we're going to cut a 2½" strip. So lay this right on the edge of here and we're going to cut it like this.
All right, then what we're going to do is we're going to take this piece right here and we're going to cut 2½" x 4½" rectangles. And so we'll just cut this and we'll set them over here to keep them all together. When you cut your pieces, if you cut more than one at a time, just keep them together, because if they get all over the place you're not going to be happy. All right, so 2½" x 4½". All right.
So then what we're going to do is we're going to cut four 2½" squares off of here. And again, I'm going to go ahead and just shave off these little peaks right here. And then we're going to come over here and just trim them. I'll open this part up so I can get two 2½" squares off of here. Let me check that one. Perfect. All right.
So this is what you need out of your print for the star. You're going to need some background fabric, and basically you're going to need 2½" squares and you're going to need eight of these for every star that you make. So the first thing we're going to do here is we are going to make our star legs, which is just snowballed corners. So we're going to put them on here like this, and we're going to sew all of one side. So we're going to take all four of these and we're going to snowball them all one after the other after the other on this one side. Hang on, let make sure I'm sewing. Yes I am. And then we're just going to chain piece them through like this, and we'll lay these little squares on here like that and sew right across. Now you can draw the line or you can use the diagonal seam tape, whatever works for you. And here's one more. All right.
Then what we're going to do is we're going to clip all of these and press them open. There we go. One more, and one more. All right. Now we're going to press these. So now we're going to do the same thing on the other side. Just attach a square right here and we will sew from the middle out or from the outside in, but just so that it comes up and meets in the middle up there. All right, so here we go. I'm going to go outside in, and we're going to do that on every single one and chain piece them just like we did on the other ones. All righty. So now we can trim these and we can iron them back as well. And just like that, we've got four star legs.
And now that we have our legs done, we can actually put our block together, our star block. And so we've got our four corners, we've got our word for the middle, and then we're going to put our legs around it like this, and then here's our four little corners right here, just like that. So then what we're going to do is we're going to sew that star together, and I'm going to start with this upper corner up here like this. I'm going to take my star legs and my upper corner, and I'm going to sew those together. And I'm going to do this by... I'm going to go straight down this column right here. So I'll do this and then I will fold this middle one over these legs.
When I was sewing this together, I think about every word I pick up. I think about the word abundance and what that means, and it can be an abundance of anything. I mean, for years I had an abundance of children, I mean it could be anything. And so I love the words. I love saying them out loud, I love feeling the different meanings for them.
Anyway, I grabbed this block over here from the top of my stack, and I'm going to attach it to this first row right here. I was getting ahead of myself a little bit. Now I'm going to take this one and sew the legs on the other side of abundance, and then this one that gets the last cornerstone. And by chain piecing these together, it's like pinning the block without having to pin it because as you'll see, this block right now, it all stays together where it's supposed to go because of how I've sewn it. So then I'm just going to roll this row over the top and sew that on. I'm going to take a few anchoring stitches, and then I'm going to line up that first seam and make sure it nests together. And then I'm going to line up the second seam, which is all the way over to the next corner block.
Now if you find that this middle piece is way too big for your other piece, then sew it from the bottom. You can simply take it, flip it over, and sew it down this way. Line up your corner, anchor a few stitches, line up that first seam, and then sometimes that little bottom piece, it's a little bit bigger, but if I just sew straight across here, the feed dogs will ease in more fabric and it will just come out perfectly like that. And so I'm going to do the same thing over here. I'm going to line up this edge, put a few anchoring stitches in it, and then I'm going to match up this seam, nest it. One seam goes north and one seam goes south. And then I'm going to match up this next seam. We can sew straight across. And look at that. Look at that cute little star. Let me press that for you. All right. All right.
So look at this cute little star. Isn't that cute? Now you're going to make 21 of those. Now what we're going to do before we go on is we're going to sash this block. If you sash each block as you come to it, when we get done, you'll just be able to put them all together and you won't have to add individual sashings. So we're going to take a 1½" strip, and we're going to put attach it down the side and over on the bottom. And so this should be an 8½" block, and you just want to check it, and mine seems to be very, very good. I'm actually always surprised when that happens. So you can actually cut your sashing strip at 8½", but I just put it on the side and sew it down like this. All right.
And then I'm going to take this and trim it off, and I'm going to finger press this back, and then I'll add another piece along the bottom of the block just like this. This is a sashing hack. I use this all the time and it makes it so easy. It's great for people who have a hard time lining up sashing from row to row. I have a terrible time getting my sashings to line up under the block, but if I do it this way, I don't have any trouble at all. So this is how you're finished star block is going to look right here, and you'll just put those in a stack until you've made all of your star blocks and you're done.
So now we're onto the heart block and this is what the heart block looks like right here. And when I called Charisma, I asked her, I said, "I know we did the quilt on Lovely Words, but could I use that same heart in our Words Have Power quilt?" And she was so gracious. She was like, "Of course, of course." So let me show you how to do this. So again, we're back to our 10" square, and I want to point out a lot of times when pre cuts come and they're 10", we think they are actually going to be 10", it makes sense, right? But this one is a little over 10". So if you just measure from the side, you're going to get pieces that are a little bit too big and they're not going to nest so well. So look at your lines on here, right here on your mat, and you can see that this one pops over about maybe an ⅛ of an inch. And so I'm just going to trim that off, which basically is just trimming off the little peaks. Then I'm going to cut a 4½" strip and a 2½" strip. So this is basically the same kind of cutting that we did for the star. All right.
So now what we're going to do is we're going to trim off our little edge again. Yeah, it just hangs over just a little bit, so always look at them. I mean it's nice that they're generous, but we do want everything to fit together perfectly. All right, so we're just going to put this right on here. Trim off those little guys, and then we're going to do 2½" x 4½" rectangles. There's one and two and three and four. And see we just have this little bit left over here. And if it were in exactly 10" squares, that would be exact. So that's just a good little tip and something to remember. Then you're also going to need two of your 2½" squares down here. And so I like to use my little ruler for that. And so we're going to cut one and two, and set those aside and set all of these aside.
For the background, you're going to need two 2½" x 4½" rectangles, four 2½" squares. Let's count these out here, 1, 2, 3, 4. And then you're going to need two 1½" squares right here. And you're going to need your word, and I think we'll choose "Learning." All right, so now what we're going to do is I'm going to line this up around the block so you can kind of see what's happening here because this takes just a bit more brain work. And so we're going to start with our two pieces down here on the bottom, and they meet together in the middle like this. And they each have a 2½" square in the middle and they have to be put on opposite. So one goes this way and I'm going to give this a fold, a finger press, and one goes this way. So we're going to sew it this way and this way and that will make our bottom row. So let's go ahead and sew that on. And then this one too, make sure it's lined up in the corner. There we are. All right.
Then we are going to trim these off just like this, and we're going to finger press these back and we're going to sew these together. These form the tip of our heart, the very bottom part of our heart right here. All right. So then we're just going to sew these together a quarter inch seam right down the middle, let me move my scissors out of the way, and press that open. Just like that. All right. This goes down here.
All right, now the sides of our block are two of these 2½" x 4½" rectangles right here of our color. And then we have to make it curve in. So we're going to take two of our white squares, again we're going to do that fold line on them because we want them to curve in toward the bottom so it matches up like that. And so it helps if we just lay them down here and put it in the right place. So this one comes in this way and this one comes in that way. And we are going to sew this on the line. Wait a minute, it slid out of that corner. We want to keep it right in there. And then this one. Like that. And then we will trim these off, and we'll press these back. And then we're going to attach these to the middle. So you know right away, if you've put this the wrong place you know right away. So I would suggest testing them before you cut them to make sure you got your angle going the right way. Our angle is going the right way. And laying it out this ahead of time will help you as well.
So then we're going to go ahead and attach these two to our word, one on each side. And then we'll put this one on the other side, making sure the yellow comes into the fabric. And then you know what, I think let's go ahead and sew that bottom part on right here while we're at the machine. We'll go ahead and do that. So line up your edge. There isn't much to line up along this. There's not a real seam that has to be lined up with, so just try to match it up across the bottom. We'll go press this open. There we go, a little bit over here. So here's the bottom half, and we're onto the top rounded part of our heart.
So on each of these we're going to put a 2½ on the outer edge and they're going to point in toward the middle like this. And then we're going to take this little 1½ and we're going to finger press it. And it goes on the very middle and it goes like this, so that this is going to come and we're going to sew that way. So it makes that curve of that heart.
So we'll put this one here. And what I like to do is I like to take one of these pieces over and just sew up here and sew down there, all in one fell swoop. And then I don't lose my piece or my place because sometimes when you're dealing with different size squares, you don't want to get them on the wrong side. So I will sew off that edge, pull a little bit of thread out, and then I will go ahead and stitch this one down. So now that's done and ready to go and we'll clip off those extras.
All right, so let's grab that other square now that makes the top of our heart, and I'm going to sew across this little one first, just because that's the direction I like to sew. Pull some thread out, move it around, and then we're going to line make sure this big 2½" square's lined up in the corner. And then we're going to sew down the side of that. And then what we're going to do is trim this off like this and we're going to press these open because these have to be sewn together on the middle seam. So we're going to go ahead and press this open right here and then this one. And then these come together like this and we sew them in the center and they form the top of the heart. And when you put the top of the heart... When you sew that into a seam, it even rounds more.
All right, so then we have this piece right here, and see how it works right on the top? So then I'm going to take this and I'm just going to sew it onto here and our heart block will be finished. And again, there's no middle seam, so just line up your two edges, make sure it fits across the width of the block, and then we will press this. And because this has more little pieces on, it has more of a chance to get a little wonky, and so I'm going to lay my eight and a half inch ruler on here and make sure that it's still right in there and pretty good. I have a little bit peeking out right here. I'll just trim that off and then it stays at 8½.
All right, so you're going to do the same thing with this that we did with the other one. You're going to put a piece of 1½" sashing here and across here. And when you go to set them together, let's go back to the quilt for a minute, when you set these together, they go together like this. See how this comes in here like this? And this one comes in here like this? And so you're going to do a star and a heart and a star and a heart, but they're all bordered like this. So you just literally sew the road together. No sashing in here because you've already put it on, and you'll do that with each row.
Now when you get done putting them all together, you'll notice there was no sashing sewn on the first part. So you just take your 1½" strips and sew a few of them together and sew down the side and across the top, because on the other side and the bottom, they will already be sashed. So you'll only have to sew on those two sides. Then you're going to add your nice big border on there and you are going to give it to somebody who it's going to make their day. I'm telling you. These words, even making the quilt and touching and holding these words, it just changes you. It's just a beautiful panel and a beautiful way to make a quilt and a great way to share it with somebody who needs some encouragement in their life.
So once you get your quilt all done and sent off to the quilter, you still have this stack of scraps. And because they were this size, I decided that what I wanted to do was use as much of the fabric as I can. You know I'm not a waster, so this is going to be a 3" piece. And so I just divided it in half, whatever size piece you have leftover. And mine came out to about 1½ or 1¾. Anyway, cut them all the same, and I measured them and I cut them at about 4½" each, and I just sewed them together in rows. All those bright colors sewed together in rows from all my leftover pieces. And look at this table runner that I did. Isn't this so cute? It's just bright and happy and cheerful. And you may get a shorter one or a little bit longer one depending upon how many strips you have leftover and what size you cut them. So I know you can make this. I know you guys can because you are learning, you are determined, and most of all, you are powerful. So we hope you enjoyed this tutorial on the Words Have Power, quilt, and our bonus table runner right here from the Missouri Star Quilt Company.
Hi everybody, it's Jenny from the Missouri Star Quilt Company. We hope you enjoyed watching this video. If you aren't already part of the Missouri Star Quilt Company family, be sure to subscribe so you won't miss a thing. And if you click that bell, it'll notify you every time a new tutorial comes out. See you next Friday.



