Skip to content

Free quilting video tutorials from Missouri Star

Quilting Tutorials
Prairie Twilight Lonestar Quilt

Prairie Twilight Lonestar Quilt

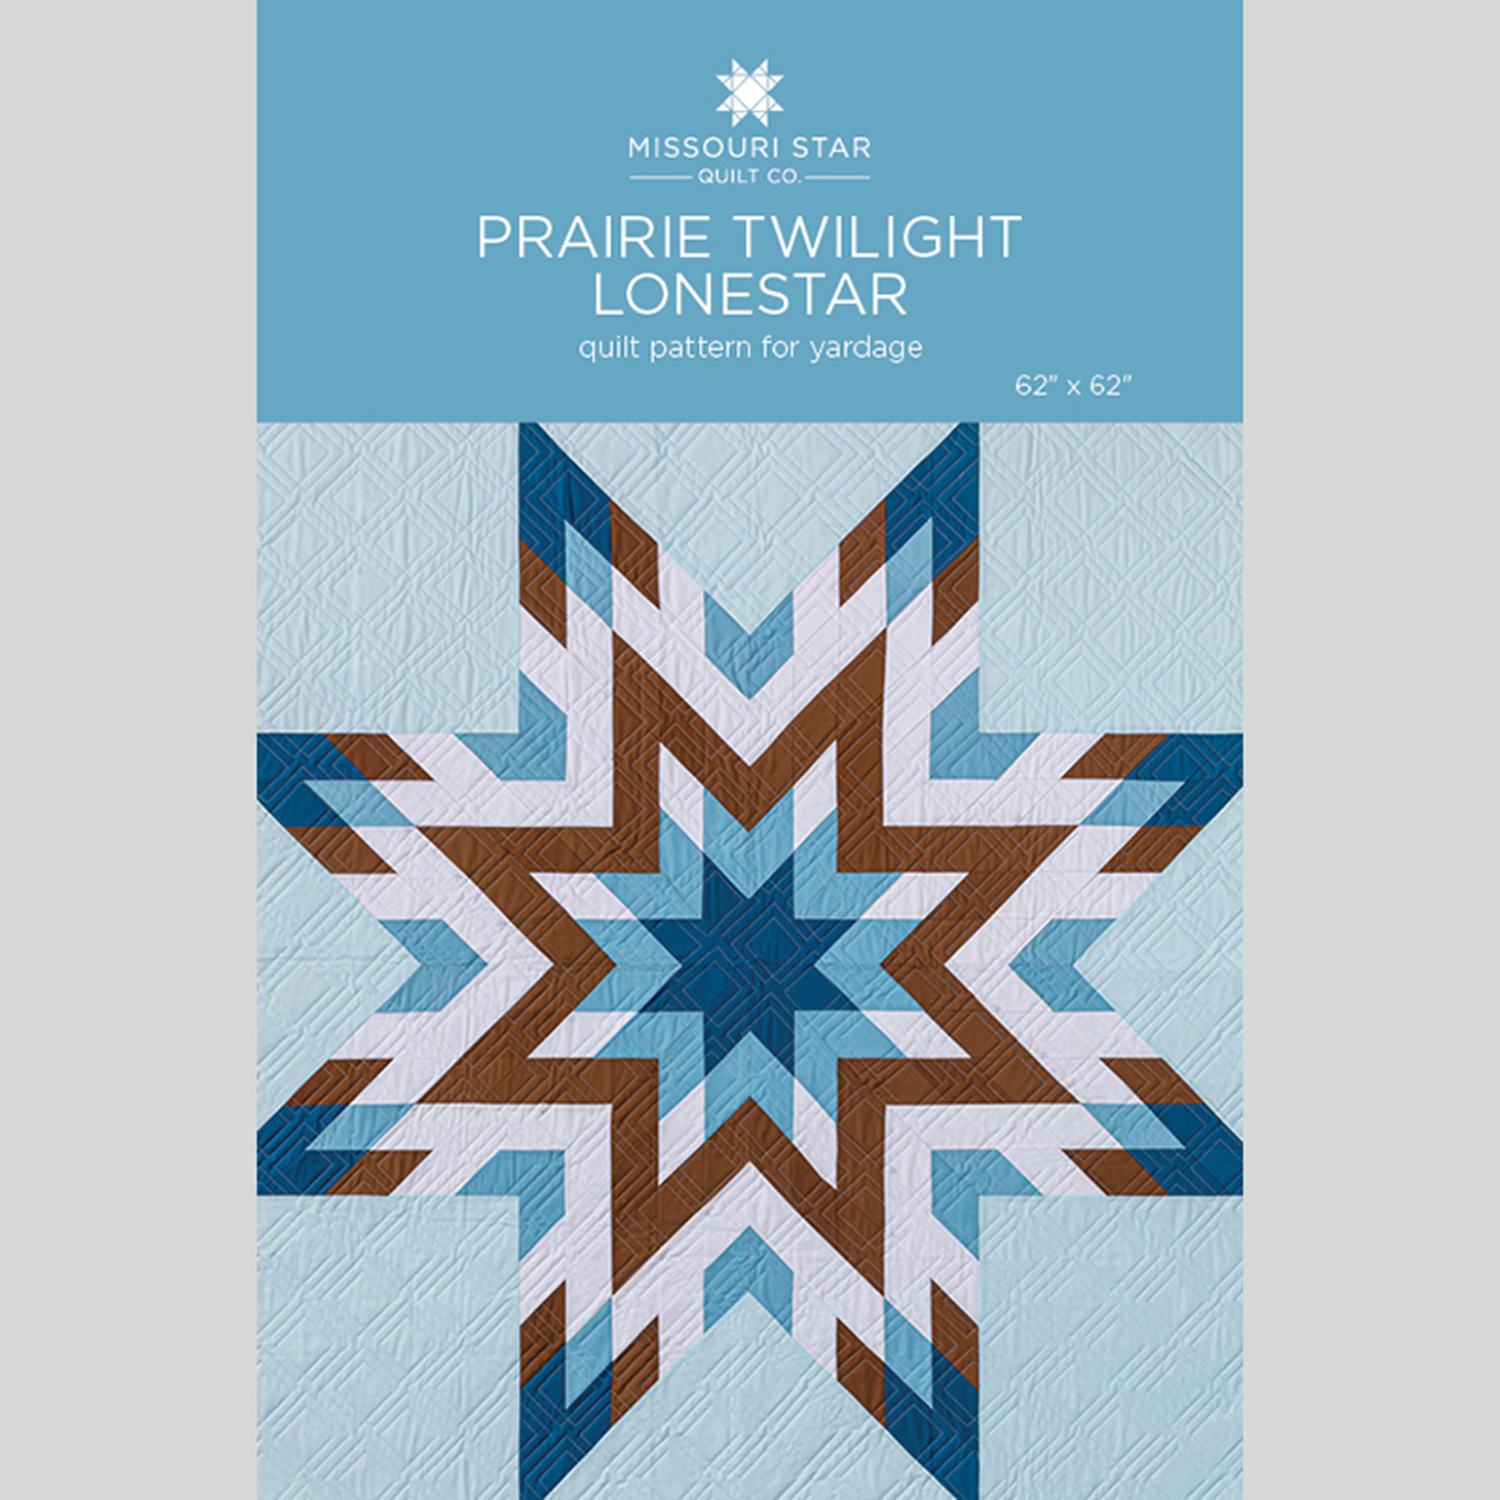
The big, lone star in this quilt is as big as the heart of Texas! The Prairie Twilight Lone Star Quilt, made with just a few shades of earthy Kona Cotton Solids, makes a big impact! Misty shows you how to create a striking quilt with Southwest flair!

Instructor

Misty Doan

Misty Doan grew up surrounded by sewing and quilting. She loves spending time sharing tutorials each week each week, and when she’s not stitching up one of her fun sewing projects for home decor, most likely you’ll find her hanging out with her husband and three awesome kids or working on a house project.

Common Questions

What is covered in Prairie Twilight Lonestar Quilt?

The big, lone star in this quilt is as big as the heart of Texas! The Prairie Twilight Lone Star Quilt, made with just a few shades of earthy Kona Cotton Solids, makes a big impact! Misty shows you how to create a striking quilt with Southwest flair!

How long is the tutorial video?

The tutorial video is 00:27:35.

Are supplies listed for this tutorial?

Yes. The tutorial page includes the supplies and materials connected to this project.

Video Transcript

hey everyone I'm so excited about today's project Courtney from our sewing team is a lone star expert and I have wanted to make a lone star for so long and she helped me design and make this one and I just love how it turned out so let me show you how to make [Music] [Music] it I'm calling this pattern Prairie Twilight I think it just turned out so beautiful and it looks really radiant as it bursts out from the middle and so in order to make this you are going to need five different prints up first of your white you'll need 7/8 of a yard of the brown you need 3/4 of a yard of this light blue it's 5/8 of a yard a half yard of the teal and whatever you choose for your background I use this really pale kind of aqua color you need two yards of that for your backing you need four yards with horizontal seams you're also going to need a marking tool and a nice ruler with a 45° line so let's go ahead and move all of this out of the way and I do recommend if you have never made a lone star quilt before Courtney has a video on our YouTube channel called Lone Star celebration and she walks you through all kinds of tips as far as starching pinning just really great tips and tricks if you've never made one of these before so go ahead and watch that so you have all of her insights and then we will get started so up first what you're going to do is we are basing our design off of 3-in strips and there are five different strip sets that you need to make we're going to work on the first one here I went ahead and cut our different colors into 3-in strips and then I cut them in half so it's not the full width of fabric that was one of Courtney's tips to manage this and so you can see here now we are going to make these strip sets so here's my first color and then when I go to add the second color I'm actually going to offset it those 3 in so I'm going to have less waist by doing that since I'm cutting all of these at an angle so let's go ahead and fold this first one over and I just lay it on my mat and kind of eyeball to make sure that I'm staggered the right amount and then we'll just fold it over and we'll sew this with a/ quar inch seam and I'm going to add one Co color after the other in that exact same way until my strip set is complete so let's go ahead head and do that okay there is that first one now I'm just going to roll this back give it a quick press there we go and now we can bring in that brown color again we just want to make sure that we're about 3 in over and then we'll fold that back and sew it down and I'm going to keep going until I have all five of my strips sewn together and then I'll meet you back here when it's all done all right so let's give this last strip a final press and then this strip set is done there we go then strip set a is all ready to go let me show you what these other strip sets look like as well I've already cut some off of them but just so you can see here is B here is c d and E and so the color placement is really what matters um and let me show you now how we're going to cut these into our segments to make our Lone Star so I can set this one aside and we are going to use our ruler here and the 45 Dee line so I'm actually going to flip this over so I am lining that that 45° line up straight with the bottom edge of this Fabric and then I want to slide it as far over as I can to make sure that I have as little waist as possible so I'm just checking for those little Salvage edges there we go there is our first cut that's the scariest part and now we can slide this over again and we are looking look for 3 in and so 1 2 3 I want to make sure now this line here the 3in line is straight with the edge that 45 should go right to that point of our Fabric and this should go straight across the bottom so those are the things you're checking for every time before you make a cut and so we're going to make that 3in cut you're going to continue your strip sets you'll cut all of them but I'm going to just show you how to do this so I've gone ahead and made some of these other Cuts so that we're all ready to go so now we're going to lay these out so here is our first one and then this one's going to come in just like so and we'll see this start to take shape which is so fun and here is our last piece just like that so you can see how this is going to come together once we sew this together but let me move this up a little bit because lining these up to sew is honestly one of the trickiest parts of this step so here are our first two strips We're going to sew we're going to fold this one back let me grab some pins here because pins are going to be your friend in this case and so what we need to do is account for that quarter inch seam that we're going to take and so what I like to do is just stagger my seams a little bit here and when I fold it back what you want is for the angle here and the angle here to match up when you fold it back a quarter of an inch and once you have that I know it's hard to see with the white on white let me go ahead and pin this and I'll show you on the brown because I think it'll be clearer for you you want to pin that in place but so see here I've I've slid it past and then when I fold it back a quarter of an inch you can see how that white is going to continue at the same angle and that means I'm going to keep those nice sharp points when I sew my quarter inch seam so you just want to take your time and pin these junctures otherwise you're going to be super sad when everything is just a little bit off so again we want these to line L up fold back that looks good put a pen in it and same thing here you can really see here here's that blue seam I'm piecing it with the white and I just want that angle to continue in the exact same way and then when I fold it back it looks like it just lines up with nothing at all all right so we've got that pin and so now that we know that this is all lined up the way that we want it we can go ahead and take this to the sewing machine and gently sew our quarter-inch seam just be careful not to tug and pull let the machine be the guide since we are working with that bias Edge and I'm going to get as close to that pin as I can without sewing over it just to make sure everything stays right where I want it then pull it out of the way and keep going okay all right now let's open this up and take a look see how we did that looks pretty darn good I'm very happy with that so you can see all of those 45° angles are matching up nicely I'm going to wait to press this at the very end because I don't want to risk distorting this but I'm just going to continue in that exact same way folding these back and pinning and by sewing these five strips together that's going to give me one star leg and we're going to make eight of these for our quilt so I'm going to finish this up and I'll meet you back here when I have it all sewn together all right so here is our first Little Star leg unit all sewn together I think it turned out really nice again just remember when you are pressing this do not you're pressing not ironing don't stretch it a lot of starch is your friend to keep it nice and stiff and easier to work with on those bias edges and so now that we have our star legs done you're going to have eight units that look just like this and we're going to start putting it together in quadrants and so here is another one and we are going to sew these together to start with but because we're going to need to set in our Square in this corner here we need to Mark out our seam to leave room for that because we do have some set in seams which is not hard you just have to know how to do it so I like to use this little ruler here and we we are going to measure in a/4 inch from this Edge and I am just going to make a little Mark right there with my chalk pin there we go you can see there and then I'll do the same thing from this side and so now you can see I have a little X that I've marked on my fabric here and the center of that X is where I am going to start my seam to go down to this end here I can go all the way to the edge but I need to leave that quarter inch so that I can set in my my corner later so let's go ahead and take this to the machine and I'm going to put the needle down right in the middle of that X perfect one other thing I forgot to mention as we're sewing down these angles aren't the same as when we were sewing all of our strips together you just want these to line up exactly so your seams should nest as you're sewing down and just be really careful not to stretch so I always kind of check before I get to the next one to make sure I'm still lined up and then use that as the opportunity to to just readjust and make sure everything is where I want it okay beautiful all right now let's open that up that looks so nice and we have that little quarter inch seam that is open at the top for us to set in our corner and so the size that you need from your background is 18 and a half Ines so I have gone ahead and cut that and so let's go ahead now and talk about attaching these Corners so I like to just pick a side and just like we marked on our other other one we're going to Mark out our quarter inch from that corner so we can line up the right spot all right so a quarter inch in from both directions and so that is where my needle is going to start right there and so then when I bring this over here I'm going to fold back this piece and I'm going to set in this Square all right so then I'm going to take a pin and I'm going to place that right in that little juncture that I marked and then we are going to line that right up with our quarter inch that we saved and again we just want to make sure this piece is out of the way when we start stitching there we go and then this is just going to line up straight down this side and we can this first seam so let's bring this in again we're going to put our needle down right where that Mark is so I am going to take a few stitches here and then go ahead and back stitch just don't go past that Mark beautiful all right now let's see how that's looking that looks really nice and so then now I'm going to turn this I'm going to pull this opposite star leg over and same idea we want to make sure the bulk of the rest of this is out of the way because we don't want want to catch that by mistake and the beauty of this side is you can see where those other stitching have started and stopped so we know it's right there here's our little quarter inch right there and so we're just going to start in that same place right at the beginning and sew all the way down this Edge so let's go ahead and do that all right so I back stitched again there to lock that in and then we are just going to sew carefully down this side all right I am actually going to stop here because I'm seeing that this isn't lining up exactly how how I want at the end I've just got a little bit of overlap and so if you have a piece that's a little bit bigger if you put it down towards the feed dogs it will help ease it in if it's way too big you probably need to double check and see you might have done something you know had a little boo boo cutting error or something but I'm going to flip this over and I'm going to put a little pin in here to make sure it stays where I want it to get started and then I'm going to ease this in because again we don't want to tug and distort our star I'm just going to make sure that this is staying nice and straight everything is lined up and then we can just zoom on down and then be sure to back stitch where I stopped [Music] before there we go all right so now let's take a look at this there is our little set in seam I think that looks really nice I'm going to wait to press this until the very end just because I don't want to run any risk of distorting this more than I need to and so now once we have one of these done we can attach another and then I'll show you how to do this set in Triangle and then that is really all of the tricks of this quilt because you'll just repeat these steps that I've show shown you to finish it out so we're going to fold this over line up our middle here just like before and remember these are those straight edges so we don't have to worry about that kind of goofy overlap you just want to make sure those seams Nest so let's go ahead and take this over you do need to I almost forgot you do need to mark your quarter inch seam I'm getting so excited that this is almost done I would have been frustrated with myself so let's again measure down because we're going to have to set in a triangle this time so there's our quarter inch that way and this way and remember you're starting right in the middle of that X and leaving the rest of that seam open so that we can add our triangle at the end now I want to put my needle down right there perfect so we'll take a few stitches [Music] forward go ahead and back stitch to lock that in and then now as I go I'm just going to line up each little juncture to make sure my seams are nesting there's that first [Music] one okay and one more little seam to match and then when you get down to this bottom corner I just kind of like to man the bulk I press one of the seams one way and one the other just so that I can have as little under the needle as possible there we [Music] go all right look at this we have half of our star coming together isn't this awesome so now we're going to set in this triangle here to finish out our star so let's go ahead and fold this and set it aside and I have a 23in square here that I've cut from our background Fabric and we need to give this a press so that we can cut this in half so let's go ahead and take it over to the ironing board make sure it's nice and straight go right to that corner there and then I'm going to find my middle just by folding this giving myself a crease there in the center Perfect all right and so now we are going to cut this in half so I've got that crease right here I want to make sure that my ruler is straight across this bottom Edge and going right to the point there we go and so now we will have two of the four setting triangles that we're going to need for this quilt the last thing I want to do before we keep going is we need to Mark our quarter inch just like we did on our squares so I'm going to use my little ruler here and we're going to be marking this 90° corner and we just want to come in from this side and this side oops there we go oops broke my chalk there we go and so then we're going to start with our needle right there at the quarter inch line so let's bring our quilt top back over here and let's get this all ready to go and so just like when we added our squares we're going to kind of fold back this excess out of the way and we are going to start by placing that little Mark that we made so that it lines up exactly with where the stitching started and or stitching stopped back there there excuse me so I'm going to go ahead and put a pin in there and then you'll see this is going to be quite a bit larger than our our piece and that's what we want we'll trim it off straight at the end we just want to have plenty of room so now same thing you guys are going to get so good at these set in seams and then the possibilities are just endless so let's lower that presser [Music] foot right on that starting point again a few stitches back stitch to lock it in there and then we can just zoom down the side of this star leg again same rules apply don't be stretching or tugging anything just make sure it's all lined up and then let the the machine do the work for you perfect there is our first one and then now we are going to bring this around the other way and once you have those marked you're really just sewing straight seams I am going to flip this over and sew it from this direction just to make it easier on myself keep some of that bulk out of the way and so if you need to come in and make your mark again but I can see right there where my stitches stopped before so I'm just going to use that as my guide and continue down this way okay I took a few stitches there just to Anchor it now I'll line up and just continue down this side [Music] okay there we go now we have half of our star complete doesn't that look awesome at this point if you want to give this a press this is the time I would do it and so we will just press this gently and then we'll use our ruler to square off this Edge the extra piece that we have left over you're just going to make the other half in the exact same way sew those together add your last two setting triangles on the side and then your quilt is going to be done so let's hold this up so you can see how this fits in right there into the quilt behind me and we get to finally say that we made a lone star and I'm so excited about that I love this quilt I hope you guys enjoyed it I Ed this great panto called diagonal plaid for the quilting which I really love and here is this beautiful backing I love the great kind of natural beach texture that that has and this finishes off at 62 in square so it's a great throw size but I have to show you this little mini that Courtney surprised me with I think it is so cute how fun is this she used inch and a quar strips to make it but everything else is exactly the same so don't be afraid to play with your strip size um and and just experiment and have fun I hope you guys enjoyed this I can't wait to see your versions of the Prairie Twilight quilt and I'll see you next time on at home hey everyone thank you so much for watching at home we're so excited to be almost a million Quilters strong here at Missouri Star and so if you haven't already joined our family be sure to subscribe and hit that notification Bell so you can be notified of all of our future tutori and we'll see you soon [Music]

More Fabric by Yard tutorials

See all