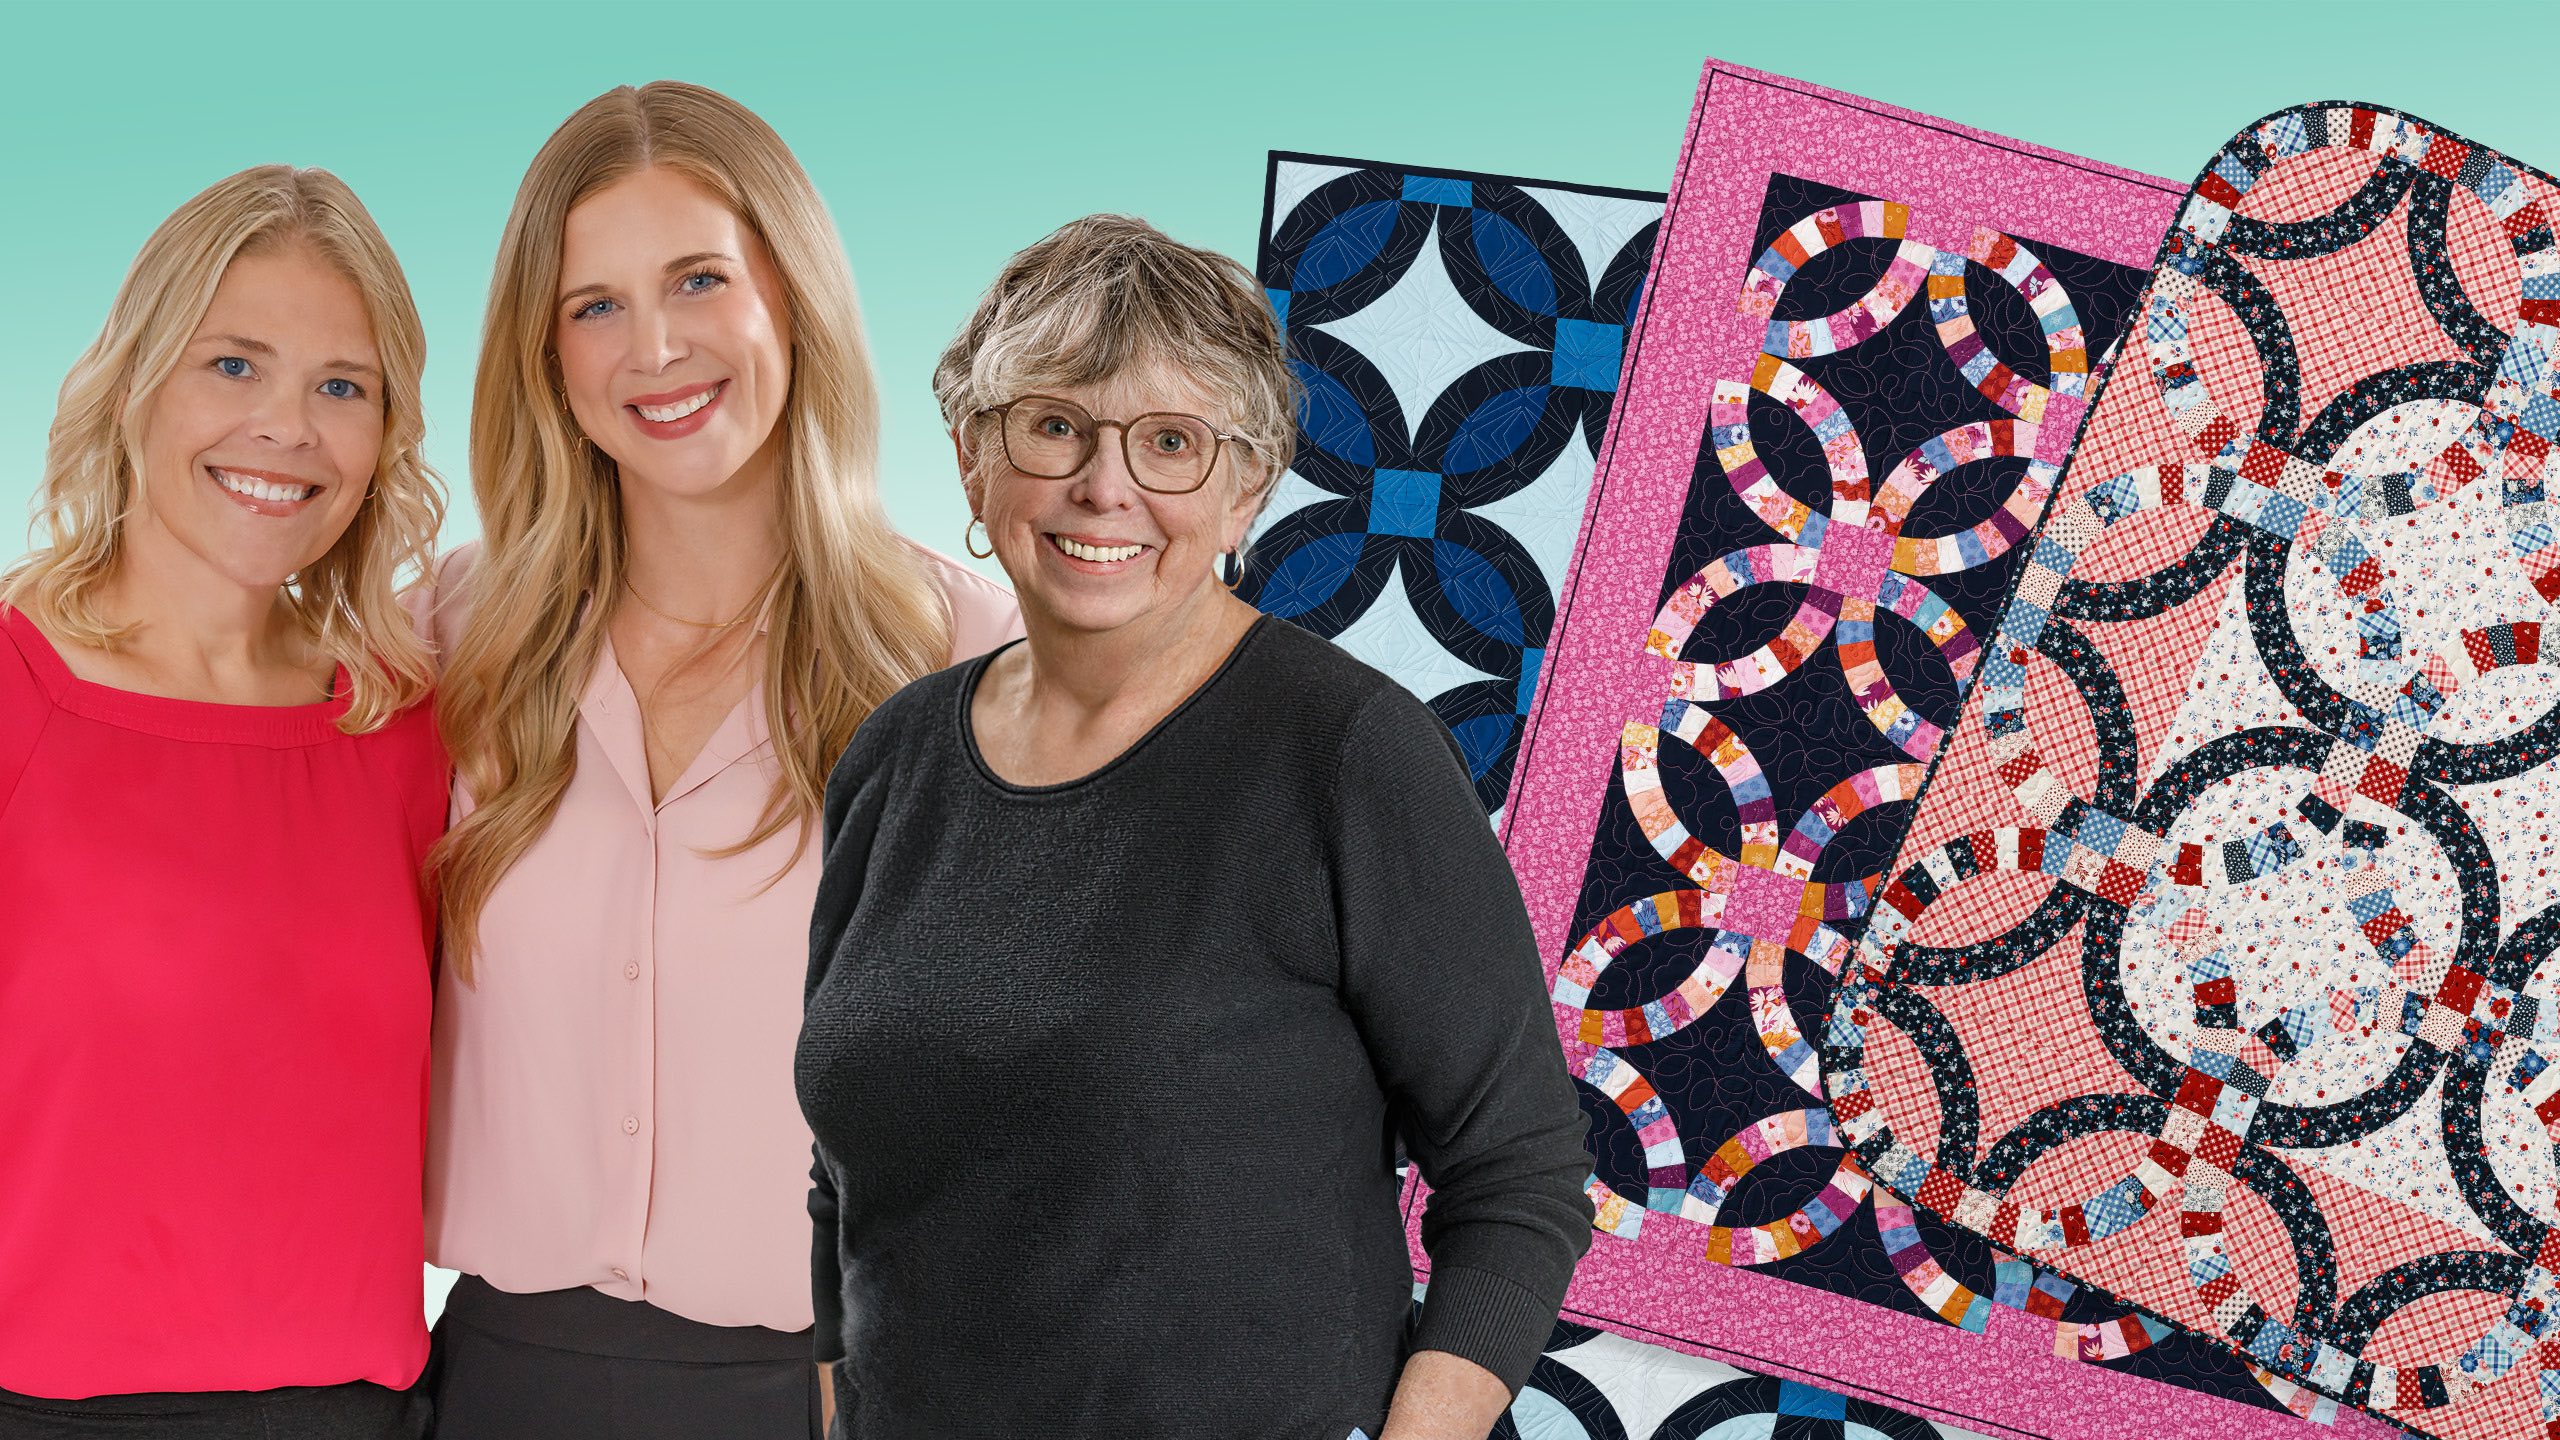
A Black Friday Triple Play you’ll love! Natalie and Misty stitch wedding ring blocks with Andover fabrics using Eddie Walker’s brand-new wedding ring template -- Natalie in the classic Quiltessential collection, Misty in the artsy Petals & Stitches line. One block, three unforgettable looks!
Natalie is the host of Quilting 101, Embroidery 101 and the Creative Strategist and Editor of Block Magazine at Missouri Star Quilt Company. She was taught how to sew by her mom, of course, and began quilting when she grew up.
Common Questions
What is covered in Triple Play: Double Wedding Ring with Eddie Walker?
A Black Friday Triple Play you’ll love! Natalie and Misty stitch wedding ring blocks with Andover fabrics using Eddie Walker’s brand-new wedding ring template -- Natalie in the classic Quiltessential collection, Misty in the artsy Petals & Stitches line. One block, three unfor...
How long is the tutorial video?
The tutorial video is 00:30:23.
Are supplies listed for this tutorial?
Yes. The tutorial page includes the supplies and materials connected to this project.
Video Transcript
Hi everybody. We are here for Double Take Week. It's a bonus video and we're here with Eddie Walker. Hello. Hi Eddie. We're so glad you could be with us today. Eddie has something super fun to share with us and we get three versions of the double wedding ring quilt. Yes. Yes. It's going to be so fun. I've always wanted to make one, but it's been very intimidating to me. So, I'm really excited for this video. Well, the thought was to simplify the wedding ring so people could make it. Exactly. And you've done that. Yeah, I really think I have. It's been very fun. And there's lots of um exciting people out there who can make wedding rings for gifts and things that they didn't think they could do. Exactly. It's going to be so great. So Eddie, you came to our Dome Girls Retreat last year and you brought your little handmade templates that you had and told us that we could make a double wedding ring quilt. Yeah. Yeah, we did. I I think you were met with a little bit of disbelief. I know. We we were like we were not so sure but by the end of retreat you had convinced us and so we have been working together to develop a template set to share with everyone and I think it turned out amazing. I do too. It's perfect. It's really great. And you really can make it. You just need to simplify what you're doing and put it together in squares instead of a nice roll of curves. Of curves. Exactly. Yes, there are curves but these are short easy ones. Yes, they are. And it's very very doable. And it's basically just comes down to math about getting that 90° arch. So, it does work. Exactly. And so, we're super excited to share it with you. And Eddie, this is your beautiful quilt that you designed. Yes. Yes. When I got I love all the different layout options and using a solid arc versus a pieced arc. Yes. It's very fun. And I was very excited to get my sample of the templates and play. And I have been playing. I love that. So, it's been great. So, all right. Let's tell everyone how to make this one. Okay. This quilt I called Let Freedom Ring because I was using patriotic colors. And this is from the uh Star Spangled Beauty from Kimberbell. And it takes um a two and a half inch strip set. Okay. This is our accent which is a solid arch. And it takes a yard and 38 to make the solid arch. The white background or the lighter background that is the middle of the quilt. It takes 1 and 1/4. From the gingham checked, it takes a yard and a half. And this is our backing. And you'll need three and 2/3 yards for your backing. That's right. And you're also going to want our amazing double wedding ring uh template set that Eddie helped us design. And a 10-in square ruler would be handy to square it up at the end. So, let's show you how to make it. Okay. So, we're going to s take our strips and we're going to separate out the backgrounds that we've used. So, we've got lights and darks. We're going to lay these down. line them up really quick and easy. And I cut several at a time. This little wedge is just perfect. We set it on here like this. And we are going to cut across there. Flip it around. This is the first one. And then that just flips back and forth on each cut. Perfect. Nice and easy. You're also going to want to cut some 2 and 1/2 in squares from these strips. Okay? And you should be able to get um two 2 and 1/2 in squares from each one with inclusive with the um wedges that you need. Okay, great. Yep. So, you need from your strips, but you need to get rid of that little angle. There we go. Nice. So, a two and a half. Beautiful. Okay, we're going to throw away the the scraps. You can make that work. We can. There we go. Now, Misti is going to sew for me. All right. You bet. Okay. We're going to take nine of these. Okay. And you can pick out any nine you want. Just try not to duplicate them. Okay. Just make it scrappy. Mhm. And so do you just chain piece some and then sew those? I go two two and then I save one and throw it on the end. That's how I would do it, too. So, and they all go with like the wide widest part at the top so that it curves. So, it makes this nice little arch, right? So, you're not like alternating up and down because that would just make a straight row, right? Mhm. Okay. Okay. Let me do these. Make sure I'm lined up. And we're just taking a standard quarter inch seam. And then I can open these. Oops. I need some scissors to trim them apart. Now there we go. The race is on. Yeah. Here we go. I think this needs to go on this side. Yeah, you can kind of play and balance them out with your color way. Yeah, it's kind of fun. And I think that means I How many you got there? Two, four, six. Six. Okay. So, this is based on a 10° ruler. So, it's nine 10° angles make up 90° arc. Okay, which is Yeah, that math makes sense to me. I like that. Have my few more here. And this like one more. Yep. One more. There you go. Okay. Now, I don't iron this. I kind of crease it with my fingers. One of the key things is the quarter inch needs to be pretty accurate to get this this arched piece to match the arch solid. And we have this solid arch. So, we can literally test our quarter inch by placing the arch on top. Mhm. And we can tell whether we've got our quarter inch pretty accurate. You did great. Okay. Okay. I did my best. Okay. Excellent. So, now that we have our two arcs, we're going to set those up there. And we're going to cut an arc out of this the accent color, which is this one. And these are using the solid arc, which we're going to place here on the edge. And we're just going to cut this out. Oh, did we cut? No. There we go. There we go. Okay, now we have pretty smooth most of our parts. We're going to cut our And so, let's just point this out really quick so people know when they go to cut the next one. This will just so you'll alternate direction lining up one of the flat edges with the edge with both sides and so you'll have very little waste because you're just going to kind of balance it out. Huh. Yeah, that's great. Okay, that is all right. And then for the backgrounds and the melons, I've cut 10in squares. I went ahead and cut 10in squares because when I thought about doing this quilt, I was thinking about jelly rolls and pre-cuts. Yes. And it works great with the 10in squares. whether your UDI is using yardage or not. So, your background template, I'm just going to do one of each cuz we've got That sounds great. Okay. So, we don't have to cut through so much there. Okay. So, we're going to line those up and we're going to place our template in this corner and we're going to cut in here. Come around there. So, we're going to use those, I think. Yep. There's our little outsides. Excellent. And then you get another cut from the other side side. And I did one of each. The pattern will tell you exactly how many you need to cut of each one. Yeah. Because this quilt has a variety of blocks in it, right? It does. some that have both pieces on both sides or the same piece on both sides and then some have opposite pieces and you get a lot of variety in the the quilt. It's it really is it makes kind of a a ring which is I love alternating the the way that it looks with the alternated backgrounds and the alternated ring um arch styles. It's so cool. Okay, so we're set. We've got everything cut. Well, except for our middles. We haven't cut those. Oh, we haven't cut their middles. Goodness. Yes. All right. So, that arc is slightly different, right? Slightly different. You can't just take what's left. Sorry, guys. Okay. So, this is our melon piece, and it fits right in between what is left between our two backgrounds. Yep. So, we're going to cut our melon. Excellent. Just around. There we go. Good day. Beautiful. All right. So, we have our components. All right. Yes. And we have a mess, too, but we'll clean it up. So, we can tidy. I'll grab a few of those things. And then, so we're ready to start assembling. Okay. Do you want me to do this? I think I would love to have you do it cuz you are the pro. That sounds great. So, what we're going to make is our center square. This this middle middle square here. So, it has one piece, one solid, one piece, one solid, and the same background. And I'm going to show you how I'm going to put that together. So, put these over here. This quilt is is fun to make in that you you really can do it quite nicely with not a whole lot of work. The block goes like this. Awesome. So, this is primarily and then you need our little squares two and a half. Those are over there. So, those go on the solid melon or solid arch, excuse me. Okay. Like that. Should we do this? Yes. What stitch do you stitch first? Cuz that's always been my hang up with with whenever I've Okay, I've tried it a bunch of times and I've always struggled with which seam to sew in which order and then getting them all to match up. Okay, this is a quilt that I take camping with me. I mean, to be honest with you, and I take a little cigar box of all of these full and I sew them together until I get gobs of these. I love that. Okay. And then I sew these to my melon. Okay. So, let's do that. Okay. Perfect. Okay. When I do that, I fold my melon in half and just finger crease these two points. Your little middles. Yep. My little middles. Okay. And I start over here and I line up my my melon and my arch as square as I can. So, it's nice and flat together. And you're not pinning. I'm not pinning. I'm not a pinner. Okay. Um, you did say, you mentioned earlier when we were chatting, that you could use a little dot of glue, which might be helpful. And if you're a pinner, pin. I mean, yeah, by all means, it's or, you know, glue. Do whatever you need to do. So, I will take a few stitches in, make sure I have needle down, and then I count. I literally count one, two, three, four, five, and I have the middle of my fifth. Then I'm going to place it on my crease. Okay. And you notice I didn't press anything. We didn't press these arches. If you press them, you can really distort them. So, we're just going to gently sew this around at our quarter inch. I'm going to pause in the middle of the fifth. Needle down. Go over to my end. Place my end as square as possible. Pull my little pieces out to the edge. And these make great little handles to hold them up there. So you're just Well, you just made that. You just made that look like a breeze. And I mean it really I've done a few. Okay. I've done a few. Okay. So this is this side. I'm going to sew this backing on the on the other side of the on the other side of the arches cuz we need this unit. Okay. So, here we go with And this is basically you've sewed these all in this direction. And they're just going to want to lay down that way. You have to check periodically, but they're going to want to lay down. Okay. All right. So, I start again very square. Oops. Let's find our center. Good call. And I just crease it again lightly. And this part is more familiar to me. This feels like a a drunkard's drunkard's cat. Yeah. Okay. So, all right. So, same way you're just match number my red one. Y number five. And I put it right in the middle. I kind of check to make sure everything's flowing this way. And it is. And like I said, one of the key things to make this fit really good is to bring that all the way out to those little PKD edges. Okay. Okay. Stop and breathe. Take a deep breath. Yep. Bring your And like I said, if you want to pin, pinning works great. We say that a lot. You just have to take your time. Take a breath. You got this. Okay. So, this is half your block. Oh my gosh. Excellent. Can we press now or do you wait until you put the whole thing together? It's more fun when you more satisfying cuz it just goes nice and flat. Excellent. It's coming together. It looks so good. Okay. Okay. Again, we're going to go to the solid arch and we're going to find the middle. And we're going to find the middle of both sides. We're going to crease both sides cuz we're going to use this one later. Okay. And there's no count to five, guys. Well, that's true. You know, we just have to find our middles. Okay. And we're going to find the middle of this right there. Yep. So, one you do inside and one you crease outside. That way they nest, right? I'm not sure what we mean by that. Okay, so you just automatically did this, but I wanted to point out you folded this one right sides together to crease and then this one wrong sides together because then they they literally nest into each other kind of valley and you just automatically did that. I don't I guess I didn't know it perfectly for making that that um those folds just nest crevice. Yeah. Yeah. Yeah. I love that. Yeah, that worked. I I must do that subconsciously cuz I don't even recognize that I do it. Yeah. I mean, like I said, I have made a few of these. Yes, you have. Um, I'd love to see a whole trunk show of all the different options and ideas that you come up with. Because it is fun. You can use honey buns to make your 2 and 1/2 in strip, which is a really pretty quilt. Yeah. Yeah. This is a little faster. You don't have to make sure anything's laying right. Nice. So, you just pull this one over after you've matched your center. Whoops. Out there to the edge, Eddie. Okay. So, now we've got the second half. This is where it doesn't make much sense kind of. I know this is We're going to add these pieces to the end. We're going to put them right here on the end of this and it's going to be our four patch. And then I deliberately cut or designed the the background piece to be oversized so we can trim it to 10in square. That's right. Okay. So then that lines up with the inside of the ark. Yes. Perfect. Let's maybe bring it out here so they can see really well what you're talking about. So we're going to put this right here with the inside of the ark. And you should have a quarter inch seam allowance sticking over. So basically this seam allowance here will match with this edge matching out to here. Okay. Okay. Excellent. So we're going to sew that on. So they don't match exactly. You just Exactly. Just to line up on the inside. You know, you never know with with pre-cuts whether that pink edge is extra or if you go from the inside of the pink or the outside of the pink. I don't Well, and it's always nice to have a little room for squaring because, you know, sometimes our seam allowances aren't exactly perfect. Exactly. Right. So, we're going to sew that one on there and this one on here. Now I did when I cut my squares, my two and a half inch squares, I did cut and then I divided into lights and darks because it's important when you want your four patches to be appear as four patches to divide them into lights and darks. Contrast, right? Yes. So you have a light on one side and a dark on the other. No, I put lights on lights on both ends or darks on both ends. Oh, okay. Cuz that way when you put them together, they're opposite. The layout is much easier cuz you don't have to rotate and play fight with. Okay, so we've got that. Yep. Now, this piece fits to here. Oh my goodness, we're so close. We're getting close. That is amazing. So, we're going to line this up. And when we do press this, this will press in. Okay. So, when we put this one here, we want this seam going in and this seam here going out. I know it looks like it can't be done, but it can. So, we're just nesting those. So, we're just nesting those seams. We're going to pull this up. Match the quarter inch seam in the back. Okay. And here we go. We've almost got it. Then you get to press it, Natalie. Okay. Oh, it's so satisfying. That is the most satisfying part, I think. It's just like, how did this work? It's magic. Okay, I get down to that square and I stop. And I hope I came out close. I think I did. Okay, I'm going to match my little folds out here. Pull that all the way out to the edge and stitch around at a quarter of an inch. Pause right there. Regroup. Then you're going to come down here and you're going to match this. That will nest right there at that end of that arched piece. And I like how you're kind of managing the bulk of that piece on top, too. Right. You can just kind of Yeah. Just keep it out to the toward the edge and skirt it around. Right. So everything's laying where you want it. Mhm. You're going to get down to that point and then you're going to come straight out. That sounds perfect. All right. You ready? We're hope they're matching. They look pretty decent. That's awesome. Looks okay. So, this is now Oh, it looks beautiful. Do you press from the top first? Um because you can, but I actually I come back here and I I press this one out through there with these toward this and then I press this one out like that. Just like whoosh whoosh. Yeah. And then I go from the top on to the top. Got it. Okay. All right. So just like so. I just every time it just gives me so much joy when those curves just lay down so nicely. They really do, don't they? You wouldn't think that because it's kind of we're we're kind of sloppy quilting. Well, I think when you showed me, Eddie, that was the part that I loved so much is you were not being super particular. No, I mean fussing too much and it just came out so nice. Now, we do want to make sure that we get that all of our little creases out. Yeah, I got a little one right there, too. And you know, I know there's, you know, lots of thoughts on whether to steam or not to steam. Yeah, I'm a steamer. Yeah, we usually just use like a little spray and we can just do a little Yeah, that might to make it stay nice and solid. Oh, that's so pretty. And then we're ready for We're going to trim it. A good square up. Yeah. So, that is just beautiful. Isn't it pretty? I love it. Okay, so we have our 10 and 1/2 in square. It's just a 10. Solid 10. Oh, 10. Sorry. Okay. And I like to take the diagonal line and make sure that I'm running it all the way through the bead. Okay. I want to have a quarter inch here and just about a quarter inch there. Okay. So I try truly I think that everybody's quarter inch is a little bit different. And so sometimes mine run 10, sometimes they run 10 and a smidgen. And so I try to square up to the to the um corner top right. Yep. So we've got my 10 over here, my one with a diagonal, and we're down here and we have a little extra, but we're going to do this. All right. So we're going to cut that. Very nice. Oops, I slipped a bit. That's all right. And I'm going to cut those little sawtooth off, pinks off. I'm going to flip it around. And here we are again. We want a quarter and a quarter. And that one's a little close, but you know what? We can make that work. Awesome. Okay, so this is basically your square. That looks so great. I love it. And I have brought samples of the other three squares that you will be making. Okay. So, and the differences here is really just your background colors and the colors of your melon in the middle. Mhm. So, we're making four of these. And so, those are your outside corners, right? Those are the the outside corners. I love the rounded edge. Such a fun finish. And to make this this block, you just sew your wedges on your melon and leave off the back portion. Okay? And then sew it together. When you're squaring this up, you square again to the to the uh 2 and 1/2 in squares. Okay. So, perfect. So, that's that one. This is the solid square with the with the red piecing in the background. That makes the basically the outer border outside edge like just goes right along there. I love that. And um we have the the white one we just made, which is this one. which is the middle of the quilt. And then on this part here, I I put a pink background so it made another arc inside. So that's so great. So that's your inside corners then. Yes, inside corners. Okay. Okay. Beautiful. That is wonderful. It's so you have 12 of these. Mhm. 16 of these, four of these, and four of these. Gorgeous. And you have basically a 36 inch I mean 36 in square grid. Yeah. So 6x6. 6x6. Oh, it is absolutely beautiful. Eddie, thank you so much. And so Natalie and I get to show the quilts that we made. I can't wait to see. You want me to go next? Sure. That would be great. All right. So this is my quilt. I just called it scrappy double wedding ring. I just did the pieced arcs. So that's I love it. Kept it simple. The colors are bright. The background is lovely. I think it turned out really really nice. The dark background. I also like how you didn't actually alternate your four patch colors and so they end up being like a real nice solid pop of color. Exactly. So just a few little tweaks you can make that really create a a very different pattern and finished quilt. So to make my quilt, you are going to need one roll of 2 and 1/2 in strips. I used Petals and Stitches by Stephanie Oranas for Andover. It's such a beautiful bright line. I used this beautiful navy for my background. And you're going to need 2 and 1/2 yards of that. I also used this pink like Natalie mentioned for the corners. And so you'll need a yard and 2/3 and that includes your 5 and 1/2 inch border. I also bound it with this. So, you'll need an extra 2/3 of a yard for your binding. And then the backing, I have this beautiful floral. And you need four and a/4 yards with a vertical seam. Let's look at it on the quilt. Oh, that's so pretty. I love it. I just think it's happy. Very happy. Very fun. And I quilted it with posies with pink thread, which I think was just a fun little pop. Stands out on that background. It looks so pretty. Exactly. So, let's just move this out of the way and we'll just run through this as one quick refresher. But I think Eddie covered most of the construction. Hopefully. Yes. All right. So, just like Eddie showed us, we are going to cut up our 2 and 1/2 in strips into our little wedges from our template. You're just going to have those in a pile and every single one you're going to sew in sets of nine. Yep. Just like we did before, each block, you're going to need two this time. And then from my background, I've cut my center melon and my outside pieces. And so, these are just going to set in just like before. And then, like Nat mentioned, I used only the pink for my 2 and 1/2 in squares. And so, those set just like so. And that is it. It all goes together the same way. It's really, really pretty. And I just did six across by six down. And so I added this little 5 and 1/2 in border. It finishes at 67 in square. Great little throw size. So super fun. And now now we get to see your version. All right. Let's go. All right. So this is mine. I'm calling it Moody Blues. And I put together using solid arcs. So everything is very simple, but we did do a little bit of a gradient with color cuz I just love to play with color. Gorgeous. Really pretty. Well, thank you. Really pretty. I love it. All right. So, to make my quilt, you're just going to need a variety of fabrics. And we've got fabrics A through F. And everything is listed out in the pattern. Um, from fabric A, this is all of your arcs. That will be uh 3 and 1 eighth yard. Fabric B is 2/3 of a yard. C is 5/8 of a yard. D is a half yard. E is a yard and 3/4s. and F is a yard and 3/4s. And then our backing is this lovely 108. You'll need a yard and 7/8 of a 108. If you use a 45, you'll need 3 and 5/8 yards. All right. So, similar to Misty's and Eddie's, my uh block looks just like this. It's super simple to put together. You're going to cut all of your arcs out of the navy fabric. your background and your melons are the parts that are going to change because also all of your two and a half inch squares are out of the same fabric as well. So, we will just go ahead and lay this one out. You're going to fold your centers just like you said and match things up. And um there's about I think maybe seven different blocks in the quilt. the the math is hard for me to remember because there's a lot of different numbers with your you know right backgrounds and your middles changing it's really pretty but it comes together nice and easy yeah there's no extra piecing of the arc so it's a little bit fast in that way and it goes together just like the other two so pretty and I loved it I had a lot of fun making it so here is our finished block and I'll show you how it fits into the quilt so they just come together like this alternating back and forth It's a great size. It's 57 by 76. I machine quilted in chevron tumblers and the backing is just really pretty. You can see the pattern the quilt pattern on that pretty nicely. It's gorgeous. I feel like any any thread color would have looked great on this. We could have gone dark or light or variegated and it would have been really fun, right? There's so many options and that's one of the things that I love the most about this tool is that it gives us so many creative options for making the double wedding ring quilt. This looks so modern, too. It's nice. I I love it. I do think, too, you could add a border if you wanted to make it a little bit bigger or, you know, just make more blocks. That's right. Just keep going. All right. So, I had a lot of fun learning and making this double wedding ring quilt with you, Eddie. Thank you so much for coming. Oh, you're very welcome. I had a great time, too. Oh, it was so fun. Thank you for giving us the confidence. And now you guys have three great ideas to use with our brand new double wedding ring template set. So, we hope you guys enjoyed this tutorial and we'll see you next time. Bye.