How to Make a Vertical Attic Window Panel Quilt - Free Quilting Tutorial
 Jenny Doan
- Panels
- Holiday
- Wall Hanging
- Beginner
- Quilt size 47" × 64"
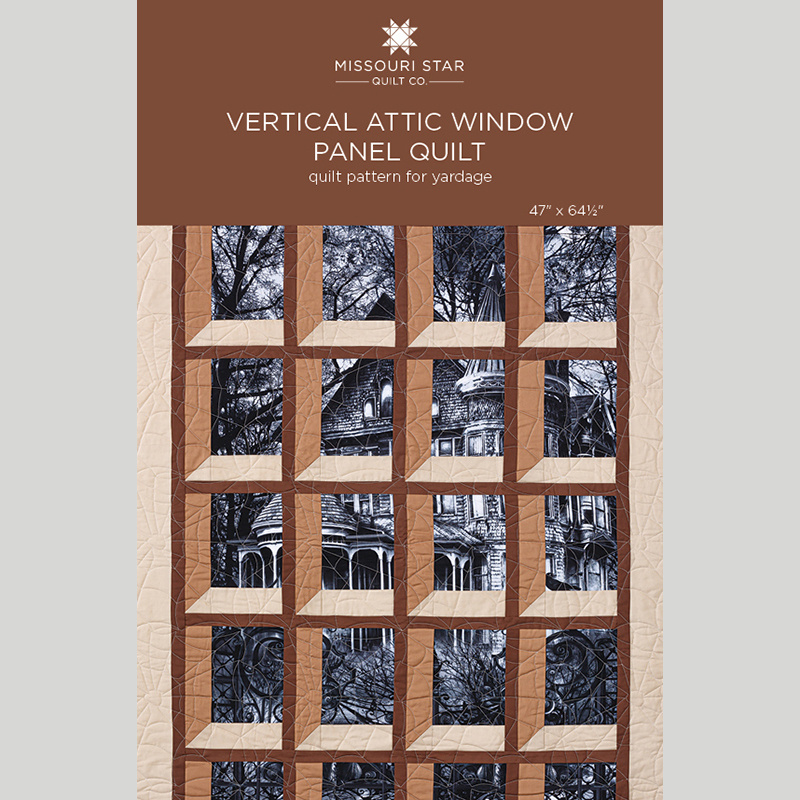
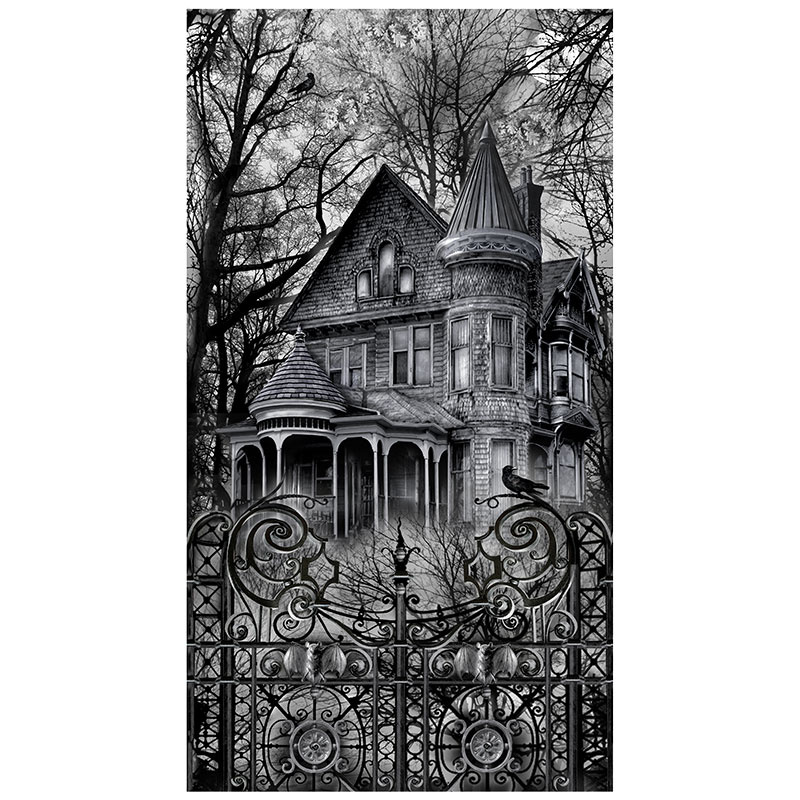
The view is always fabulous, especially when you quilt your own windows! This week, Jenny Doan is stitching up an Attic Window with just a touch of the spookies. She starts with the Wicked Eve - Haunted House panel by Timeless Treasures. The panel is cut into a grid and each piece is framed with a few quick strips. Put ‘em all together, and - just like magic - you’ve got a dimensional window looking out on that ghostly scene.
Instructor
Jenny Doan
Jenny Doan is an American quilter, author, and YouTube personality. Jenny started Missouri Star Quilt Company in 2008 and today it is the largest quilting supply vendor in the United States.
Shop this tutorial
 Vertical Attic Window Panel Quilt Pattern by Missouri Star$6.95Shop →
 Digital Download - Vertical Attic Window Panel Quilt Pattern by Missouri Star$4.95Shop →
 Wicked Eve - Haunted House Black Panel$8.45Shop →
 Kona Cotton - Khaki Yardage$7.28Shop →
 Kona Cotton - Taupe Yardage$7.28Shop →
 Kona Cotton - Sable Yardage$7.28Shop →
 Fleur Noire - Line Plaid Black Yardage$11.24Shop →
 Missouri Star Quilter's Best Blend Throw Batting$20.95Shop →
 Olfa Splash Aqua 45mm Rotary Cutter$18.75Shop →
 Missouri Star 2.5" x 8" Ruler$10.95Shop →
 Missouri Star 5" x 15" Ruler$15.95Shop →
 Exclusive Missouri Star Jenny TG1600 ProPlus Oliso Smart Iron$199.99Shop →
 Missouri Star Wooly Betty Board - 17.25" x 25.5" Orange Border$98.95Shop →
 Elan 8" Dressmaker Scissors$20.95Shop →
 Magic Pins™ Quilting Pins - 100 count$18.75Shop →
 Missouri Star 50 WT Cotton Thread White$6.95Shop →
 Baby Lock Accomplish - 1500 SPM Straight Stitch Machine$999.00Shop →
Common Questions
What is covered in How to Make a Vertical Attic Window Panel Quilt - Free Quilting Tutorial?
The view is always fabulous, especially when you quilt your own windows! This week, Jenny Doan is stitching up an Attic Window with just a touch of the spookies. She starts with the Wicked Eve - Haunted House panel by Timeless Treasures. The panel is cut into a grid and each p...
How long is the tutorial video?
The tutorial video is 00:12:10.
Are supplies listed for this tutorial?
Yes. The tutorial page includes the supplies and materials connected to this project.
Is a transcript available?
Yes. A written transcript is available on the tutorial page.
Video Transcript
favorite 15 and so we decided to do it a little different.
This one will also have its own pattern but it's basically still an attic window. So let's take a look at the panel we used back here. So we decided we would go with this cool haunted house panel and we just did the Attic Window block around it. It's the same block, it just looks really cool. But we're going to do some tips and tricks on this to show you some easier ways to do things.
Jenny: So to make this quilt you're going to need fabric that is a light, a medium, and a dark. And of your light fabric you're going to need one and a half yards and that's for your, they did the Border out of this and the bottom of the sill. You know you want that light to shine off the bottom of the sill. And so then for your medium you're going to need a half a yard. And for your dark you're going to need three quarters of a yard. Your
backing is three and a quarter and it's you know obviously it's whatever you want or one and three quarter yards of a 108".
Now the panel that we used is called Wicked Eve Haunted House panel
and it's by Timeless Treasures and I just want to show you the panel right
here.
Natalie: That's so cool.
Jenny: Isn't that so fun? All right so how you make an attic window quilt when you're working with a panel. For me it's about the math and I want to make it easy so this panel measures..let's see what it measures.
Natalie: You need the edge?
Jenny: I do need the edge right here. So this measures 43". Now 43 is not divisible by a whole number so I would cut this to 40", because then I can have eight inch squares right? And then I'm just going to cut it eight inch strips and get my blocks out of that.
So then the width on this is 25" and we want to go to 24". and the reason
is is because you can get a block that's six by eight so you're going to cut this in eight inch strips and then cut six inch blocks. You want to trim that
panel before you start cutting your blocks because otherwise you know you don't want one block that's you know off.
Natalie: That way you can kind of center it up. If you want to and you can figure out what part you want in the window and if you know maybe you want to have more of the top of the panel right, cut off the bottom.
Jenny: Exactly. So just take a look at it and see where you want to make those cuts. So then we end up with a block that is six by eight and all of our blocks should be the same. So then what we're going to do is whatever size your block ends up. so if you decide you want to use
a Christmas panel I mean this this will work for any panel! But you what you want to do is you want to make sure that your
medium, light and dark fabrics are the size that you need. So the first thing we're going to do is we're going to put this sashing block on the bottom and this is our windowsill and this is the light fabric. And it's
two and a half by six.
Natalie: Do you worry about whether you misplace which parts of the panel are where? Do you ever do like row one, window pane one, two,
three, four, or anything like that?
Jenny: So what I pretty much do when I do it is literally have it laying out and I pick up this block and make this block and set it right back.
Natalie: I was just curious because it would be easy. I mean, this looks like oh it's a tree branch but is that the top of the tree or the middle of the tree. I would worry about mixing that.
Jenny: That is a great point to point out. And you know you can actually go row one, block one. You know you could easily do that with a sticky note
or something like that.
Natalie: Okay.
Jenny: So this sill always goes on the bottom of your block because it's the light you want it reflecting the light. It's right here and this reflects the light so it looks like you're looking in the house and doesn't this look so cool? I think this is a really fun one. So we're going to put this on and that's two and a half inches. All right Natalie, if you'll iron that, that would be awesome.
Natalie: Sure.
Jenny: So once you iron this, now you're going to measure the block and know how tall it is, because then you're going to put your side piece on right here and it should be it should be the same height. So how tall is this?
Natalie: That should be eight now, ten.
Jenny: Yeah so now it's 10. So then this piece over here is going to come here. And you'll notice on on all of these the Attic Window traditionally this is a mitered corner. Well we're making it easy for you. So what we're going to do is we're going to take our light fabric and we're going to turn it, it's a two and a half inch square the same size as your strip, we're going to draw a line diagonally and we're going to do it so that it it points away from the block. So it comes down like this so it looks mitered but it's really easy!
Natalie: That's so cool.
Jenny: So that's uh my little trick for this. You know I like to do the shortcuts. So there you go. Trim it... you can trim that off and press it back?
Natalie: Okay.
Jenny: And then we will add it to this side, and we're always adding to the left the bottom and the left. I guess if your windows were going the other way they could be different, but...
Natalie: Yeah as long as they're all the same.
Jenny: Yep. So then I'm just going to lay this right sides together here and sew it down.
Natalie: It's a really great use of panel.
Jenny: Well for one it makes the quilt the panel or quilt whatever it is you're working on a lot bigger than it started out.
Natalie: That's true.
Jenny: And for two when you're done surrounding these blocks it's done you know it's actually really done.
Natalie: Yeah.
Jenny: All right. So now the next thing we're going to do is, this is actually a
sashing but it also looks like the outside wood of the window. So we're
going to add a sashing to this side of that as well. We are going to add this to the other side, to the right hand side of this so that when you put it together they line up. And then this outer piece right here becomes the little outer border the frame of our window if you will. So we're just going to go ahead and sew this down a quarter of an inch and I'm just going to line it up. So this is a 10 by one and a half inch strip. And again you can use any color fabric, just remember it's a light, a medium, and a dark. And then we've got lots of this sewn together here.
Jenny: We're going to show you how we put the whole thing together. So we have we have this row right here and Natalie when you're asking about how things go together.
Natalie: Yeah.
Jenny: So that's the top row - it fits right into the tree right there.
Natalie: Cool.
Jenny: And so what we're going to do is we are going to attach this to that top row. And so what we're going to do...
Natalie: Just to clarify you only added this little sashing to the these first three blocks. This one doesn't have one because you're going to border...
Jenny: I'm going to border the whole thing, yeah. And also there will be
a sashing that comes in here as well.
Natalie: Awesome, that's very cool.
Jenny: So it comes together really fun.
Natalie: Love it!
Jenny: All right, so I'm going to sew this on here. And this will be our row. And there are four blocks across on this Attic Window and again, that depends on the size of your panel. All right now go ahead and press this
open.
Natalie: Okay.
Jenny: And we'll see this row all right. Now we can't really add it because
we need a sashing that goes across the top and I did not bring that with us
today. But you can see on these other rows how it happens. So here's our row and here's our sashing. So when you get when you go to add your row
on right here you're going to put this little sashing in between right here and what you're going to want to do when you do that, is you're going to want to pin this in here and you're going to want to make sure that these two, that your sashing lines, line up row to row like this. That they just line up right together. So when you put this on here, you're going to want to pin and it's only an inch and a half so you can see very clearly when things come together and when they don't, because you know the worst thing is if they're off just a little bit and you don't want that. So let's look at the quilt behind me. So we finished the top row and we've added this on. We've added this sashing in between every row like this. Then we've bordered it with an inch and a half piece sashing piece out here and it
becomes the first little inner border and I think that really sets apart your
panel from it. And then we put this outer border in out here and I love it. We quilted it with spider webs can you see all the little spider webs on here. Because it's so cool, it's a spooky scary one. The back we put this
cute plaid, black and gray on the back. You can see the spider web on that and then on this binding out here, we just brought in the same
dark brown color. Just makes it really cute! So Natalie what size does this end up?
Natalie: It's 47 by 64. So it's a great wall hanging or door cover, really cute.
Jenny: Oh I love the door cover idea!
Natalie: Cute for a baby quilt even if you had some fun.
Jenny: Oh my gosh so you could use little squares that you know were baby oriented. A lot of times you'll get a panel that has little squares cut out and now you know how to make little windows around all those little squares. So this was such a popular one! We really enjoyed it. Shall
we hold up that original one again?
Natalie: Yep.
Jenny: So now there are two patterns for how to make Attic Window quilts
Natalie: This one is the vertical. Sorry the the new pattern is vertical.
Jenny: This this is not vertical...we need to
Natalie: Oh is it upside down, sideways, the poor deer...
Jenny: So this is the regular Attic Window with and then this one is the vertical Attic Window.
Natalie: What I what I would just recommend really quickly is if you look on the back of the pattern when you're looking through this one, is for a a bigger panel that's more square and this is for a more vertical panel that's narrower and longer. So you may pick the pattern that you need based on the size of your panel.
Jenny: That's exactly right. So we've given you some options and there's
lots of different ways to work with a panel and make an Attic Window quilt. We hope you enjoyed this tutorial on one of our favorite 15s from the Missouri Star Quilt Company!