

Make a Round Robin "Sparkling Stars" Quilt with Jenny Doan of Missouri Star
 Jenny Doan
- Traditional
- Double
- Beginner
- Quilt size 87" × 87"
Triple Play is a favorite tradition here at Missouri Star. Once a month, Jenny, Misty, and Natalie each demonstrate their own, unique take on a favorite block, technique, or template. In this episode, the talented Doan ladies are using the Round Robin technique to build one BIG quilt. They're calling it Sparkling Stars, and it sure is pretty!
Instructor
Jenny Doan
Jenny Doan is an American quilter, author, and YouTube personality. Jenny started Missouri Star Quilt Company in 2008 and today it is the largest quilting supply vendor in the United States.
Shop this tutorial
 Sparkling Stars Quilt Pattern by Missouri Star$5.95Shop →
 Digital Download - Sparkling Stars Quilt Pattern by Missouri Star$4.95Shop →
 Holiday Charms - Holly Green Metallic Yardage$10.96Shop →
 Holiday Charms - Candy Canes Red Metallic Yardage$10.96Shop →
 Holiday Charms - Ornaments Red Metallic Yardage$10.96Shop →
 Holiday Charms - Dots Black Metallic Yardage$10.96Shop →
 Holiday Charms - Stars Green Metallic Yardage$10.96Shop →
 Holiday Charms - Stars Ivory Metallic Yardage$10.96Shop →
 Holiday Charms - Stripe Crimson Metallic Yardage$10.96Shop →
 Holiday Charms - Poinsettia Holiday Metallic Yardage$10.96Shop →
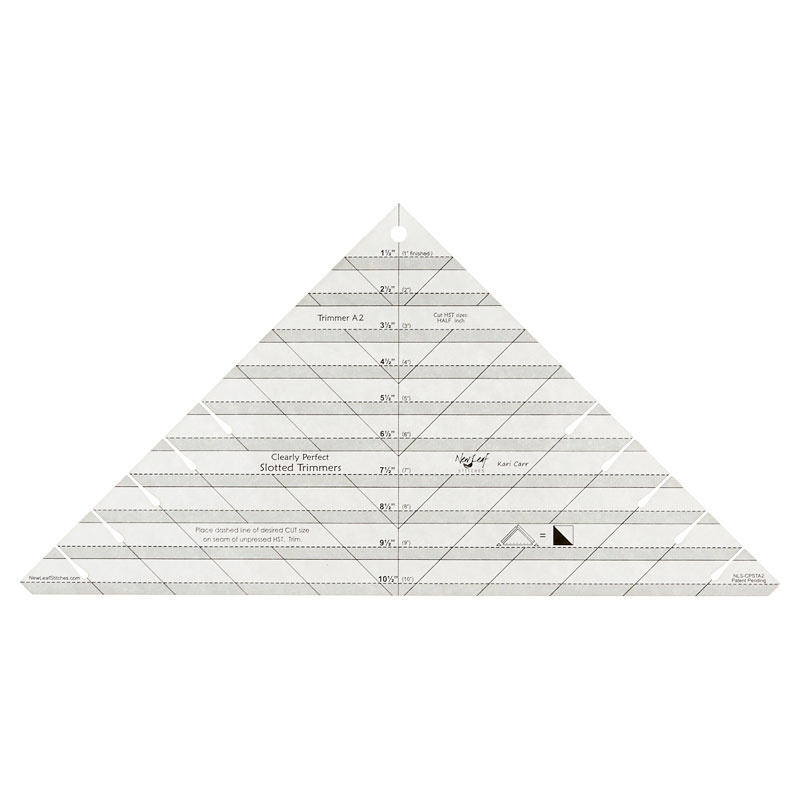 Clearly Perfect Slotted Trimmer A2$26.95Shop →
 Clearly Perfect Slotted Trimmers$31.95Shop →
Common Questions
What is covered in Make a Round Robin "Sparkling Stars" Quilt with Jenny Doan of Missouri Star (Video Tutorial)?
Triple Play is a favorite tradition here at Missouri Star. Once a month, Jenny, Misty, and Natalie each demonstrate their own, unique take on a favorite block, technique, or template. In this episode, the talented Doan ladies are using the Round Robin technique to build one BI...
How long is the tutorial video?
The tutorial video is 00:39:09.
Are supplies listed for this tutorial?
Yes. The tutorial page includes the supplies and materials connected to this project.
Is a transcript available?
Yes. A written transcript is available on the tutorial page.
Video Transcript
Natalie: Yep, this was a fun one.
Jenny: This was a fun one. So this quilt behind me is my quilt and this is called a Round Robin. Now in the quilting world there’s a whole thing for round robin quilts. And what it means is that one person makes the center and then you pass that off to your friend and she gets to do whatever she wants to around it. And she passes it on to someone else. And by the time you get the quilt back it’s this whole different cool idea. So on this quilt I designed the center right here. This is mine. I designed this middle. And Misty designed the next rows and Natalie designed the last rows
Natalie: The border.
Jenny: And so you’re going to get to see all of those. And we need to tell you how much fabric you need to make this because this is a fabric quilt, this is a yardage quilt. I guess all quilts are fabric quilts, aren’t they? Probably, yes. But this is a yardage quilt and we made these little charts like this with our fabrics on.
Natalie: Super helpful, when you have a pattern that has fabric A, fabric B, Fabric C to cut a little tiny swatch off of a scrap. Make yourself a little chart
Jenny: Label them
Natalie: So that you know which fabric you’re going to use for which thing.
Misty: Because you think that you’ll remember and you won’t. And you’ll need this to reference.
Jenny: So you actually need five different colors for this quilt. And this is fabric A. Girls, get your fabric A’s. And for fabric A you’re going to need 1 ¼ yards. And for fabric B you’re going to need 1 ½ yards. And fabric C you’re going to need 2 ¼ yards and that includes your outer border. This is also your border fabric. And then fabric D, you need 1 ½ yards and that’s your inner border. And fabric E you need a ½ yard. And that’s these A, B, C, D, E. Right?
Natalie: Yep
Jenny: Then you need your background and I used this little golden stars. Natalie used bold; Misty used white. So that’s your background. And for the background fabric you’re going to need three yards of that. For your backing you’re going to need eight yards of 45 inch fabric or you’re going to need 2 ¾ yards of a 108. And this is mine. And look at yours.
Misty: I love this navy too.
Jenny: It’s so pretty. Really pretty. Alright. Then I’m the only one who has this fabulous last piece of fabric because any time there’s a stripe, I want it on the binding.
Natalie: You have the cutest binding.
Jenny: So for your binding you’re going to need ¾ of a yard. And of course mine has a stripe. And I had to do it. Alright.
Natalie: What is your line called? You have Holiday Charms?
Jenny: Mine is Holiday Charms by Studio RK for Robert Kaufman.
Natalie: Mine is Made my Day by Anna Maria Horner.
Jenny: Lucky duck. I love that fabric.
Misty: And mine is Gingham Boundary by My Mind’s Eye for Riley Blake.
Jenny: Also gorgeous. You know I’m going to teach you this middle block here but I can’t wait for you to see the other quilts because the fabric changes everything.
Misty: It does. It’s so fun to see.
Natalie: It’s a really great size quilt too. It’s 87 by 87.
Jenny: It’s a great size.
Natalie: And you’ll see that each of us quilted with a different quilt pattern and we’ll tell you that as we go but Mom, you used Snow Winds. It’s beautiful. It’s one of my favorite.
Jenny: It’s hard to see on here.
Natalie: It’s a really pretty swirling pattern.
Jenny: Up here on the black you can see the snowflake and then it has these blowing, curly wind things and then another snowflake. It’s really one of my favorites.
Natalie: The other thing that’s cool is that in this quilt you can’t really tell but this has metallic fabric and then we also used a shiny, gold glide thread but it has a shimmer to it and so that’s just beautiful.
Jenny: It really sets it apart.
Natalie: It’s such a beautiful holiday line, very elegant.
Jenny: Well I think it’s fun to have fun with your thread and do that sort of thing. Alright so let’s get our stuff and we’ll show you how to make this quilt.
Natalie: Awesome.
Jenny: So making the center of the quilt was my job. I started first. So this is my center right here. And I have four nine patches and then I used five of our Lemoyne star, our lemon star, our Jenny’s doll quilt star. They’re all the same star. It’s a half square triangle star, very easy and quick. And so this part right here is what you’re going to make first on this round robin. This is round one. Alright so let’s get started. The first thing we’re going to do is make four of those nine patches. And so nine patches are made like this, very simple, 2 ½ inch strips. We’re going to do a strip set. One has our two greens on the outside with our background in the middle. The next one has two backgrounds with one green in the middle. And we’re going to cut these into 2 ½ inch strips. And I’m just going to lay those on top of each other. You don’t have to do that unless you want to. But I’m going to straighten up this edge right here. Let me make sure this is straight. When you are cutting multiple layers you want to be really careful and make sure it’s straight. So we’ve got this right here. And I’m just going to come, I love this little ruler because I can just lay it on the edge, cut two and cut two. And you’re just going to go down and cut your whole strip like this. And you are going to need to make four of those. Alright. So how we’re going to make these is we’re going to take two of these outsides and one of the middles and put them together just like that. Natalie, do you want to do that?
Natalie: Sure.
Jenny: And then we’ll just, we’ll have so many nine patches we won’t hardly know what to do. I was going to say, you can sit. We’ll let you sit for this part.
Natalie: Ok.
Misty: So much better.
Jenny: We really enjoyed doing this round robin. Round robin is something like in quilt guilds and groups. A lot of people do these. And the surprise element is so fun because you never know what somebody else is going to do. And it could be something simple. It could be an applique. It could be, I mean, you just never know what you’re going to get. And so there’s that feeling of anticipation and surprise. I love doing them. I think they’re really fun.
Misty: Wondering what’s going to come next.
Jenny: Well and it was fun for us because we made a mock one first. So I made a middle and then I handed it off. And then Misty made the next layer and she handed it off. And then Natalie made that third layer and we really didn’t know what it was going to look like until the very end. And then of course we got the fabric we wanted to use and we each chose three very different fabrics.
Misty: Ya and I think you guys are going to love seeing how different these quilts look in those different lines. It’s pretty amazing.
Jenny: It really is. Can you press this for us?
Misty: Of course. There we go.
Jenny: Alright so now here’s our little nine patch right here. And you can see we want it to match the size of these blocks so we’re going to put two pieces on either side right here. And I have some of those cut. These are four inch pieces. So we’re going to sew a 4 ½ inch strip on the bottom side of this. So it will be 4 ½ by 6 ½. Go ahead and do that, Natalie.
Natalie: Ok
Jenny: And then it should be 4 ½ by 10 ½ on the other side. And of course I didn’t know the size of this block until I made this block because they have to all line up, you know. So it was easy once I got my nine patch done then I cut this fabric to fit. Alright let’s just finger press this back and then you can add this 4 ½ by ten inch piece on the side. It doesn’t matter what side you add it to because it can just be rotated.
Misty: I was just going to ask that.
Jenny: Super easy. The same on all the sides. Alright so she’s sewing a quarter of an inch right down the side of that.
Natalie: Sorry I’m not quite as speedy.
Jenny: And then Misty, if you’ll press that.
Misty: Of course. Ok.
Jenny: Alright, so then you can see this is going to go here. Over here it’s going to go like this. Down here it’s going to go like this. And you’re just going to flip it for all four corners. But now we need to make our little star blocks and these are fun. So these are made out of five inch squares and this is a really easy way to do it. So we’re going to take a fabric A square like this. And we’re going to take a fabric B square like this and we’re going to take a background square. And so what we’re going to do here is we’re going to sew one background square to the green. One background square to the red. And then we’re going to sew a red and a green together like this.
Natalie: And are they all, sew all the way around the edges.
Jenny: Yes you’ve got two of each square, two greens, two reds and two backgrounds. And we’re going to go a background to a green and you’re going to sew all the way around it. A background to a red and we’re going to sew all the way around that. And then a background, I mean I’m sorry, not a background but the two colors together and we’re going to sew all the way around that. The size of the square we’re looking for on this is a three inch half square triangle. Alright, so Natalie while you’re sewing these I’m going to go ahead and cut this and start squaring these. Now I like to use the clearly perfect slotted trimmer. And these are going to square to three inches. And so what I’m going to do is I’m just going to cut this now that this is sewn all the way around the outside edge like this, we’re going to cut it diagonally both directions like this and like this. And then I’m going to trim these to three. So I’m going to match my seam line on theirs and trim this off like this. Misty, I’ll let you press those open. And this will make one star.
Natalie: Do you want me to do the other one as well?
Jenny: Which one? Oh I’m sorry, I thought I gave them all to you. Yes, don’t you stop. We’ve got to keep going here.
Natalie: I thought maybe you already had some made.
Jenny: Well I do have some made. It’s true. I guess we could stop. Get my three here. There we go. There’s one and two and three and four. So you should have four of the red and background and four of the green and background and then four of our two colors together right here which I’m going to do that. And this is a super easy way to make these little stars too.
Misty: It makes them fast to get all the pieces you need.
Jenny: Well it looks so hard, you know, and it is actually the shape of, what is that shape, Natalie? This shape right here, this elongated shape?
Natalie: A diamond?
Jenny: Is it diamond?
Misty: Trapezoid?
Jenny: I don’t know but
Natalie: A rhombus?
Jenny: Oh a rhombus, that’s what I was thinking of.
Natalie: A rhombus is just like a square that’s elongated.
Jenny: Well that’s what I feel this looks like, a rhombus. I could be wrong.
Natalie: I think all descriptions are correct.
Jenny: There we go. Alright so once you have your little piles together like this and you’ve got your red and white and your green and white and your green and red, what we’re going to do is we’re going to start building this from the center out. So I like to do a, and again once you’ve made one, make sure you keep a look at it. But I like to do a pinwheel in the center with these just like this. With the different colors and your seams all going to the middle. And then I build my star legs out. So then we’re going to come on the green and we’re going to come this way and this way and this way and this way. And I do this because I’m fairly angley challenged so I have to make sure it looks good. And then when I put them together I remember whites together, whites together. Or the background together like that and like this. And then you’re going to have four little cornerstones and the cornerstones, these squares we’ve squared to three. So your little cornerstones are also going to be three inches. And I’m just going to measure this over and cut a couple. One, two, three, one, two, three. And then these will go in the corners right here like this and that will finish your little star. Now when I put this together, you can put it together in rows, you know, do what makes sense to your brains. Put it together in rows like this. Or I tend to do it in quadrants. So I’ll make this block here where it has a little four patch. But you have to be really careful if you do this because these are all going to go together in quadrants. So I have some over here that are already sewn in my little quadrants. And then I’ll have Natalie sew one and we’ll sew the block together. So here’s my little quadrants right here. So you can see I have my two and I have my green and white and the red and white and the corner block and we’re going to put these together like this. And this is going to make our little star.
Natalie: And they’re all exactly the same.
Jenny: They are all exactly the same. So Natalie if you want to sew that together. It sews together like a big four patch. These little seams at every three inch where your block changes, that is where you nest up. You can nest up this center as well. It has a little, you know, you have your dog ears on either side which you can trim off if you want. And just make sure that those are nested up nice and tight
Natalie: Do you have the next one?
Jenny: I do and I have it even pinned. I know you’re shocked.
Natalie: You’re worried about me.
Jenny: Do you want me to take the pin out? Does it make you nervous?
Natalie: Well because I didn’t match it up, I’m just not trusting
Jenny: She has to trust me. Alright. Then we’re going to open these up and sew together this way like this. And if you did it perfect which we did, it all works. You just never know. You know, sometimes I open those up. We did that actually yesterday with Misty. She opened up a step out and she was like, oh
Misty: That is not right.
Jenny: This is not right. This happens.
Misty: That’s true. It does happen. I had a star leg and it was upside down.
Jenny: It had a mind of its own.
Misty: It did.
Jenny: Alright as soon as Natalie gets this done we’ll show you how to put this middle together. It’s a very simple middle but it has a lot of pizzazz I think, you know, it’s like wow!
Misty: It kind of sparkles.
Jenny: Ya.
Natalie: There you go.
Jenny: Alright, if you’ll press that open.
Natalie: I wish you the best.
Jenny: It is fine.
Misty: It looks great.
Jenny: I’ve got pieces everywhere. Are we good, does it pass inspection?
Misty: I think it looks great.
Jenny: Alright. So let’s look here. So we’ve got our, what’s this block Natalie?
Misty: Nine patch
Jenny: Our nine patch. My mind went completely blank. A nine patch block, a star and a nine patch. You’re going to put this together in rows. And so we’ll lay it out just like this, nine patch, star, nine patch. You’ll sew those three together. The next row is all stars. So you’re going to have star, star, star. And then your final row is also nine patch, star, nine patch. And that’s the whole middle right here. That’s my whole center, just those two little blocks. Quick and easy. And now we’re on to round two.
Misty: Alright. So mine is the second round. And so this is my quilt. This is a Gingham Foundry collection and so exact same pattern. But isn’t it fun to see? Same center.
Natalie: I love it. So sweet.
Misty: I love it too. When I was deciding what to do for my round, I loved how Jenny’s center just sort of sparkled and so I wanted to just carry that out. I wanted the whole thing to just kind of radiate from the middle. So that’s what I was looking to do. And I thought it would be fun to include another star in there as well. And so I’m going to start by teaching you how to make that star. And so we’re going to begin with our E fabric. We’re going to cut 3 ½ inch strips and cut those into 3 ½ inch squares. And then we’re going to have 3 ½ inch background squares as well. And I’ve gone ahead and drawn a line corner to corner and we’re just going to sew a quarter of an inch on either side of that. And to make one star block you’re going to need four of these sets but I have some of them already done.
Jenny: Well when I heard you say E fabric, that chart is so handy.
Misty: Exactly. That’s why I said you’re going to want to have those close by so that you can refer to them. So we’ll just cut that in half and then Nat if you want to, actually, we’re going to square first.
Natalie: Ok. Either way.
Misty: I almost had you press them too soon. But we’re just going to use the trimmer B from the clearly perfect slotted trimmers and trim these down to three inches. There we go. And then now you can press that one.
Natalie: I think it’s great that you have, when you can just slide it over to one side and just make the cut.
Misty: I do too.
Natalie: That’s such a great quick step.
Misty: Makes it really quick. Press that. So these sawtooth stars are so quick because we just, for each of the sides, are going to put our whites together and we’re going to sew it together just like that.
Jenny: Alrighty. I can do that.
Misty: I know you can. And I’ll get the rest of my pieces ready. So the center of our star is going to be 5 ½ inches. So I just cut a 5 ½ inch background square. And then we’ll press this open. And we’re going to surround it with our star legs that we made. So these are made the exact same way as the ones I showed you. And then we’re going to put our three inch squares in the corner. And they just go together in rows just like that. So should we sew this one together?
Jenny: Yep, let’s do.
Misty: Alright so these go on either side. And then these go on either side.
Jenny: There we go. Next one.
Misty: That one. Press that, Nat.
Jenny: Ya these are great little stars.
Misty: I like them. I think I like all stars. I’m partial to them all.
Jenny: Quilters do love stars.
Natalie: I just can’t help it. They just look so pretty.
Misty: So happy and ya. There we go. And press that one back. And then we can sew our rows together.
Natalie: Hold on, I want this guy to go out.
Misty: Make it behave.
Natalie: He doesn’t want to.
Jenny: I actually like to let seams go the way they want to go.
Misty: Sometimes you have to, they just have a mind of their own. Alright, so then we will sew these together. There you go.
Jenny: Perfect.
Misty: And we’ll add that one to the other side. So this is what it’s going to look like when it’s all done. So quick and easy. And so then you’re going to make four of those. And those are going to anchor our next round in the four corners. We’ll finish that up.
Jenny: There we go and one more over here.
Misty: One more, yep. Perfect.
Jenny: There we go.
Misty: There we go, Nat you can press that if you want.
Jenny: You need four of those, right?
Misty: You need four of those for this round, exactly.
Jenny: No big deal.
Misty: You got it. It’s super quick. And so then all that’s left on this round is some big half square triangles and some big quarter square triangles. So let’s do those half square triangles first. And to do that you’re going to use your C fabric which is that pretty yellow floral. And you’re going to cut.
Natalie: I think this whole line just looks so Scandinavian.
Misty: Ya it really does. And so you’re going to cut those into 11 inch squares. And you’re going to pair it with an 11 inch background and so same idea as our little half square triangles, we’ve drawn that line, sewn on either side and pressed them open. And so these
Jenny: It’s done.
Misty: It’s done. And so you need eight of those.
Jenny: Do you square them to any size?
Misty: You square them to 10 ½.
Jenny: Ok.
Misty: So that’s what all of these blocks are going to finish on this round.
Jenny: And then on the block that large do you have to use a bigger tool?
Misty: We have a bigger trimmer so I’m going to show it for sure on the quarter square triangles but it’s the same idea. These ones have already been trimmed down I think. Let me look here. There’s my 10 ½. Yep, so see those just match up perfectly. And so you can get these bigger versions of the clearly perfect slotted trimmer and they’re really helpful.
Natalie: I mean you could also square that with a 12 inch square.
Misty: Totally.
Jenny: Ya if you have a big ruler.
Misty: Absolutely. And so then for our quarter square triangle we’re going to start the same way with our blocks but these are a little bit bigger. These are 11 ½ inches because we’re going to sew them more than once. So I actually need a pen so we can mark this for you since it’s so big. I don’t know where it ran off to.
Natalie: Here you want this one?
Misty: Yes, please. A little bit bigger ruler.
Natalie: I’ve got a five by 24 down here if you want it.
Misty: That will do the trick for this bigger square. We’re just going to mark that corner to corner. And then if you would sew on either side of that one.
Jenny: Happy to.
Misty: Thank you.
Jenny: It’s so interesting, we’re so used to sewing the ten inch squares. I’m like, this is a long, long way.
Misty: It goes a little bit longer. Sometimes it’s nice to have those big blocks that just go together so quick. Alright so now we’re going to cut that apart right on that line.
Jenny: And this block was what size again?
Misty: So it started at 11 ½. Yep and so then let’s press that open at least one.
Natalie: Ok
Misty: And so each of those you’re going to pair with an 11 inch background square. And we’re going to do, same idea but we’re going to put it running, you know, opposite ways. And we’re going to sew on either side.
Natalie: Very cool.
Misty: Because we are just wanting this one little point.
Jenny: And I love how what it does is it kind of sets that center on point.
Misty: Ya exactly.
Jenny: And nothing to match up here. You know, nothing, well the corners. Other than that
Misty: It’s just simple straight sewing. There we go and then we’ll cut that one right on that line. And that will give us two of our quarter square triangles.
Natalie: And do you want to square that?
Misty: Ya let’s show you how to square that before we press it because this big one is so great.
Jenny: And what size are we squaring to?
Misty: To 10 ½ again. All of our blocks.
Natalie: Very little to square off.
Misty: Something now but there we go. I could still see my lines.
Natalie: It’s funny how it doesn’t make a difference but it kind of does.
Misty: Ok so there we go. Now my center seam is lined up with this solid line and my stitch line is lined up with the dashed line this way. So I can just trim off my little notches and either side here.
Natalie: It’s kind of nice having them on the outside edge there.
Misty: It really is isn’t it? You don’t have to fit it in the little slots. Oops. Missed a tiny little thread there. There we go. Maybe. You want to press that? There we go. Just like that.
Jenny: That is just quick and clever.
Misty: It’s quick and easy and so you can see those sit there in the middle. And then you need four of those. . Your half square triangles go on either side and those star blocks in the center. And then we added a 3 ½ inch border all the way around. And next up is Natalie.
Natalie: Yay. Border time.
Jenny: Alright well we are ready for round three and that’s Natalie.
Natalie: I got the fun part of adding a border. And I thought a pieced border would be very interesting and fun to learn.
Misty: It is gorgeous, Nat
Natalie: And I think this is one of those borders that really looks a little bit more difficult. You look at it and you’re like, ah that’s got to be advanced. That has to be something hard. But it really isn’t. It’s still just half square triangles
Jenny: And look at that middle.
Misty: And we need to talk about this fabric for just a second. It’s so pretty.
Natalie: Anna Maria Horner is a fantastic artist and designer and I’ve always loved her fabrics. It’s Made My Day.
Misty: Literally.
Natalie: It’s the name of the line. It totally made my day that I got to use her fabric. So I quilted it with Sticky Buns. And you can see that we’ve got a 3 ½ inch border here, a 3 ½ here and a six here. We can do that on the side as well. I can show you this gorgeous backing.
Jenny: This is beautiful.
Natalie: Her fabrics are just so beautiful.
Jenny: I might need a dress out of that.
Natalie: Yes, I’m hoarding the scraps. Again, I do highly encourage, if you ever have a pattern that has multiple fabrics, anything that has fabric A, fabric B, block A, block B make yourself a little chart, a cheat sheet, whatever you want to call it. It’s so, so worth the time.
Misty: It saves so much time in the long run.
Natalie: Yep, totally. Ok. So what we’re going to do first on this is make the four corner blocks. I know it seems like it’s all one big piece but these four corner blocks are totally different than the rest of the border.
Jenny: Well you made it look good.
Misty: Ya it all blends together.
Natalie: So the corner blocks all look just like this. They’re very simple, simple half square triangle blocks. It’s just a little four patch. So we’re going to start with 4 ½ inch squares. Because we’re just making simple half square triangles we’re just going to draw a line from corner to corner. And we are going to make a set that has the background and the A fabric.
Jenny: I’m ready for you.
Natalie: So if you will just stitch on either side of that line and then I’m going to draw on the back of this one. There we go. And we’re going to put these two together. Because you’ll notice in this block, we have two that have the A fabric with a white background. And then we have one in this corner that’s got an A and a B fabric. So we’re going to make a couple more half square triangles.
Misty: Can’t cut with the pen.
Natalie: I was going to try though. I was going to try really hard. So we can go ahead and square these with this one because they all square to four.
Jenny: I’m going to look at my bobbin. It’s a little bit lumpy. It doesn’t look terrible but it’s
Natalie: Is the tension funky?
Jenny: I’m going to look at it.
Misty: Check it while you can.
Jenny: Check it while I’ve got a minute here.
Natalie: I’ll have you press those back
Jenny: 90% of all things, when something is wrong with your machine, 90% of it is in the threading or the bobbin. You’ll be like, my sewing machine is not working.
Natalie: Flip your bobbin around, refill it, maybe it’s too close to the end. Maybe your top thread is off a little bit.
Jenny: I’m just going to redo the whole thing while I’m waiting because I’ve got a minute.
Misty: Did you trim this yet?
Natalie: Not yet, not yet. I’m getting there though.
Misty: No, it’s ok, I just didn’t want to get ahead of you.
Natalie: No worries, we are doing just fine here.
Jenny: We are doing just fine. We’re on round three
Natalie: We’re great. These quilts are all so fun though.
Misty: I know. I love how different they all look.
Natalie: Me too. Alright so then these blocks go together just in a simple four patch. You’re going to put your A fabrics together to make that little diamond. And that just creates this line that goes across so that it continues the zig zag. And then you are going to put a four inch square up in the corner and we’ll stitch that together like a little four patch. Super simple. And then you do that four times because, you know, four corners and it works out just great.
Jenny: Now because I left my thread in between
Natalie: And that’s a cool trick. I love doing that when you’re piecing four patches or even nine patches. If you leave them lined up and you sew, you know, top to bottom then you can flip and keep those threads attached and continue your little chain piecing adventure.
Jenny: That is so fun. I mean even this block, think about four of these together.
Natalie: Oh ya, that would be great. I mean you can make some diamonds, switch them. I mean there’s lots of fun things. So these go in your corners. And now it’s time for this little zig zag. And they are literally all the same block.
Jenny: Oh my gosh.
Natalie: So very fun. So we are going to start by drawing a line corner to corner. This time we’re starting with five inch blocks because we’re going to seam it twice and we want to get to four inches. So we need enough space to take a couple seams and still be able to square that down.
Jenny: So both sides.
Natalie: And what I was looking at, we’re going to sew on either side. This is the block. I need one of these individual blocks in here somewhere maybe. Here we go. Just one. So what I was looking at when I looked back at the quilt to check myself and make sure I was teaching right, the A fabric is underneath which means that’s the one you’re going to start with because this is the one that’s going to go on last. So if you’re ever looking and you know, forgetting which one to begin, look for the one that’s inside because your larger piece obviously is going to go on last. Maybe not obviously.
Jenny: I never thought about that but that’s a good little trick.
Natalie: So we’re going to press these open. We’re not going to trim yet. And then we’re going to take a 4 ½ inch square of this darker one because these should be roughly 4 ½ inches now. And line those up. And if it’s a little bit big, if it’s a five inch, it doesn’t really matter. We haven’t squared anything yet. But what we need is to put this here. And we’re going to draw another line and it can be on, probably on your lighter fabric. Oops.
Jenny: Well unless you have a white pen or something silver.
Natalie: Ya but I usually look for the lightest one.
Jenny: I do too.
Natalie: Alright and then you’re going to stitch again on both sides of the line.
Misty: This is a mini version of a block I did earlier for mine. I love it.
Natalie: Yes, totally. Yep, so if you can master it big then you can get ready for this border and be all set.
Misty: Totally.
Natalie: Alright, we’re going to cut these in half. I keep on wanting to grab something, anything besides a rotary cutter to be cutting. I think you can notice real quickly that these are opposite blocks so you have an A block and a B block to make this. And you get them both through this process. So nothing super scary, just know that they’re different and maybe make separate piles to keep, see what am I doing?
Misty: I’ll just move these out of the way.
Natalie: Move all the other tools because I’m going to try and cut with anything that’s not a rotary cutter today.
Misty: That’s so funny.
Natalie: Alright. Again we’re squaring these to four inches. That’s our finished, our unfinished size.
Jenny: Not much waste.
Natalie: No a lot of waste. Alright. And really that is it guys.
Misty: I love it.
Natalie: That’s it. So now you’re going to make little block sets and you can make pairs of both. You can kind of do this two ways because most of your, essentially it is the same thing but one block has to offset, or one row has to offset the other row. So what happens, if you can see these, so say that you put them all together in this method, it will still work. You just slide it over and then you have to put an extra one on the side. But if you put them all together this way, so you have half this way and half this way, then they just line up perfect like that. Does that make sense?
Misty: So half with yellow in the middle
Natalie: So you have half with your yellows in the middle and half with your purples in the middle and it makes this block. So you get all the pieces and then you just sew them together. And what I would do is I would go ahead and do, you know, two piles. One pile of all of these guys and one pile of all of these little guys. So you have your two separate piles. Then I would stitch them together in long rows. And then I would do my top to the top and my bottom to the bottom and then put the sides on. Or vice versa because it’s a square quilt. It doesn’t really matter.
Jenny: It looks like you have eight blocks across there and then your corners. Wow.
Natalie: Yep. Ya so and I mean the diagram is there to help you figure out which ones go where but it really is this simple.
Misty: I love that, Nat
Jenny: That is so awesome.
Natalie: Super easy. And again, 3 ½, 3 ½, and six. And our quilt is enormous.
Misty: I think it’s 87 inches square.
Natalie: 87 square. That’s awesome. That’s a great size. And you add a bigger border if you wanted more drop. Whatever you want to do.
Jenny: This is fun.
Natalie: I hope that that helps because this is a fun border to put on any quilt.
Jenny: So if you get a round robin you could use this border on yours.
Natalie: Yep. And because it’s a half square triangle, you know, depending on what size you actually needed mathematically you could square them down to 3 ½ or leave them at 4 ½, whatever, you know, it’s a half square triangle. You could make all kinds of cool things with it.
Misty: Yep, love it.
Natalie: Hope you enjoy!
Jenny: So I think this round robin was really fun.
Natalie: I loved it.
Misty: I loved it too.
Jenny: I did too. So the round robin is a style of quilting so we actually named our quilts Sparkling Stars because there’s lots of little stars in it and big stars and three different kinds of stars
Natalie: And I think each individual quilt has a sparkle all its own.
Jenny: A sparkle all its own.
Misty: I love what you did there, Nat.
Jenny: Love what you did there. Anyway, and I love the borders. I love the rounds. I just think it was really fun. So we hope you guys enjoyed this tutorial on our Sparkling Stars Round Robin quilt from the Missouri Star Quilt Company.
Jenny: Hi everybody, it’s Jenny from the Missouri Star Quilt Company. And I am here with Natalie and with Misty and we hope you enjoyed watching our latest Triple Play. You can find us together on the third Friday of each month as we hit another tutorial out of the park. If you aren’t already part of the Missouri Star Quilt Company family be sure to subscribe and click that bell to be notified each time we release a new video. See you next time.


